Ruby
Ruby
 Golang
 .Net
.Net
 MCP
MCP
 C++
C++

2026 is shaping up to be a big year for AI agents. We are seeing more products where the AI not only answers a question but also does some work for the user.
You have probably used ChatGPT or a similar AI tool to answer a question, help with writing, or explain some code. You type something, the AI responds, and the conversation goes back and forth. That is powerful, but it is also limited. The AI is essentially stuck in a chat box - it can only talk to you; it cannot do anything on your behalf.
AI agents change that. An agent is an AI that can actually take actions - browse the web, read and write files, run code, call APIs, and more. It does not just answer your question; it works toward a goal, step by step, using whatever tools it needs. Tools like Lovable, Cursor, and Claude Code are examples of this in practice.
In this article, we will explore the concepts behind building an AI agent in Python. We will use the OpenAI Python SDK (Responses API) for the examples, but the same ideas can be generalized to any other LLM SDK. We will use a low-level SDK with minimal abstractions so we can observe and implement most of the agent's behavior on our end.
TL;DR
This tutorial explains how AI agents work by building a simple one in Python.
We will cover the core pieces: LLMs, prompts, context, memory, the agent loop, tools, MCP, and skills:
| Component | What it does |
|---|---|
| LLM | Acts as the reasoning engine that understands the user request and decides what to do next. |
| System prompt | Defines the agent’s role, behavior, boundaries, and response style. |
| Context window | Controls how much information the model can see at once, including prompts, history, tool results, and files. |
| Memory | Helps the agent remember useful information across steps or conversations. |
| Agent loop | Repeats the process of thinking, acting, observing results, and deciding the next step. |
| Tool calling | Lets the agent use external functions such as APIs, web search, file access, or code execution. |
| MCP | Provides a standard way to connect agents to reusable tools and data sources. |
| Skills | Package reusable instructions, workflows, examples, and scripts for specific tasks. |
What are Agents?
An AI agent is an AI system that can autonomously plan and execute multi-step actions toward a goal.
To understand agents, it helps to first understand what is powering them under the hood - a large language model, or LLM. For example, ChatGPT is a product built on top of OpenAI GPT LLMs. When you type a message and get a response, an LLM is doing the heavy lifting. It takes text as input and generates text as output.
On their own, LLMs are impressive but limited. They can only respond with text. They cannot open your browser, read a file on your computer, or send an email. They also do not know what happened yesterday, because their knowledge comes from training data with a cutoff date, not a live connection to the world.
Agents fix this by giving LLMs access to tools. A tool is just a function your code exposes to the model - something like "search the web" or "read this file." The model can decide to call a tool when it needs to, and your code actually runs it. This turns a passive text generator into something that can act.
A good way to see the difference is to compare using ChatGPT with using Claude Code for a coding task. With ChatGPT, you describe the problem, copy the suggested code, paste it into your editor, run it, copy the error back, and repeat. The model has no idea what is actually in your project. Claude Code is different - it is powered by an LLM but also has access to tools like bash and file reading. You describe what you want, and it reads your files, writes code, runs tests, and fixes errors on its own. You just watch and steer.
The simplest way to understand an agent is:
- The user gives a goal.
- The model decides what step to take.
- The agent runs that step using a tool.
- The model looks at the result.
- The process continues until the task is complete.
This is different from a normal chatbot. A chatbot mainly responds. An agent can respond and act.
In a simple agent, the model may only call one tool and return the result. In a more capable agent, the model may make a plan, call multiple tools, observe the results, adjust the plan, and continue until the task is complete.
Before we build this kind of system, we need to choose the model that will drive it.
LLMs
LLMs are trained on massive amounts of text data - entire open source repositories on GitHub, books, articles, websites, and more. Through training, the model learns patterns in language well enough to generate coherent, useful responses. The scale of this training is what makes them surprisingly capable across such a wide range of tasks.
At their core, LLMs are text-in, text-out systems. You send them a block of text (called a prompt), and they generate a response. Everything that happens - reasoning, answering questions, writing code, making decisions - is expressed through that text interface. When an agent calls a tool, it is really the model writing out a structured text request, and your code intercepts that and actually runs the function.
The key limitation to keep in mind: LLMs only know what they were trained on. They have no awareness of events after their training cutoff and no way to look things up in real time unless they are given a tool to do so. This is part of what makes tools so valuable - they extend the model's reach into the real world.
Choosing an LLM
For an AI agent, the LLM is its brain. The quality of the model affects how well the agent understands instructions, chooses tools, handles errors, and completes multi-step tasks.
At the same time, the most powerful model is not always the right choice. We also need to think about cost, speed, context window, reasoning ability, and where the model is hosted.
Benchmarks
Benchmarks are standardized tests used to compare the performance of different models. For coding tasks, there is SWE-bench. For general reasoning, there is MMLU. Each benchmark tests the model on a specific type of problem and gives it a score. A higher score generally means the model will perform better on that type of task.
Benchmarks are a useful starting point when choosing a model, but they are not the whole story. A model that scores well on a benchmark may still behave unexpectedly in your specific use case, so it is always worth testing with your actual workload.
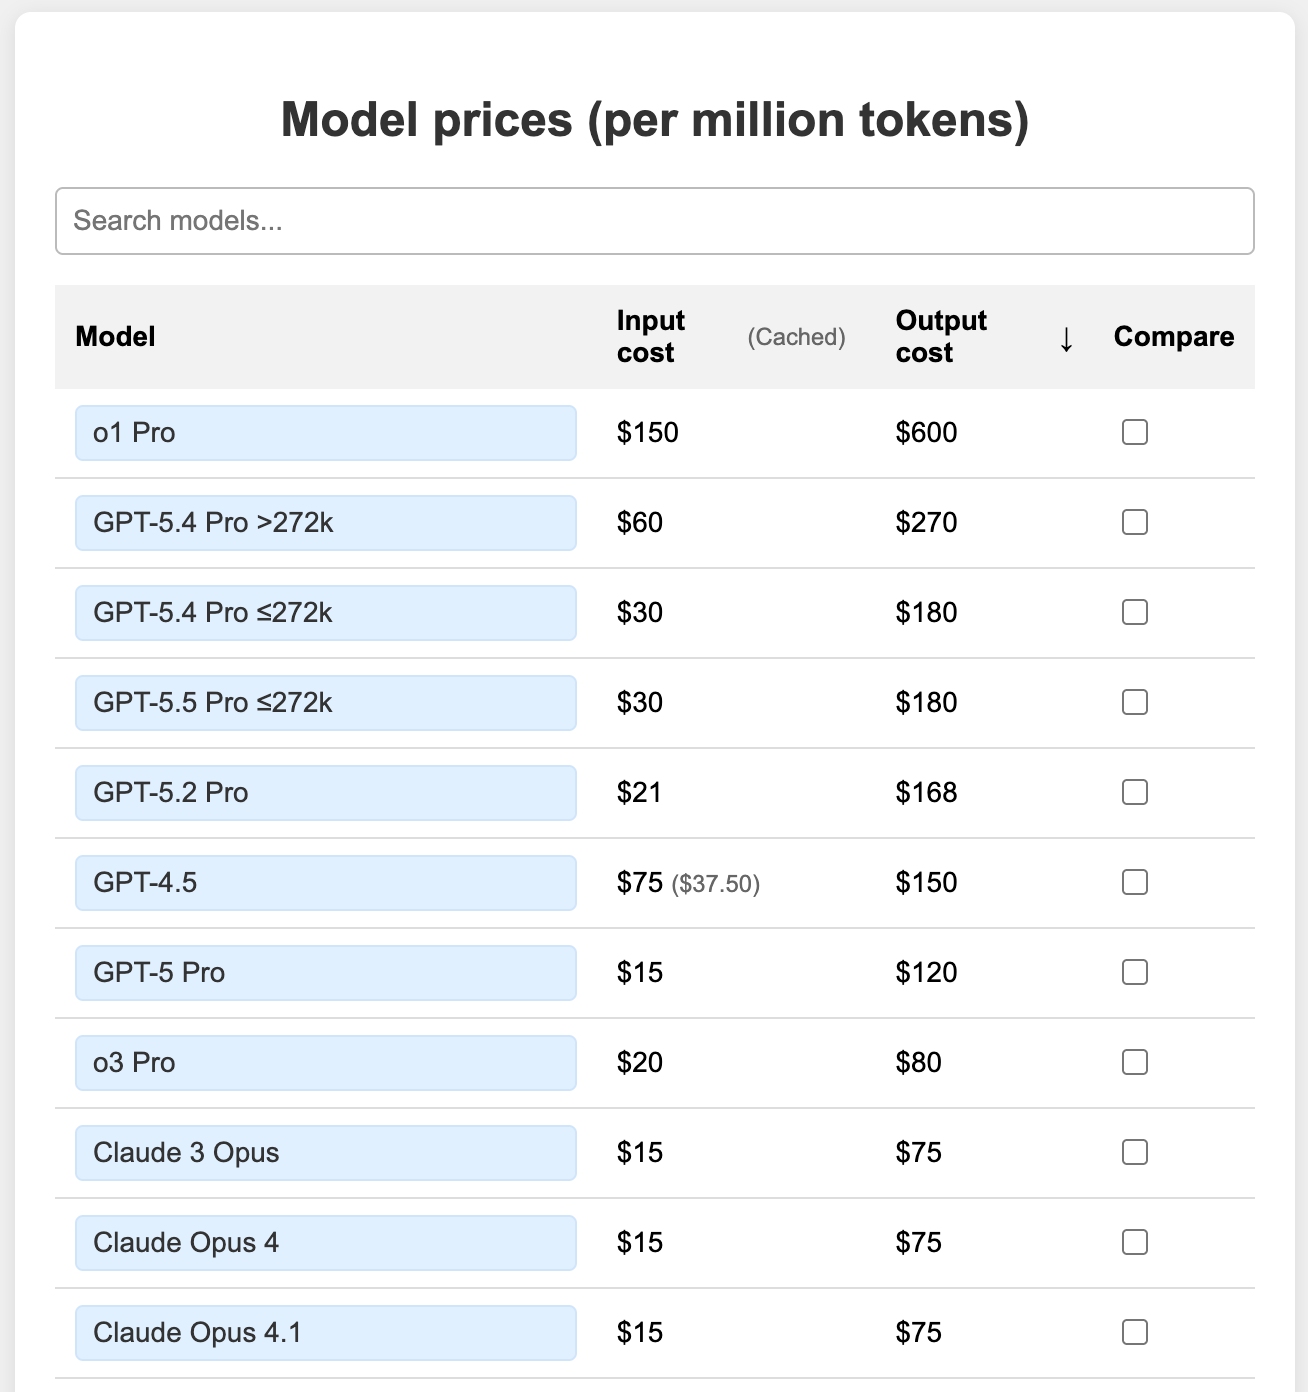
Costs
Choosing the best-scoring model from a benchmark may not always be the most intelligent decision.
Cost is a real factor, especially at scale. Most providers charge per token, which is the basic unit of text the model processes. A token is roughly four characters, or about three-quarters of a word on average. Both what you send to the model (input) and what it generates back (output) count toward your token usage.
For an agent that runs multiple steps in a loop, token usage adds up quickly. A good approach is to start with a capable model and then see if a smaller or cheaper one can do the same job well enough. Sometimes a smaller model handles simple tasks just fine.
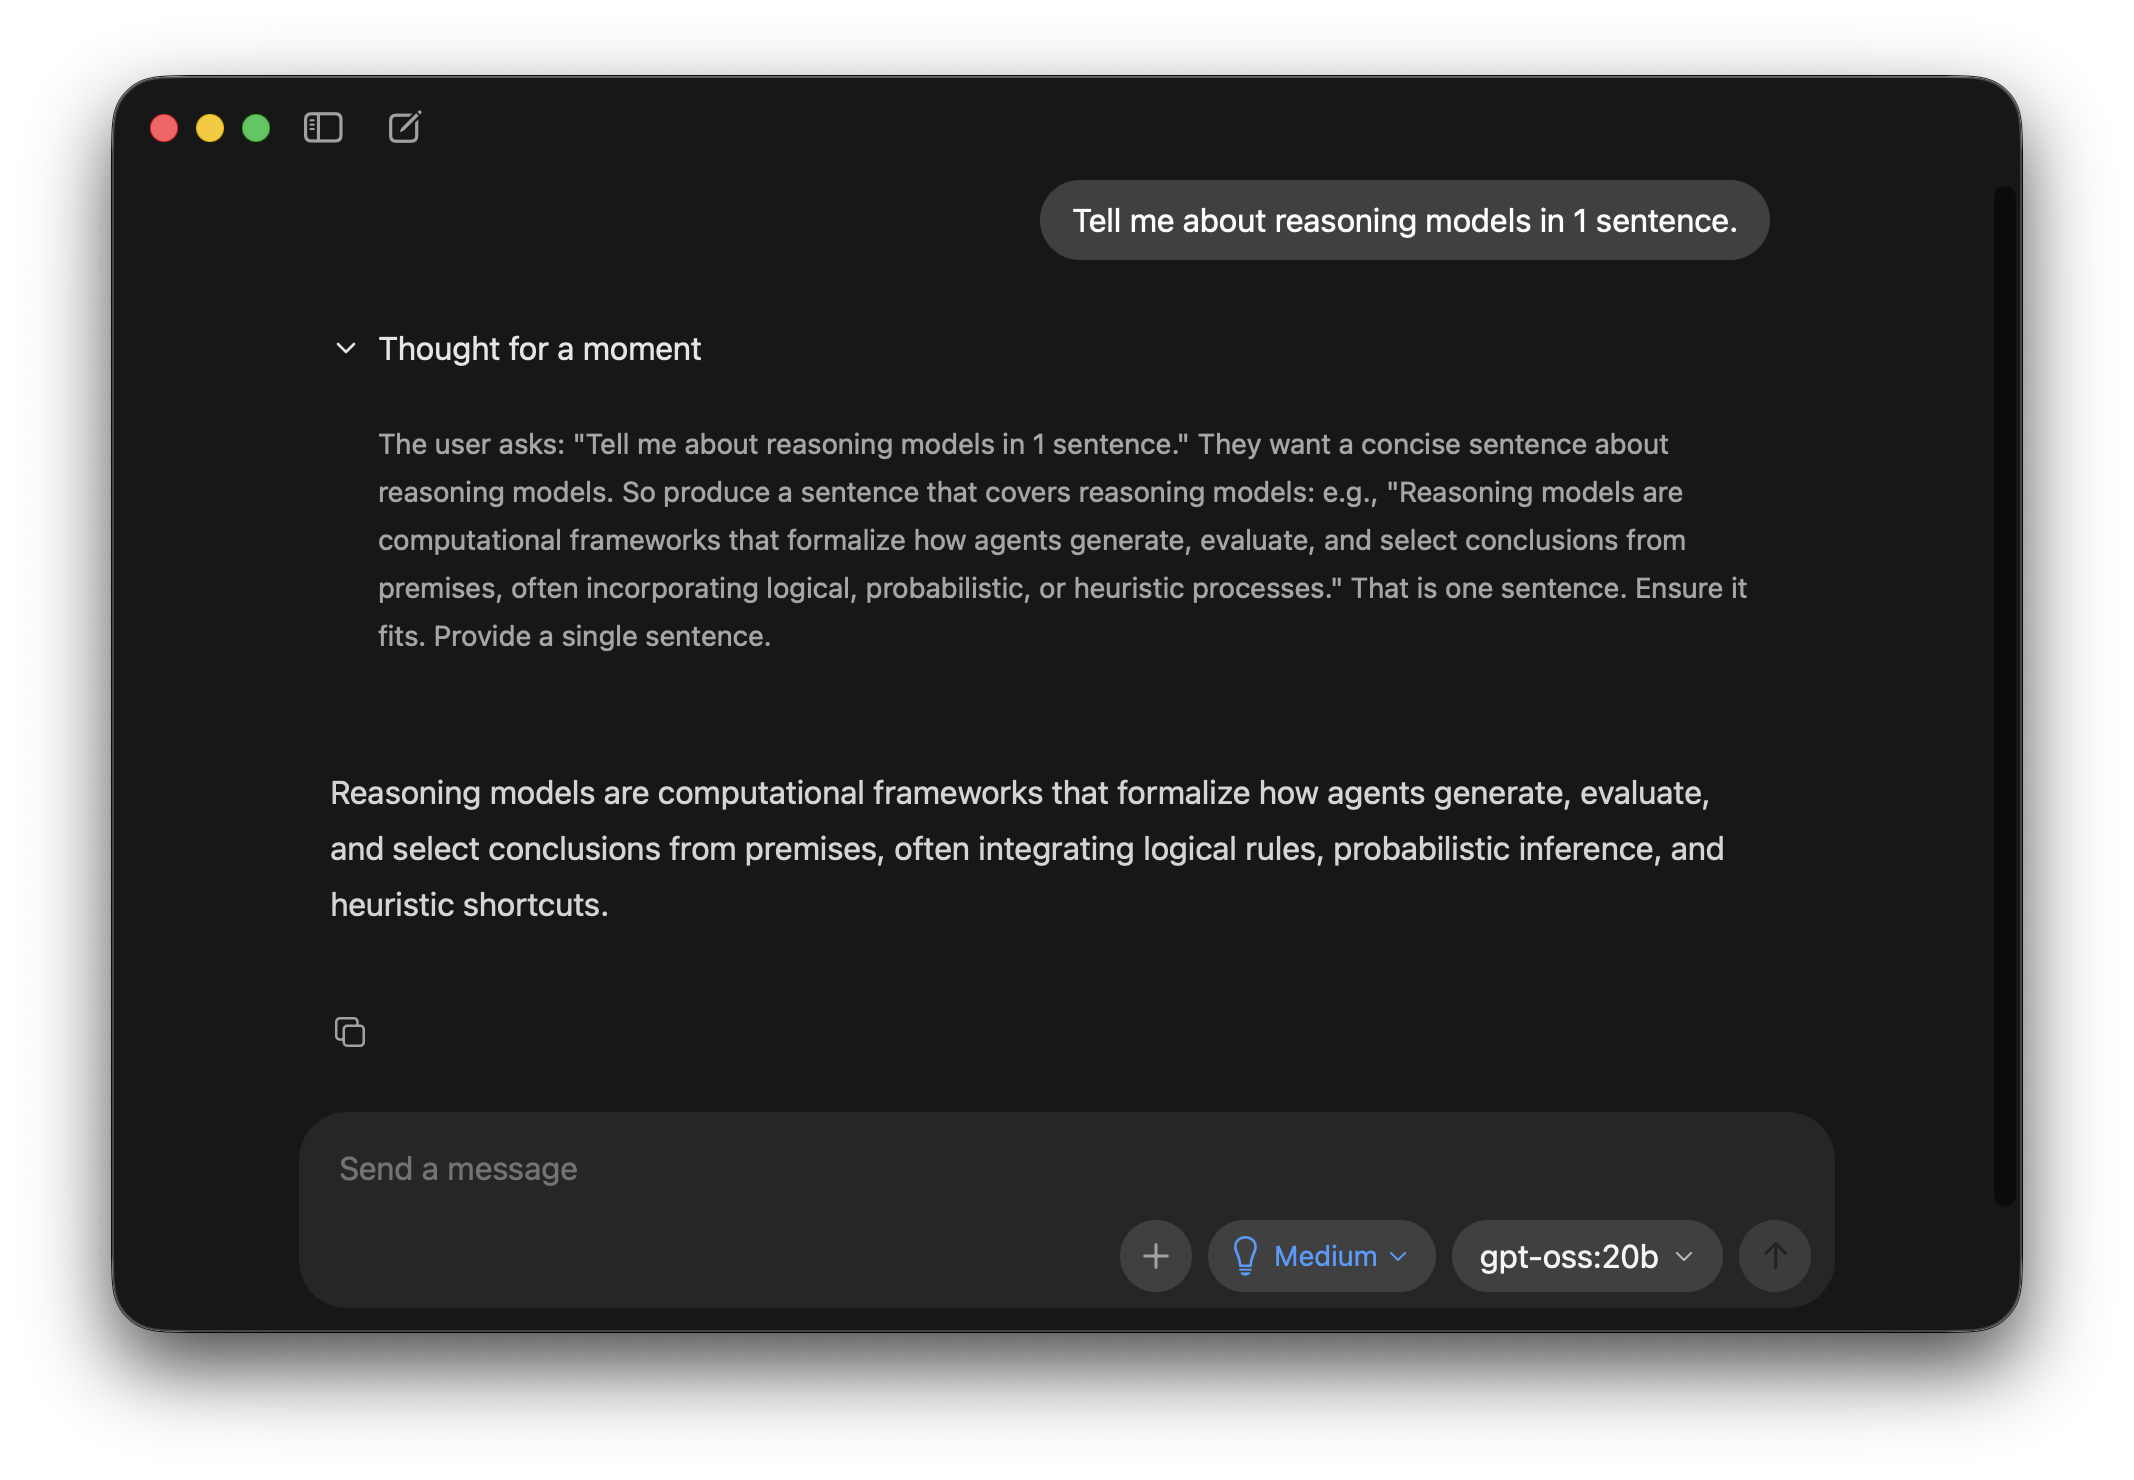
Reasoning Level
Some models are designed to think before they answer. These reasoning models break complex problems into smaller steps internally, often called reasoning traces. You can think of it as the model working through a scratchpad before writing its final response. This can improve performance for tasks that need planning, debugging, tool use, or careful decision-making.
More reasoning effort usually means higher cost, higher response time, and better accuracy for complex tasks.
Not every request needs high reasoning. If the task is simple, we can use a lower reasoning level or a cheaper model. If the task involves multiple steps, unknown errors, or important decisions, more reasoning can be useful.
Hosted vs Local
Most people start with a hosted model - one that runs on a provider's servers and is accessed via an API. These are easy to set up, well-maintained, and generally the most capable options available. The trade-off is that you pay per token, and your data is processed by a third party.
There are also open models that can run entirely on your own machine/server. They can avoid per-token API costs and give you more control over data. The downside is that they require capable hardware and are generally less powerful than the best hosted models today. That said, local models are getting better quickly. Previous generation frontier capabilities are being replicated in the next generation of local models, and this gap will continue to close. Examples of open-weight models that can be self-hosted, depending on hardware and quantization, include Gemma 4 series and Kimi K2.6.
There are already decent local coding models that people use for simple code generation and verification. In the coming years, this will improve, and stronger models will become available on consumer devices.
Hosted models are still easier to use for many applications. They usually provide better quality, higher reliability, larger context windows, and managed infrastructure.
Local models give more control over data, cost, and deployment. But they also require more setup, hardware, monitoring, and optimization.
Configuring the LLM
Once you have picked a model, there are two things you set up before the agent starts running: the system prompt and the context window.
System Prompt
A system prompt is the model's top-level instruction that guides its behavior during a conversation.
It can set rules such as:
- what role the AI should play
- what tone it should use
- what it should or should not do
- how it should handle tools
- how it should handle safety and user requests
- how it should format the final answer
For an agent, the system prompt is very important. It tells the model how to behave while using tools. It can also define boundaries, such as asking for permission before destructive actions or avoiding actions outside the user's request.
Let's see an example of this in practice:
import os

if __name__ == '__main__':
    from openai import OpenAI

    client = OpenAI(api_key=os.environ["OPENAI_API_KEY"])

    response = client.responses.create(
        model="gpt-5.4-mini",
        input=[
            {
                "role": "system",
                "content": "You are a friendly Python tutor. Refuse all requests unrelated to Python coding",
            },
            {
                "role": "user",
                "content": input("Enter your Python question: "),
            },
        ],
    )
    print(response.output_text)
In the above script, we initialize an OpenAI client and use client.responses.create to send a message to gpt-5.4-mini model. The system prompt is specified in the input list as the first entry. "role": "system" designates the entry as the system prompt. In the above example, the model is instructed to act as a Python tutor and refuse requests unrelated to Python. As the next entry, we accept the user prompt via input() and pass it to the LLM for answering.
If the script is run and any unrelated queries are passed to the LLM, we get a refusal response similar to the below one:
Enter your Python question: How many states are there in the US?

Model response: I’m here to help with Python coding questions only. If you have a Python-related question, feel free to ask!
Even though the underlying large language model knows the answer to the user's query, it refuses to answer as per direction in the system prompt.
Context Window
The context window is the model's working memory. It is the amount of information the model can see in one request.
The context can include the user message, conversation history, system prompt, tool results, files, documentation, and any other information we provide.
Most of the latest flagship models support up to 1M tokens, which is roughly 750,000 words or about 15 books. Older models like GPT-4 series models had a 128K token window, around 2 books' worth. For agents that run long tasks or work with large documents, context window size matters a lot. When the context fills up, older information gets dropped, which can cause the agent to lose track of earlier steps in a long task.
A larger context window is useful, but it is not free. More context usually means more cost and slower responses. Also, just because a model can accept a lot of context does not mean every token is equally important.
Good agents manage context carefully. They include what is needed, summarize old information, and avoid filling the context with unnecessary data.
Once we understand the model and its context window, the next question is what the agent should remember across steps and conversations.
Memory
Memory helps an agent remember useful information.
Short-term memory helps the agent remember what the user said earlier in the same conversation. This usually lives inside the context window.
Let's consider an example. The snippet below accepts a user query inside a loop and sends it to a model to get the response:
import os

if __name__ == '__main__':
    from openai import OpenAI

    client = OpenAI(api_key=os.environ["OPENAI_API_KEY"])

    while True:
        user_query = input("You: ")

        if user_query.lower() in ["exit", "quit"]:
            break

        response = client.responses.create(
            model="gpt-5.4-mini",
            input=user_query,
        )

        assistant_reply = response.output_text
        print(f"Model: {assistant_reply}")
The code works, but there are issues:
You: Tell me about Taj Mahal in 1 sentence
Model: The Taj Mahal is a magnificent white marble mausoleum in Agra, India, built by Emperor Shah Jahan in memory of his wife Mumtaz Mahal, and is one of the world’s most famous symbols of love.

You: When was it built?
Model: I can help, but I need to know **what “it” refers to**.
Please share the name, photo, or location of the building/structure/object, and I’ll tell you when it was built.
As seen from the transcript, the model fails to answer the user's follow-up prompt. This is because, we did not implement short term memory. For the model to be able to respond to follow-ups properly, we need to store and pass the conversation history to LLM calls. The snippet improves on the above script with short term memory implementation:
import os
if __name__ == '__main__':
    from openai import OpenAI

    client = OpenAI(api_key=os.environ["OPENAI_API_KEY"])

    conversation_history = []

    while True:
        user_query = input("You: ")

        if user_query.lower() in ["exit", "quit"]:
            break

        conversation_history.append({
            "role": "user",
            "content": user_query,
        })

        response = client.responses.create(
            model="gpt-5.4-mini",
            input=conversation_history,
        )

        assistant_reply = response.output_text
        print(f"Model: {assistant_reply}")

        conversation_history.append({
            "role": "assistant",
            "content": assistant_reply,
        })
We introduced a conversation_history list that stores previous messages. User messages are appended to this list with "role": "user" and model responses are appended with "role": "assistant". This way, whenever a request is sent to the model, it gets the entire message history through the input argument and will be able to respond to follow-up prompts correctly.
You: Tell me about Taj Mahal in 1 sentence
Model: The Taj Mahal is a stunning white marble mausoleum in Agra, India, built by Emperor Shah Jahan in memory of his wife Mumtaz Mahal.

You: When was it built?
Model: It was built between 1632 and 1653.
Long-term memory stores information beyond one conversation and persists even after the current chat or task ends. This is useful when you want the agent to remember user preferences, past decisions, or domain-specific facts across sessions. Common approaches include RAG (retrieval-augmented generation), where relevant information is fetched from a database and added to the context as needed, and built-in memory systems like ChatGPT Memories, where key facts are stored and automatically recalled in future conversations.
Agent Loop
The agent loop is the core flow of an agent.
A simple loop looks like this:
- User sends a message.
- Agent adds the message to the conversation context.
- Agent sends the context and system prompt to the LLM.
- LLM decides what to do next.
- If needed, the LLM calls a tool.
- Agent runs the tool and sends the result back to the LLM.
- LLM decides whether more steps are needed.
- When done, the LLM generates the final response.
- Agent sends the response to the user.
This loop is what makes agents feel different from normal chatbots. A chatbot usually gives one response. An agent can act, observe, and continue.
In practice, the intermediate steps are where the interesting work happens. The model may call a tool, wait for the result, process that result, decide to call another tool, and keep going before it gives a final answer. The loop runs as many times as needed until the model decides the task is complete or the user stops it. This brings us to tools - what they are and how they actually work.
Tool Calling
Tools are external capabilities that the agent can use.
Tools (also called functions) let an AI agent do things beyond generating text. They can be used to take actions or get information.
Examples of tools:
- search the web
- call an API
- read files
- edit files
- run code
- send emails
- query a database
- create calendar events
The agent chooses a tool when needed. The tool has a name, a description, and input parameters. The model decides which tool to call and what arguments to pass.
Tool descriptions are important. If a tool description is unclear, the model may call it at the wrong time or pass the wrong input. We should describe tools in simple language and make their inputs strict.
Here is an important detail: the model does not run the tool itself. When it decides to use a tool, it outputs a structured request with the tool name and the arguments it wants to pass. Your code intercepts this, runs the actual function, and passes the result back to the model. The model then reads the result and decides what to do next. This back-and-forth between the model and your code is what makes the agent loop so powerful.
Let's see an example of tool calling in action:
import json
import os
from dotenv import load_dotenv

load_dotenv()


def get_weather(location):
    return {
        "location": location,
        "temperature": "24 C",
        "condition": "Sunny",
        "humidity": "52%",
        "wind": "11 km/h",
    }


if __name__ == '__main__':
    from openai import OpenAI

    client = OpenAI(api_key=os.environ["OPENAI_API_KEY"])

    tools = [
        {
            "type": "function",
            "name": "get_weather",
            "description": "Get the current weather for a destination.",
            "parameters": {
                "type": "object",
                "properties": {
                    "location": {
                        "type": "string",
                        "description": "The city or destination, e.g. Paris or Tokyo",
                    }
                },
                "required": ["location"],
                "additionalProperties": False,
            },
            "strict": True,
        }
    ]

    input_list = [
        {
            "role": "system",
            "content": "You are Safar, a travel planning AI agent",
        },
        {
            "role": "user",
            "content": input("Ask you travel questions: "),
        },
    ]

    response = client.responses.create(
        model="gpt-5.4-mini",
        input=input_list,
        tools=tools,
        tool_choice="required",
    )

    print("The model responded with:")
    print(response.output)

    input_list += response.output

    for item in response.output:
        if item.type != "function_call":
            continue

        if item.name == "get_weather":
            args = json.loads(item.arguments)
            print(f"The model wants to call get_weather with: {args}")

            weather = get_weather(args["location"])
            print(f"The local Python function returned: {weather}")

            input_list.append({
                "type": "function_call_output",
                "call_id": item.call_id,
                "output": json.dumps(weather),
            })

    print("Sending the tool result back to the model")
    final_response = client.responses.create(
        model="gpt-5.4-mini",
        input=input_list,
        tools=tools,
    )

    print("Final answer:")
    print(f"Model response: {final_response.output_text}")
In the tools list, we have defined a function named get_weather according to OpenAI function calling guidelines and have specified the parameters that the model accepts using the parameters key. This definition follows JSON Schema specification.
Since, we add this tools list when making calls to OpenAI, the model will know that it has access to a weather tool and will be able to request a function call when needed.
In the script, you can see that when we receive a response from the model, we always check if the response type is a function call or not (item.type != "function_call") and if the response is a request to call get_weather tool, we call the get_weather() Python function and send it back to the model:
weather = get_weather(args["location"])
input_list.append({
                "type": "function_call_output",
                "call_id": item.call_id,
                "output": json.dumps(weather),
            })
Let's run the script and ask the agent a question that would require a weather tool call:
Ask you travel questions: Sunscreen needed in Goa?

The model responded with:
[ResponseFunctionToolCall(arguments='{"location":"Goa"}', call_id='call_X9OBZhGwT3yhfmTAOclefWE8', name='get_weather', type='function_call', id='fc_05ba95ec38f46f7f006a17ce9e3bb0819a9a0b430001f7bd91', namespace=None, status='completed')]

The model wants to call get_weather with: {'location': 'Goa'}
The local Python function returned: {'location': 'Goa', 'temperature': '24 C', 'condition': 'Sunny', 'humidity': '52%', 'wind': '11 km/h'}

Sending the tool result back to the model

Final answer:
Model response: Yes — sunscreen is a good idea in Goa. It’s sunny there right now, so UV exposure can be strong even if it feels pleasant.

Quick tips:
- Use broad-spectrum SPF 30+ (SPF 50 if you’ll be at the beach a lot)
- Reapply every 2 hours, and after swimming/sweating
- Don’t forget ears, neck, hands, and feet
- A hat and sunglasses help too

If you want, I can also suggest a Goa beach-day packing list.
For our query, the model initially responds with a ResponseFunctionToolCall item. This requests our get_weather function to be called with location argument set as Goa.
Responding to this request, our script executes the function call and sends the function call response back to the model for getting the final response. The function call always returns temperature as 24 degree Celsius with condition as sunny. Trusting this data, the model produces its final response, suggesting the user to use a sunscreen.
The weather function defined in the above script is not a very useful one, it returns a hardcoded weather data for all requests. In a practical scenario, the function should make an actual call to a real Weather API to fetch data.
The above script illustrates the concept of an agent loop. Even though the example involves just one user request and model response, the agent takes intermediary steps (tool calls) before returning the final response.
Now let's move to a real world example involving tools. We will provide web search capability to our agent by defining a custom SerpApi web search tool.
Providers usually have their own built-in tools for web search. However, these tools can be slow or unreliable at times. To get live search data from search engines reliably, we can write a custom tool/function using SerpApi Python SDK.
import json
import os


def google_search(query):
    import serpapi

    client = serpapi.Client(api_key=os.environ["SERPAPI_KEY"])

    results = client.search({
        "engine": "google",
        "q": query,
    })

    return [
        {
            "title": result.get("title"),
            "link": result.get("link"),
            "snippet": result.get("snippet"),
        }
        for result in results.get("organic_results", [])[:5]
    ]


if __name__ == '__main__':
    from openai import OpenAI

    client = OpenAI(api_key=os.environ["OPENAI_API_KEY"])

    tools = [
        {
            "type": "function",
            "name": "google_search",
            "description": "Search Google with SerpApi and return web search results.",
            "parameters": {
                "type": "object",
                "properties": {
                    "query": {
                        "type": "string",
                        "description": "The Google search query to run",
                    }
                },
                "required": ["query"],
                "additionalProperties": False,
            },
            "strict": True,
        }
    ]

    input_list = [
        {
            "role": "system",
            "content": "You are Safar, a travel planner. Use Google search when current destination information would improve your answer.",
        },
        {
            "role": "user",
            "content": input("What travel question should I research? "),
        },
    ]

    response = client.responses.create(
        model="gpt-5.4-mini",
        input=input_list,
        tools=tools,
        tool_choice="required",
    )

    print("The model responded with:")
    print(response.output)

    input_list += response.output

    for item in response.output:
        if item.type != "function_call":
            continue

        if item.name == "google_search":
            args = json.loads(item.arguments)
            print(f"The model wants to call google_search with: {args}")

            search_results = google_search(args["query"])
            print(f"Step 7: SerpApi returned {len(search_results)} search results")

            input_list.append({
                "type": "function_call_output",
                "call_id": item.call_id,
                "output": json.dumps(search_results),
            })

    final_response = client.responses.create(
        model="gpt-5.4-mini",
        input=input_list,
        tools=tools,
    )

    print(f"Model response: {final_response.output_text}")
Here, we define a google_search() that accepts a query and performs a Google search with the query using SerpApi Python SDK. The function returns the first five search results obtained from Google.
Let's see the results in action:
What travel question should I research? When is the Tomato festival - La Tomatina happening this year?

The model responded with:
[ResponseFunctionToolCall(arguments='{"query":"La Tomatina 2026 date official"}', call_id='call_mk2KL4xnvR0mexyt2lXFTHgE', name='google_search', type='function_call', id='fc_01af4c5fc07e8479006a192316ab20819bb10273439c89fb9a', namespace=None, status='completed')]

The model wants to call google_search with: {'query': 'La Tomatina 2026 date official'}
Step 7: SerpApi returned 5 search results

Model response: La Tomatina is happening on **Wednesday, August 26, 2026** in **Buñol, Spain**.

If you want, I can also help with:
- tickets
- how to get there from Valencia
- where to stay nearby
This is the core idea behind tool calling. The model does not directly browse the web or fetch data by itself. Instead, it identifies when a tool is needed, asks for that tool to be called, and then uses the returned result to continue the conversation. This separation is useful because the model can focus on reasoning, while tools provide access to external systems and real-time information.
Without the google_search tool, the model would not be able to answer questions that require live data. It should respond with something like: “I don’t have access to real-time information.” By defining the tool, we give the model a safe and structured way to request the information it needs.
MCP
As you build more agents with more tools, a new problem emerges: every tool integration is custom-built and cannot easily be reused elsewhere. If you build a GitHub integration for one agent, you would have to rebuild it from scratch for another. That is where MCP comes in.
Model Context Protocol (MCP) is like USB-C for AI integrations. It is a standard protocol that lets models connect to external tools and data sources in a consistent, reusable way. Instead of building a custom integration for every tool, you write an MCP server once, and any model that supports MCP can use it.
Examples include:
- GitHub MCP
- Figma MCP
- SerpApi MCP
- database MCP servers
- browser MCP servers
- file system MCP servers
With MCP, the model can discover supported functionality and call tools when needed. This makes integrations reusable across different models, clients, and applications. For a small agent, normal tool calling may be enough. For larger systems with many integrations, MCP can make the architecture cleaner.
Let's see an example of MCP usage in practice. The script below uses the SerpApi MCP server - using this, the agent will be able to call all the SerpApi supported engines like google, google_shopping, amazon, etc.
import os

if __name__ == '__main__':
    from openai import OpenAI

    client = OpenAI(api_key=os.environ["OPENAI_API_KEY"])

    serpapi_mcp_url = f"https://mcp.serpapi.com/{os.environ['SERPAPI_KEY']}/mcp"

    response = client.responses.create(
        model="gpt-5.4",
        tools=[
            {
                "type": "mcp",
                "server_label": "serpapi",
                "server_description": "SerpApi MCP server",
                "server_url": serpapi_mcp_url,
                "require_approval": "never",
            }
        ],
        input=[
            {
                "role": "system",
                "content": "You are Cartwise, a shopping assistant. Help users compare products, prices, reviews, and buying options.",
            },
            {
                "role": "user",
                "content": input("What do you want to shop for? "),
            },
        ],
    )

    print("Full model response (includes MCP operations): ")
    print(response.output)

    print(f"Model response: {response.output_text}")
SerpApi exposes the MCP server via the URL https://mcp.serpapi.com/. Users can supply the API Key via the URL path as seen in the example: https://mcp.serpapi.com/{os.environ['SERPAPI_KEY']}/mcp.
The code here is relatively simpler compared to the tool calling example. We just need to provide the MCP server info via the tools argument:
tools=[
            {
                "type": "mcp",
                "server_label": "serpapi",
                "server_description": "SerpApi MCP server",
                "server_url": serpapi_mcp_url,
                "require_approval": "never",
            }
        ]
From this definition alone, the model can discover supported MCP functionalities and it will be able to autonomously call the MCP server tools based on the user request.
Let's ask the agent a shopping query. Here, I am asking it to find the price of a mobile device:
What do you want to shop for? Find best price for Moto Razr Ultra phone

Full model response (includes MCP operations):
[
  McpListTools(id='mcpl_06176a7178fb9f5c006a17f6c23578819ab2c977e7bc2b0bc7', server_label='serpapi', ...,

McpCall(id='mcp_06176a7178fb9f5c006a17f6c40930819aac6136e6a0f0ced8', arguments='{"params":{"q":"Moto Razr Ultra phone price","engine":"google_shopping","num":10},"mode":"compact"}', name='search', server_label='serpapi', type='mcp_call', approval_request_id=None, error=None, output='{"shopping_results": [{"position": 1, "title": "Motorola Razr Ultra 2025", "product_id": "14521999409488109662", "product_link": ...]}]}', status='completed'),
  ResponseOutputMessage(id='msg_06176a7178fb9f5c006a17f6cc3e68819aa688012defa9cf78', content=[ResponseOutputText(annotations=[], text='Best price I found for a **new Moto Razr Ultra** is:...'
]

Model response: Best price I found for a **new Moto Razr Ultra** is:

- **$699.99 at Best Buy** — Motorola Razr Ultra 2025
  - was **$1,300**
  - rating: **4.0/5** from **520 reviews**
  - free delivery by Sat

Also matching:
- **$699.99 at Motorola US** — Motorola Razr 2025
- **$764.00 at Etoren** — Motorola Razr 50 Ultra
- **$1,049.99+** for some Razr 60 Ultra / 2026 variants
The model response includes a series of operations:
- McpListTools: This is the request from the model sent to the MCP server to list available operations. From this call, the model will know that SerpApi has a
google_shoppingengine for shopping searches. - McpCall: Based on the above response, the model calls MCP servers
google_shoppingengine with the queryMoto Razr Ultra phone price. This call will fetch the shopping results via SerpApi MCP. - ResponseOutputMessage: Once the above response is obtained, the model has enough information regarding the prices to formulate its response to the user. The model responds by listing the device price across a number of retailers.
If we omitted the SerpApi MCP definition in the above script, the model should have responded with something like: “I cannot access real-time prices.” This is because the model itself does not have live data access unless we explicitly connect it to external tools or systems. MCP is one way to provide that connection in a standard way.
Now that we have seen how MCP connects agents to external capabilities, let’s look at another way to extend agent behavior: skills.
Skills
While tools handle actions, skills handle behavior. A skill is a reusable set of instructions or a workflow that tells an agent how to perform a specific type of task well.
We have seen tools and MCP which are code-heavy. Tools are code that gets called by the model whereas MCP requires a server implementation according to the Model Context Protocol spec. Skills are relatively simple and can just be a plain text markdown file.
A skill can include:
- steps to follow
- rules
- examples
- output formats
- scripts
- templates
- best practices
Skills are useful for repeated tasks. Examples include writing reports, analyzing PDFs, creating slides, debugging code, or handling customer support. Skills make agents more specialized.
Instead of putting every instruction into the system prompt, we can use skills where the model receives just the skill metadata in the context and will be able to load and use the full skill when the current task needs it.
A skill file is just a markdown file with the below format:
---
name: skill-name
description: A description of what this skill does and when to use it.
---
Skill contents in markdown
Let's see a real-world example: The SerpApi Search Skill provides instructions for the agent to interact with SerpApi realtime search APIs. You can see the skill.md file, which provides instruction to the model to invoke various SerpApi API calls.
You can see a usage example below, where we use SerpApi skill to build a travel planning agent.
import os
import subprocess
from pathlib import Path

from openai import OpenAI


MODEL = os.getenv("OPENAI_MODEL", "gpt-5.4-mini")
SKILL_PATH = Path(__file__).resolve().parent / "skills" / "serpapi-web-search"


def run_shell_call(shell_call):
    print(f"\nModel requested shell call: {shell_call.call_id}")
    print(f"Commands: {shell_call.action.commands}")

    command_outputs = []
    for command in shell_call.action.commands:
        print(f"\n[script] Running command: {command}")

        result = subprocess.run(
            command,
            shell=True,
            executable="/bin/zsh",
            capture_output=True,
            text=True,
            check=False,
        )

        print(f"[script] Exit code: {result.returncode}")
        if result.stdout:
            print(f"[script] stdout:\n{result.stdout[:1500]}")
        if result.stderr:
            print(f"[script] stderr:\n{result.stderr[:1500]}")

        command_outputs.append({
            "stdout": result.stdout,
            "stderr": result.stderr,
            "outcome": {
                "type": "exit",
                "exit_code": result.returncode,
            },
        })

    output_item = {
        "type": "shell_call_output",
        "call_id": shell_call.call_id,
        "output": command_outputs,
    }

    if shell_call.action.max_output_length is not None:
        output_item["max_output_length"] = shell_call.action.max_output_length

    return output_item


if __name__ == "__main__":
    client = OpenAI(api_key=os.environ["OPENAI_API_KEY"])

    input_list = [
        {
            "role": "system",
            "content": "You are Safar, a travel planning assistant.",
        }
    ]

    tools = [
        {
            "type": "shell",
            "environment": {
                "type": "local",
                "skills": [
                    {
                        "name": "serpapi-web-search",
                        "description": "Search current travel information with the SerpApi CLI.",
                        "path": str(SKILL_PATH),
                    }
                ],
            },
        }
    ]

    print("Type 'exit' or 'quit' to stop.\n")

    waiting_for_user = True

    while True:

        if waiting_for_user:
            user_query = input("You: ")

            if user_query.lower() in ["exit", "quit"]:
                break

            input_list.append({
                "role": "user",
                "content": user_query,
            })
            waiting_for_user = False

        print("\n[script] Sending request to the model.")
        response = client.responses.create(
            model=MODEL,
            input=input_list,
            tools=tools,
        )

        input_list += response.output

        shell_calls = [item for item in response.output if item.type == "shell_call"]
        print(f"[script] Shell calls requested: {len(shell_calls)}")

        if not shell_calls:
            print(f"Model response: {response.output_text}\n")
            waiting_for_user = True
            continue

        for shell_call in shell_calls:
            input_list.append(run_shell_call(shell_call))

        print("\n[script] Sending shell output back to the model.")
The script uses local skills capability of OpenAI SDK - we have the skill files added in skills/serpapi-web-search folder relative to the scripts parent directory.
Skills can be specified using the below format:
    tools = [
        {
            "type": "shell",
            "environment": {
                "type": "local",
                "skills": [
                    {
                        "name": "serpapi-web-search",
                        "description": "Search current travel information with the SerpApi CLI.",
                        "path": str(SKILL_PATH),
                    }
                ],
            },
        }
    ]
We provide the skill name, description and path to the agent. When using skills, OpenAI SDK will emit shell calls that must be run in the terminal. This is needed so that the agent can list and view the full skill file contents that are present locally. We have a run_shell_call() function defined for this. Whenever the model requests for a shell call, we will run this function and pass back the shell results to the model.
Now let's run the agent and ask it a travel planning question. We will ask the model about hotel prices in Goa, India:
Type 'exit' or 'quit' to stop.
You: Find Goa hotel prices for a vacation: two nights from 10 June 26

[script] Sending request to the model.
[script] Shell calls requested: 1

Model requested shell call: call_Cgs0D4tNOZFPZ30GNVJzJNHZ
Commands: ['cd .../skills/serpapi-web-search && cat SKILL.md']

[script] Running command: cd .../skills/serpapi-web-search && cat SKILL.md
[script] Exit code: 0
[script] stdout:
---
name: serpapi-web-search
description: >-
  Search the web using SerpApi's 100+ search engines. Use this skill whenever
  the user needs current or web-sourced information: ...

[script] Sending shell output back to the model.

[script] Sending request to the model.
[script] Shell calls requested: 1

Model requested shell call: call_Y2PGcBkpSEkzIikqu1H30uRW
Commands: ["cd .../skills/serpapi-web-search && sed -n '1,220p' rules/ENGINES.md"]

[script] Running command: cd .../skills/serpapi-web-search && sed -n '1,220p' rules/ENGINES.md
[script] Exit code: 0
[script] stdout:
# SerpApi Search Engines Catalog

Complete list of 107 SerpApi search engines. Use the `engine` parameter to select the desired search engine.
...

[script] Sending shell output back to the model.

[script] Sending request to the model.
[script] Shell calls requested: 1

Model requested shell call: call_oncTqSWJWQoDbqJS06aJP1OD
Commands: ['cd .../skills/serpapi-web-search && serpapi search engine=google_hotels q="Goa" check_in_date=2026-06-10 check_out_date=2026-06-12 --fields \'properties[0:20]\'']

[script] Running command: cd .../skills/serpapi-web-search && serpapi search engine=google_hotels q="Goa" check_in_date=2026-06-10 check_out_date=2026-06-12 --fields 'properties[0:20]'
[script] Exit code: 0
[script] stdout:
{
  "properties": [
    {
      "type": "hotel",
      "name": "Vivanta Goa, Miramar",
      "description": "Swanky hotel across from the beach featuring a rooftop pool, a stylish restaurant & a 24-hour gym.",
      ...


[script] Sending shell output back to the model.

[script] Sending request to the model.
[script] Shell calls requested: 0

Model response: I found live Goa hotel prices for **2 nights: 10 Jun 2026 to 12 Jun 2026**.

Sample prices from Google Hotels:
- **Vivanta Goa, Miramar** — **$82/night**, **$164 total**
- **Aloha Holiday Resort** — **$17/night**, **$33 total**
- Other properties in the Goa search were showing a wide range, from budget stays to luxury resorts.

A few notes:
- These are **current live rates** and can change quickly.
- The prices shown are from hotel search results and may be **before taxes/fees**.
- I searched broadly for **Goa**; if you want, I can narrow it down by:
  - **North Goa / South Goa**
  - **Budget / mid-range / luxury**
  - **Beachfront**
  - **2 adults vs family**

If you want, I can make a short list of the **best 10 Goa hotels under a budget you choose**.
As seen from the output, the model initially requested a shell call that runs cat SKILL.md which is to read the skill contents.
With the skill contents obtained, the model proceeds with another shell call sed -n '1,220p' rules/ENGINES.md which lists all SerpApi supported engines. With this data, the model will be able to get all supported SerpApi search engines and choose the best one for the task.
Next, model requests running the command serpapi search engine=google_hotels q="Goa" check_in_date=2026-06-10 check_out_date=2026-06-12 --fields 'properties[0:20]' which uses SerpApi CLI to get results from Google Hotels. We run this shell command on our end and pass the results to the model that includes JSON results from Google Hotels API.
With this data obtained, the model was able to generate its final response and give us suggestions for Hotels to book in Goa along with the prices.
Now that we have seen prompts, memory, tools, MCP, and skills, we can put these pieces into one simple stack.
Agent Capability Stack
An agent can be understood as a stack of capabilities. We have seen the core building blocks of an agent: system prompts, tools, MCP, and skills. Now, let’s compare how they fit together in the agent capability stack.
At the bottom, we have the system prompt. This defines global behavior and constraints.
Then we have skills. Skills provide packaged procedures for specific task types.
Then we have tools. Tools let the agent do things in the world.
Then we have MCP. MCP gives us a standard way to connect models to tools, files, APIs, databases, IDEs, browsers, and other systems.
We can think about the stack like this:
| Layer | Purpose | Use when |
|---|---|---|
| System prompt | Global behavior and constraints | You want rules that apply every turn |
| Skills | Reusable workflows | You want the model to follow a repeatable process |
| Tools | External actions and information | You want the model to call APIs, read files, run code, or fetch live state |
| MCP | Standard integration layer | You want reusable integrations across models and clients |
Use a system prompt for safety boundaries, tone, refusal style, and stable rules.
Use a skill when you want the model to follow a repeatable workflow or use scripts and templates.
Use tools when the model must call external services, fetch live state, create side effects, or interact with the environment.
Use MCP when you want to expose tools and resources through a standard protocol.
Summary and Next Steps
In this tutorial, we started out with the components of an AI agent and built a few simple agents for use cases such as shopping and travel. We provided capabilities to agents using tool calling, MCP, and Skill files.
To explore on your own, you can find the code snippets used in the tutorial in this GitHub repo.
If you are looking for a different SDK or tool to start with like the Claude agent SDK or n8n, we have you covered:

Even though we covered the basics for building simple agents, some important next steps to learn more about are:
- multi-agent systems
- observability
- error handling
- permissions
- context compaction
- evaluation
A multi-agent system has multiple agents, where each agent can be specialized for a specific goal. These agents can communicate with each other. We can also have verifier models that check the output from other models.
Similar to building a backend application, we need observability and error handling for agents. The model can hallucinate, choose the wrong tool, pass bad arguments, or get stuck in a loop. We need a way to monitor this behavior and improve the system over time.
Permissions are also important. An agent that can read files is useful. An agent that can delete files or send emails should be more carefully controlled. We should decide which actions require user approval.
Context compaction is another important idea. As the conversation grows, the agent cannot keep everything forever. It needs to summarize old information and keep only what is useful for the next step.
Evaluation helps us understand whether the agent is actually doing a good job. We can test the agent on sample tasks, check if it used the right tools, verify whether the final answer is correct, and compare outputs across different prompts or models. Without evaluation, it is hard to know if the agent is improving or just producing confident-looking answers.
The best way to understand agents is to build small ones, give them real tasks, inspect their tool calls, and evaluate their outputs. Start with a simple loop, add tools carefully, introduce memory only when needed, and add observability before trusting the agent with important actions. And if your agent needs real-time data access, you can explore SerpApi APIs to extend its capabilities.