 Ruby
Ruby
 Golang
 .Net
.Net
 MCP
MCP
 C++
C++

This blog will show you how to give a local LLM access to real-time web data. We'll build a small chat app in TypeScript; the model will decide what to search for, your code will run the search, and the model will write an answer with the fresh data in hand. The inference runs on your hardware, and the only thing that leaves your local environment is the search query the model chose to issue.
By the end of this blog, you'll understand the full request flow, you'll know how to keep a large search response from blowing past your context window, and you'll have a public repository you can clone and run against your own local model.
Why LLMs Don't Have Access to Real-Time Data
Every large language model is limited by its training data cutoff. Anything that happened after that date is invisible to the model. That's true whether you run the model locally or call a hosted API.
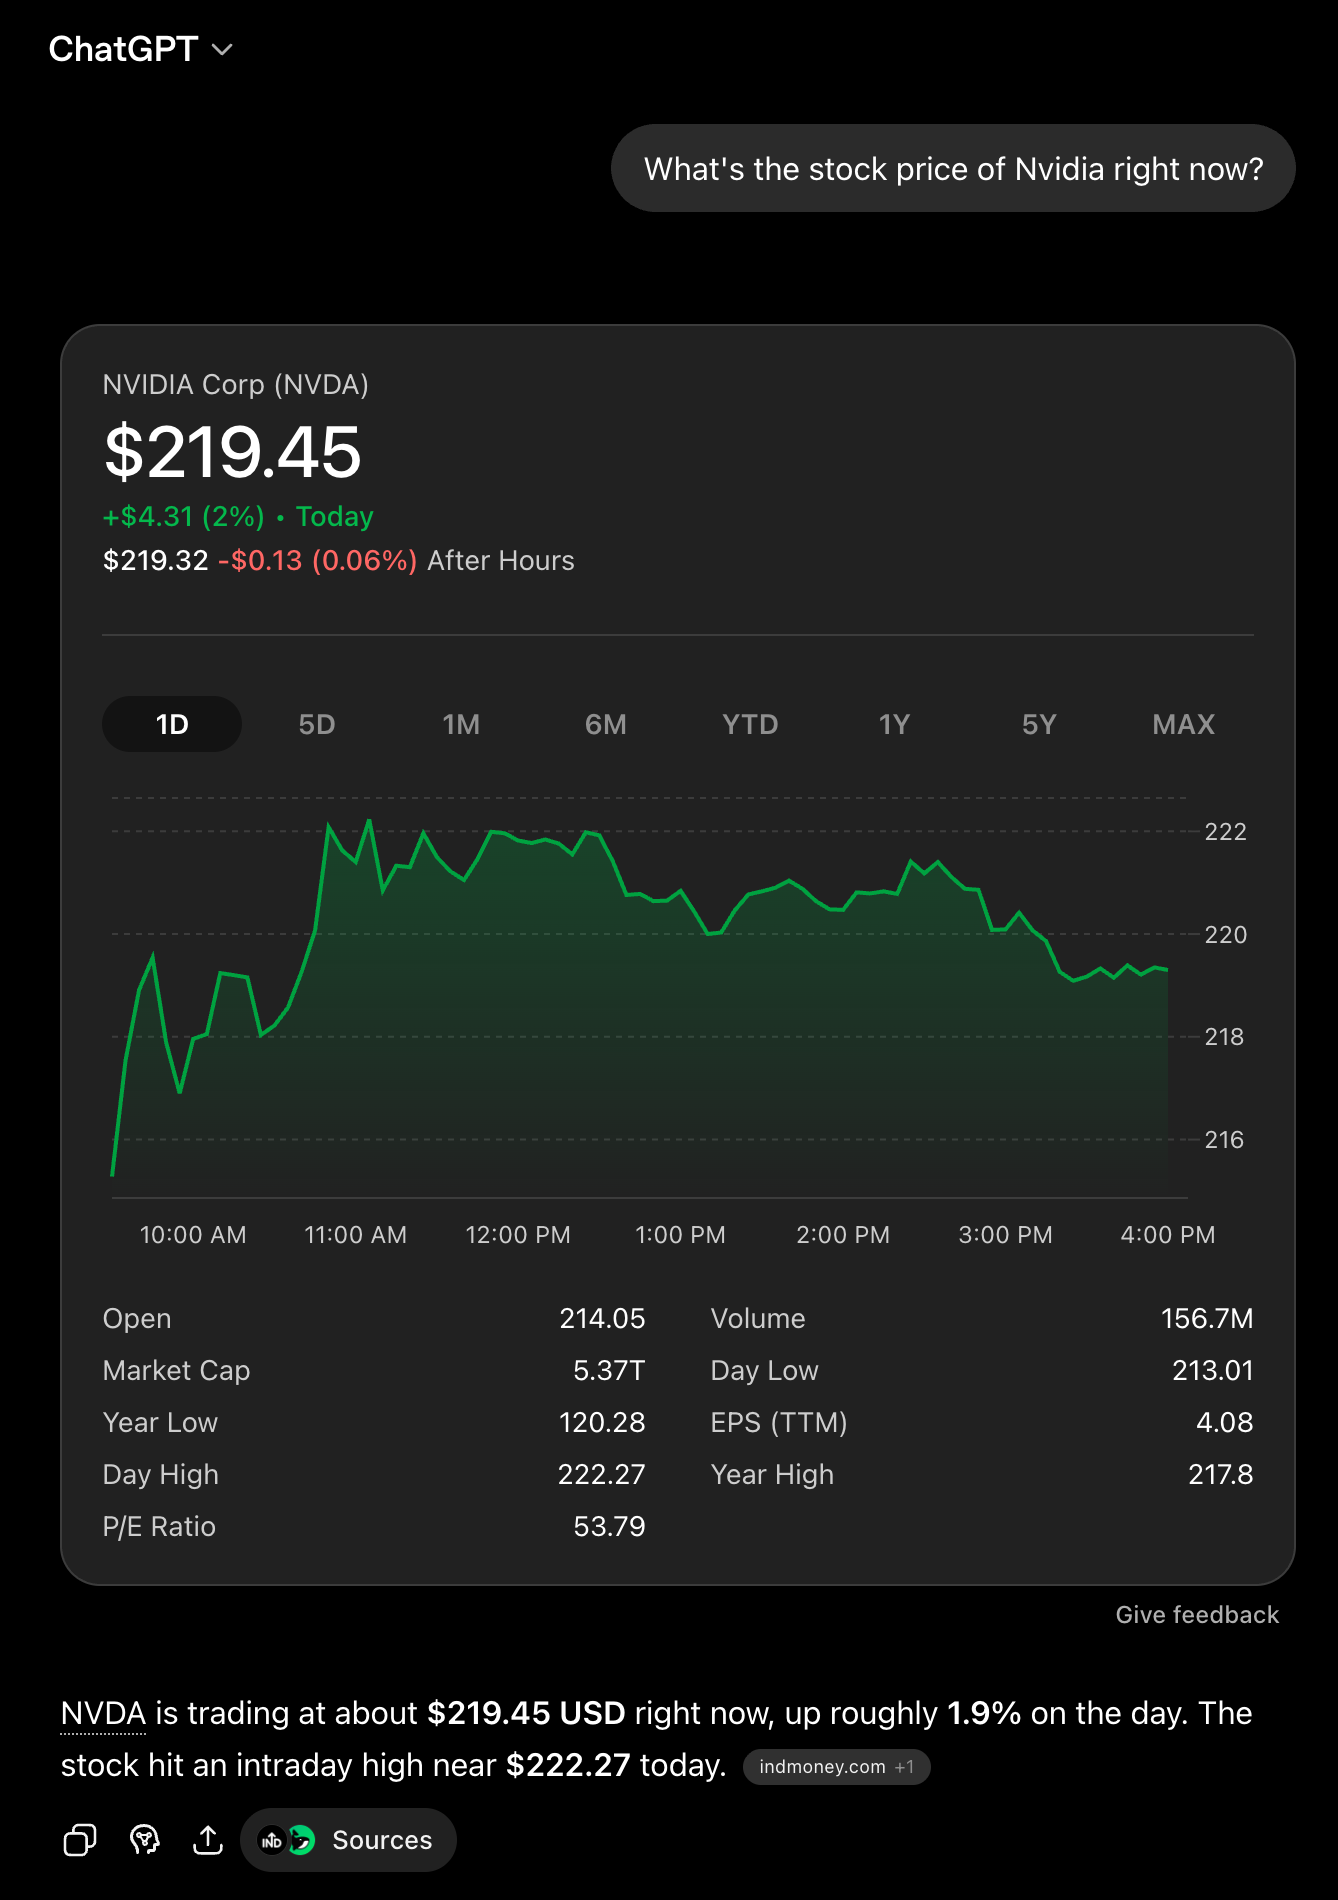
Cloud chat products hide this from most users. ChatGPT, Claude, and Gemini ship the model wrapped in a product, and that product includes a built-in search tool. When you ask ChatGPT, "What's the stock price of Nvidia right now?" the model doesn't answer on its own; the product called a search tool, fed the result back to the model, and the model wrote the up-to-date reply.
The moment you skip that product and run a model locally, none of it is wired up. You get the model on its own; no tools, no search, no real-time data. The fix is what the big AI labs already do under the hood. Give the model a tool and let it decide when to call it.
The tool, in our case, is a web search API; one API call returns structured search results instead of raw HTML. We'll use SerpApi, which returns clean JSON across Google Search, Finance, News, Maps, Flights, and 100+ other search engines.
Run a Local Model with LM Studio
There are different ways to use LLMs locally, but in this guide, we're going to use LM Studio. This is a desktop app for downloading and running open-weight models on your own hardware. It matters for this project for one reason; it exposes the model through OpenAI and Anthropic standards on localhost. You point the SDK you already use at that endpoint, and the same code that talks to GPT or Claude now talks to your local model.
Here's how to get a model running locally in a few minutes:
- Download and install LM Studio from lmstudio.ai.
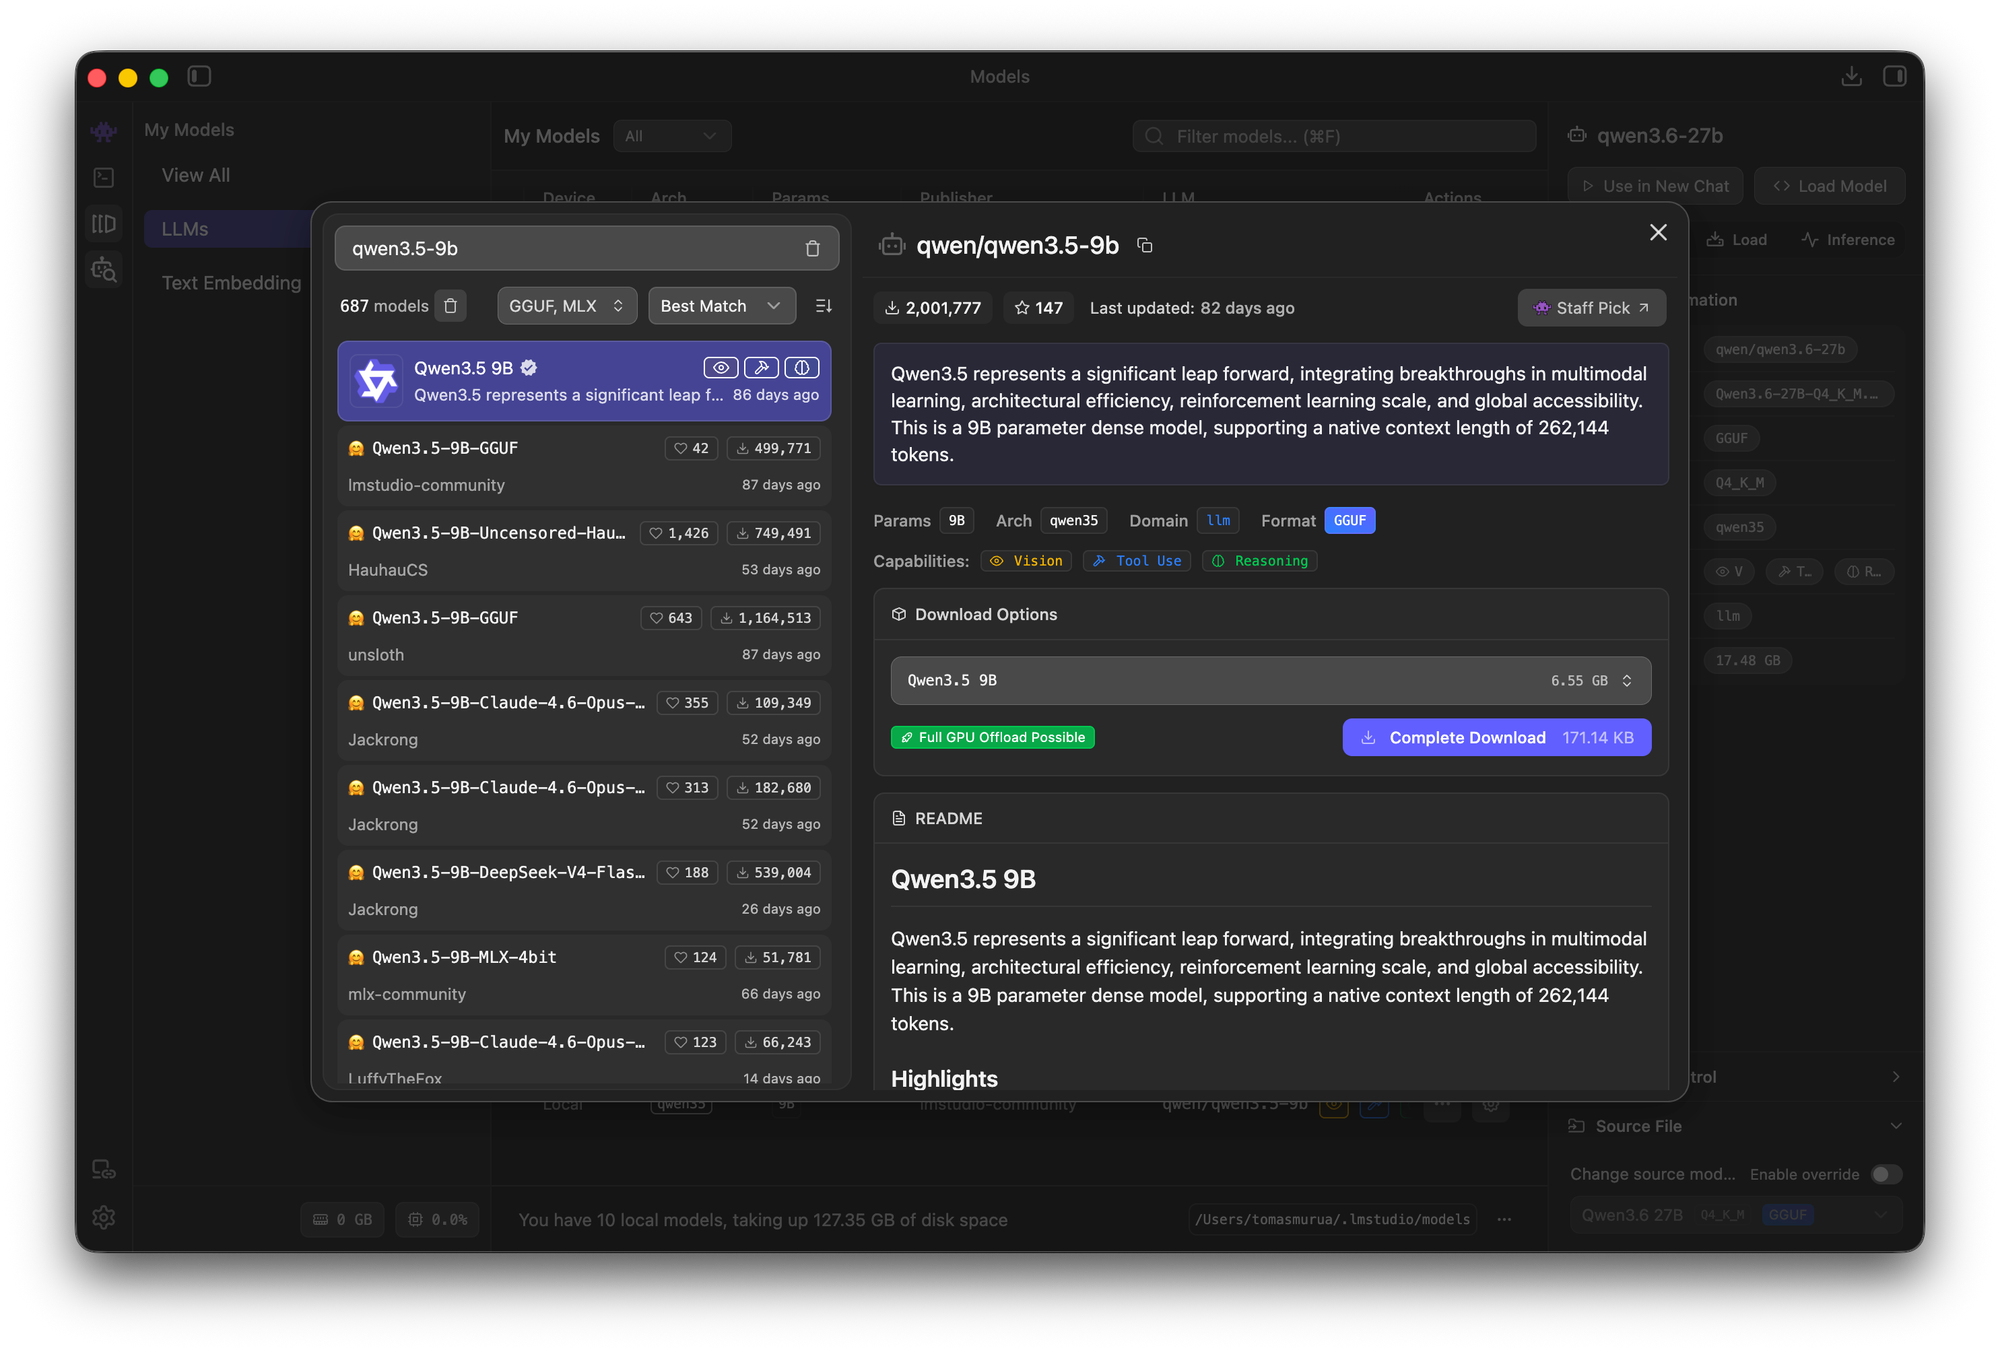
- Open the model browser and download a model with native tool calling. I'm using Qwen3.5-9B, which runs comfortably on an M4 Max with 36 GB of unified memory.
- Open the Developer tab, load the model, and click Start Server.
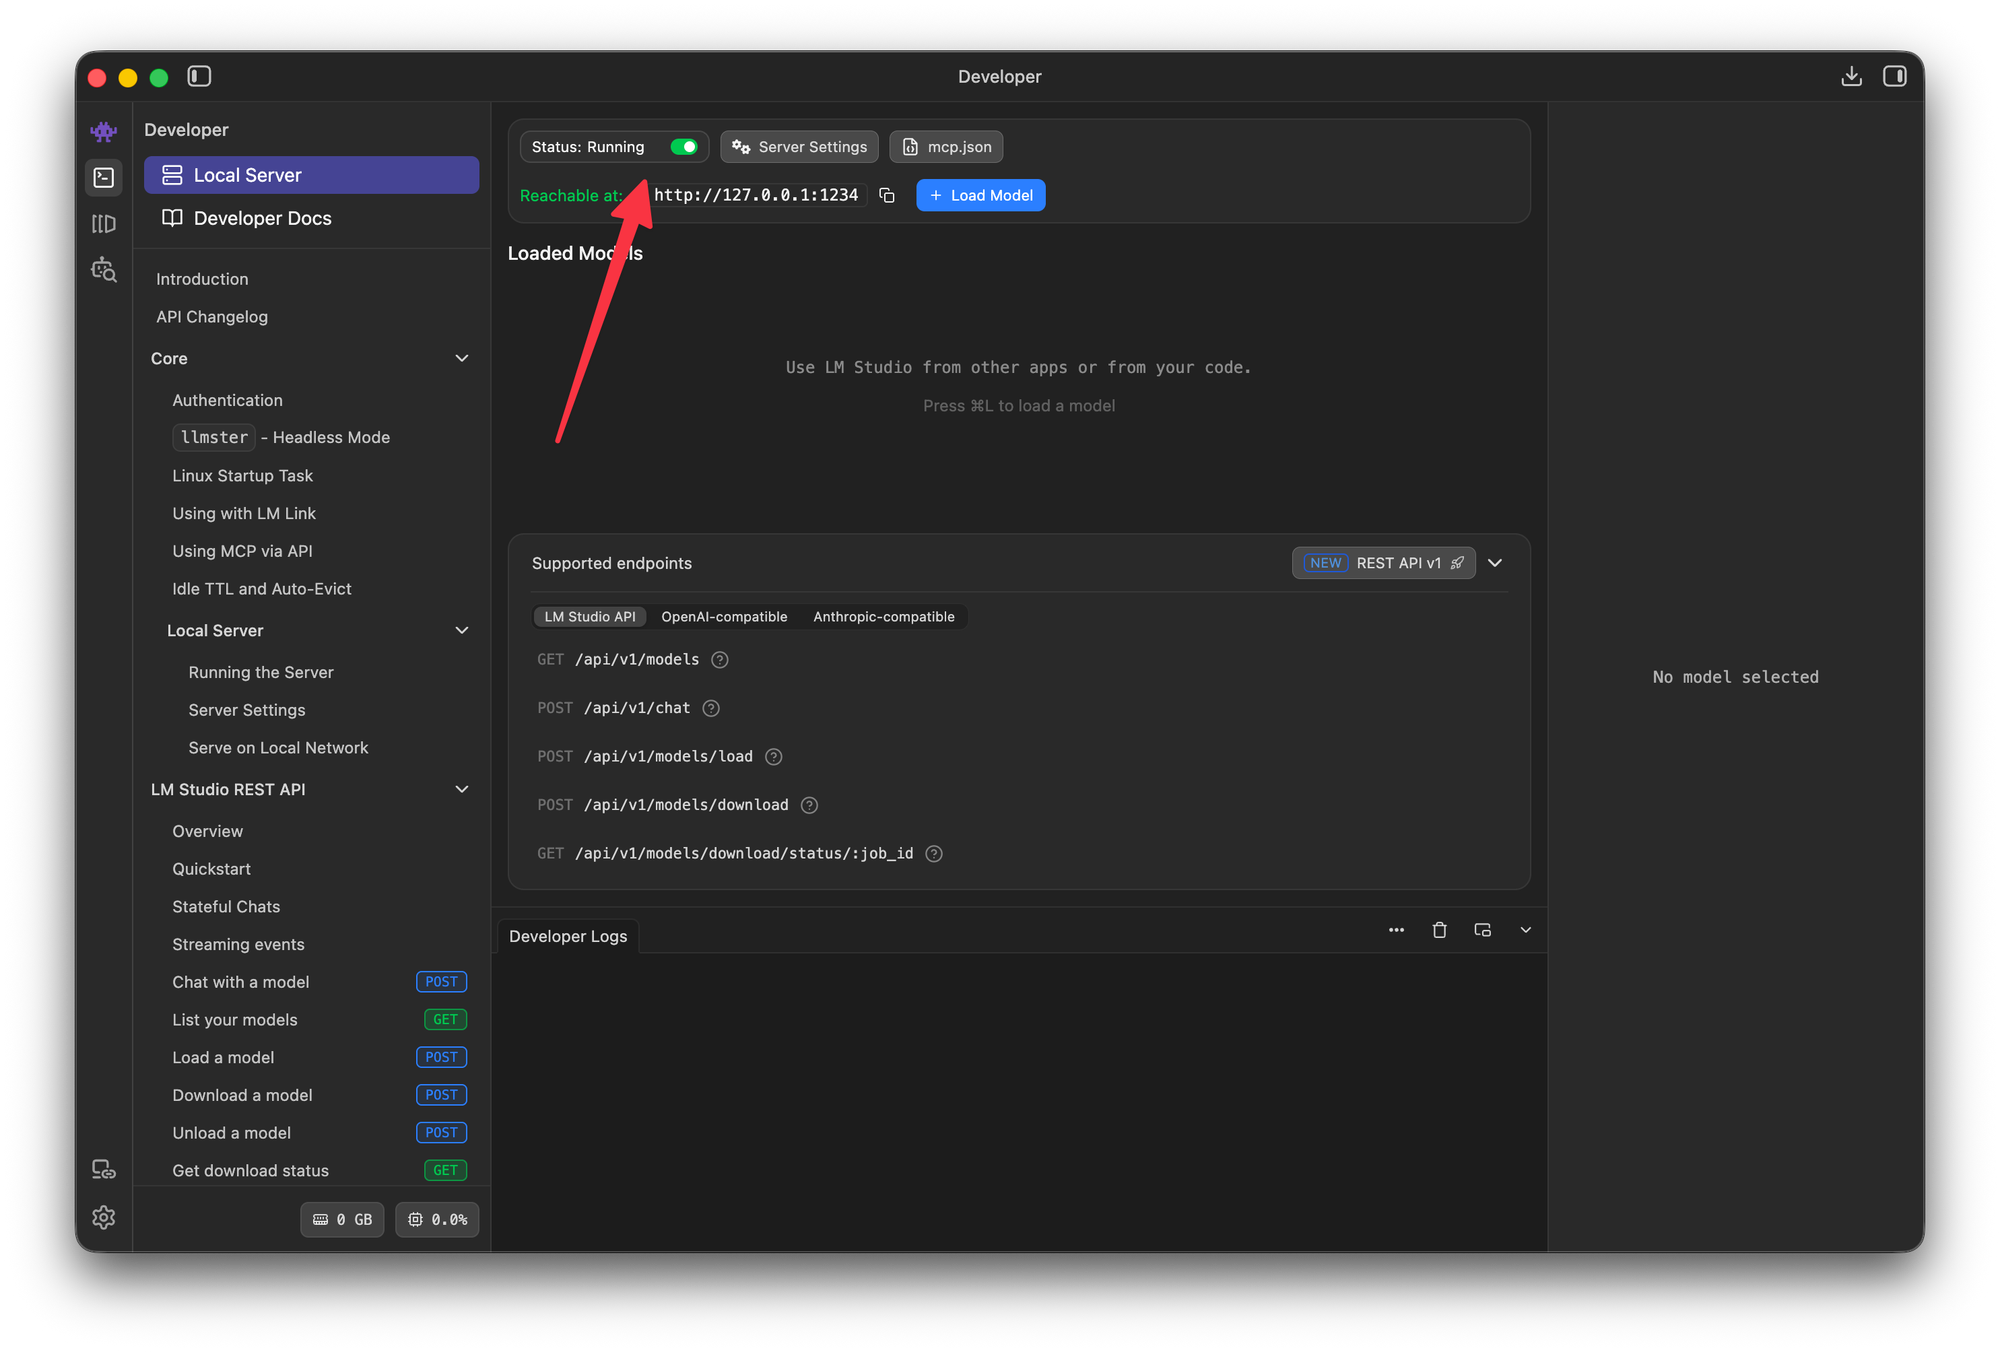
- LM Studio now serves an OpenAI-compatible endpoint at
http://localhost:1234/v1.
The server has to stay running for the rest of this guide; that local endpoint is what our code talks to. It is not necessary to pre-load the model because the app requests it on demand, so LM Studio loads it only when a call actually comes in.
If you're not sure what your hardware can handle, LM Studio's model search flags the best match for your hardware and warns you when a model is too large to run. I chose Qwen3.5-9B because it offered a good balance between speed and the quality of its responses.
Build the Chat App
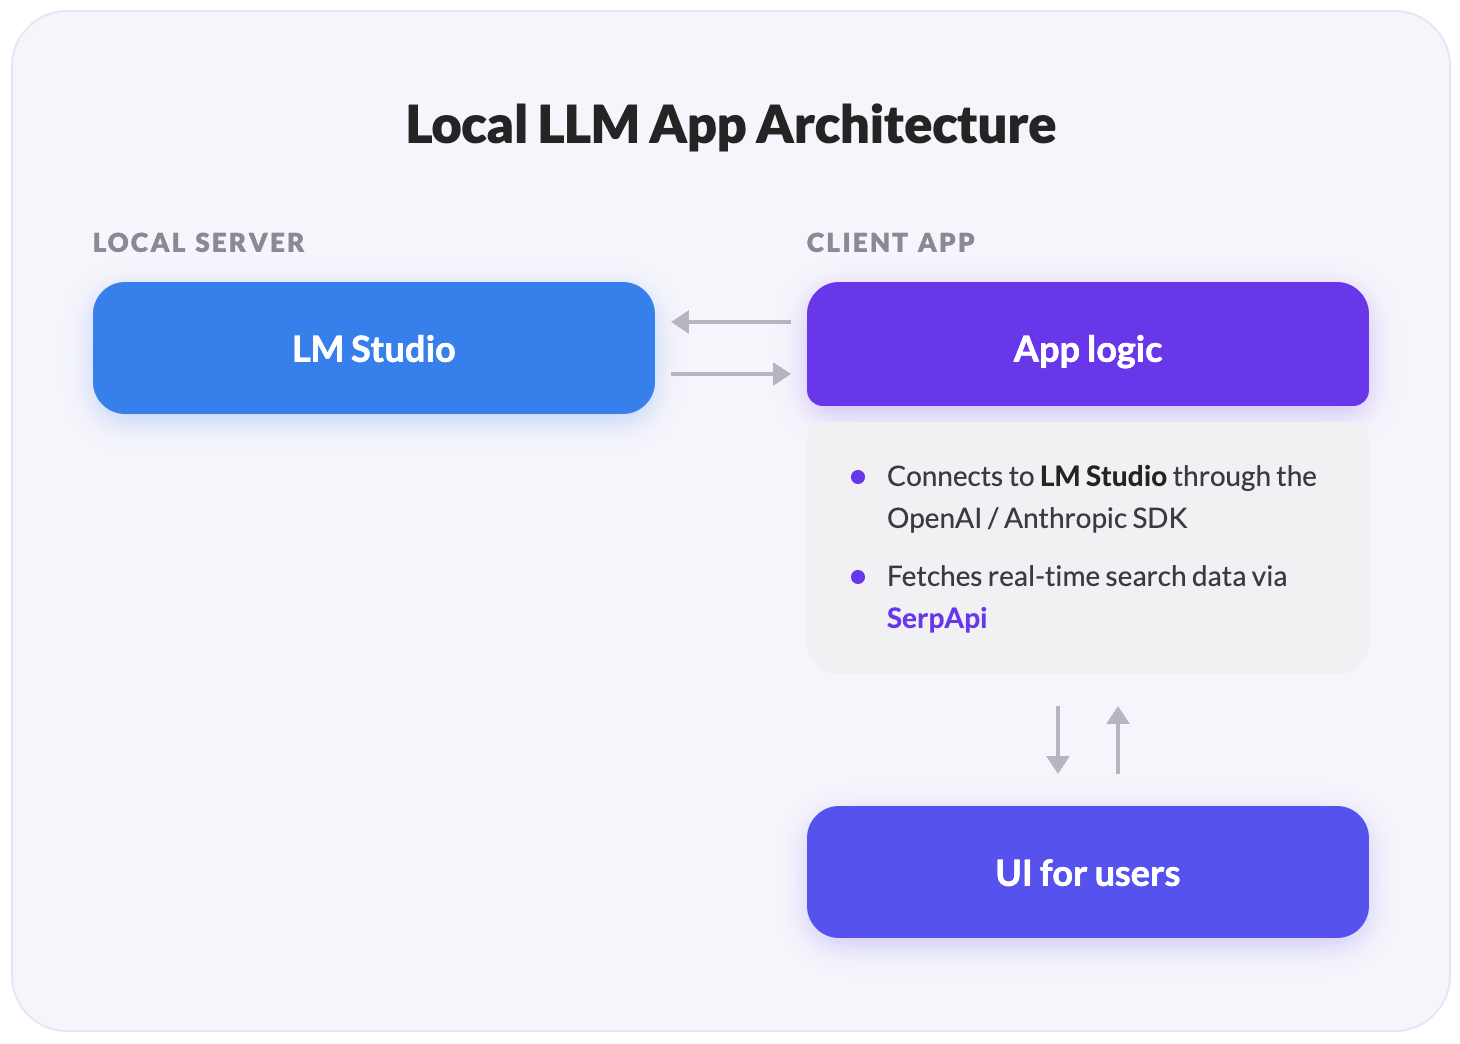
We'll build a chat app that wraps a local model in the same tool-calling loop that the cloud products use. The loop is the back-and-forth between the model and your code: the model asks for a search, your code runs it, and the model writes the answer.
The full project is a TypeScript app you can clone from:
Currently, it supports five SerpApi engines (Search, Finance, News, Maps, and Flights), and you can add more. The architecture has three moving parts:
The third part is the one most tutorials skip, and it's the one that makes a local setup actually work: a search response is far too big to fit in a model with a small context window. We'll fix that with a single SerpApi parameter called JSON Restrictor.
Set Up the Project
Clone the repo, install dependencies, and grab an API key from your SerpApi dashboard:
git clone https://github.com/serpapi/local-llm-web-search.git
cd local-llm-web-search
bun install
echo "SERPAPI_API_KEY=your_key_here" > .env
Make sure that the server is running in LM Studio, then start the app.
bun devWith the local server running and the key in place, you're ready to walk through how the loop works.
How the Loop Works
The pattern is the one OpenAI documents for function calling and Anthropic documents for tool use. Five steps, in order. The code below is lifted from the app's agent.ts and restrictors.ts, trimmed to the essentials.
Step 1. Declare the Tools to the Model
You hand the model a list of tools it can call. Each tool has a name, a description, and a JSON Schema for its parameters. Here is an example of declaring SerpApi as the web search tool the model can reach for:
import OpenAI from "openai"

const TOOLS: OpenAI.Chat.Completions.ChatCompletionTool[] = [
  {
    type: "function",
    function: {
      name: "google_search",
      description:
        "Search Google for current web results. Use for news, facts, or anything time-sensitive.",
      parameters: {
        type: "object",
        properties: {
          query: { type: "string", description: "What to search for" },
          gl: { type: "string", description: "Two-letter country code, e.g. 'us'" },
          hl: { type: "string", description: "Two-letter language code, e.g. 'en'" },
        },
        required: ["query"],
      },
    },
  },
  {
    type: "function",
    function: {
      name: "google_flights_search",
      description: "Find flight options between two airports for a given date.",
      parameters: {
        type: "object",
        properties: {
          departure_id: { type: "string", description: "IATA code, e.g. 'JFK'" },
          arrival_id: { type: "string", description: "IATA code, e.g. 'LAX'" },
          outbound_date: { type: "string", description: "YYYY-MM-DD" },
          return_date: { type: "string", description: "YYYY-MM-DD, round-trip" },
        },
        required: ["departure_id", "arrival_id", "outbound_date"],
      },
    },
  },
  // ...one entry per SerpApi engine you want to support
]
A few things worth noting:
- The descriptions matter more than they look; the model picks tools by reading them, so write each one like documentation for a developer who has never seen your code before.
- Each tool name maps to one SerpApi engine. The app supports
google_search,google_finance_search,google_news_search,google_maps_search, andgoogle_flights_search. - These definitions go to the model on every request, so keep them lean. They count against the same context window budget as everything else.
Step 2. Ask the Model What It Needs
You send the user's prompt to the model along with the tools list. The model returns one of two things:
- A direct answer when it already knows
- Tools calls when it needs the web data
Point the OpenAI client at the LM Studio server you started earlier:
const client = new OpenAI({
  baseURL: "http://localhost:1234/v1", // LM Studio's OpenAI-compatible endpoint
  apiKey: "lm-studio",                 // any non-empty string works locally
})

const messages: OpenAI.Chat.Completions.ChatCompletionMessageParam[] = [
  { role: "system", content: "You are an assistant with access to web-search tools." },
  { role: "user", content: userPrompt },
]

const first = await client.chat.completions.create({
  model,
  messages,
  tools: TOOLS,
  tool_choice: "auto",
  temperature: 0.1,
})
A few things worth noting:
- The LM Studio server must be running in the background for this call to connect; the model itself loads on demand when the request arrives. If you get a connection refused error, that's the first thing to check.
tool_choice: "auto"lets the model decide between answering directly and calling tools. A low temperature (0.1) keeps tool selection deterministic; we'll raise it for the second call when the model writes the answer.- If
first.choices[0].message.tool_callsis non-empty, the model wants the web, and you have work to do. - Before this call, the app trims the conversation history with a sliding window, dropping the oldest turns so a long chat doesn't overflow the budget.
json_restrictorkeeps each response small; the window keeps the cumulative history small.
Step 3. Run the Tool Calls
For each tool call, validate the arguments and run the matching SerpApi engine. The model can pick more than one tool in the same turn. For example, "Compare Apple and Tesla stock" is going to trigger two finance lookups, so run them concurrently:
const toolCalls = first.choices[0].message.tool_calls ?? []

const results = await Promise.all(
  toolCalls.map(async (call) => {
    const args = validate(call.function.name, JSON.parse(call.function.arguments))
    const data = await executeTool(call.function.name, args)
    return { call_id: call.id, data }
  }),
)
A few things worth noting:
validateruns the arguments through a Zod schema before any network call. Smaller models occasionally emit malformed JSON inarguments, and the check catches it before you spend a SerpApi search on garbage input.executeToolis where the response gets trimmed. That's the next step, and it's the part that makes the whole thing viable on a local model.
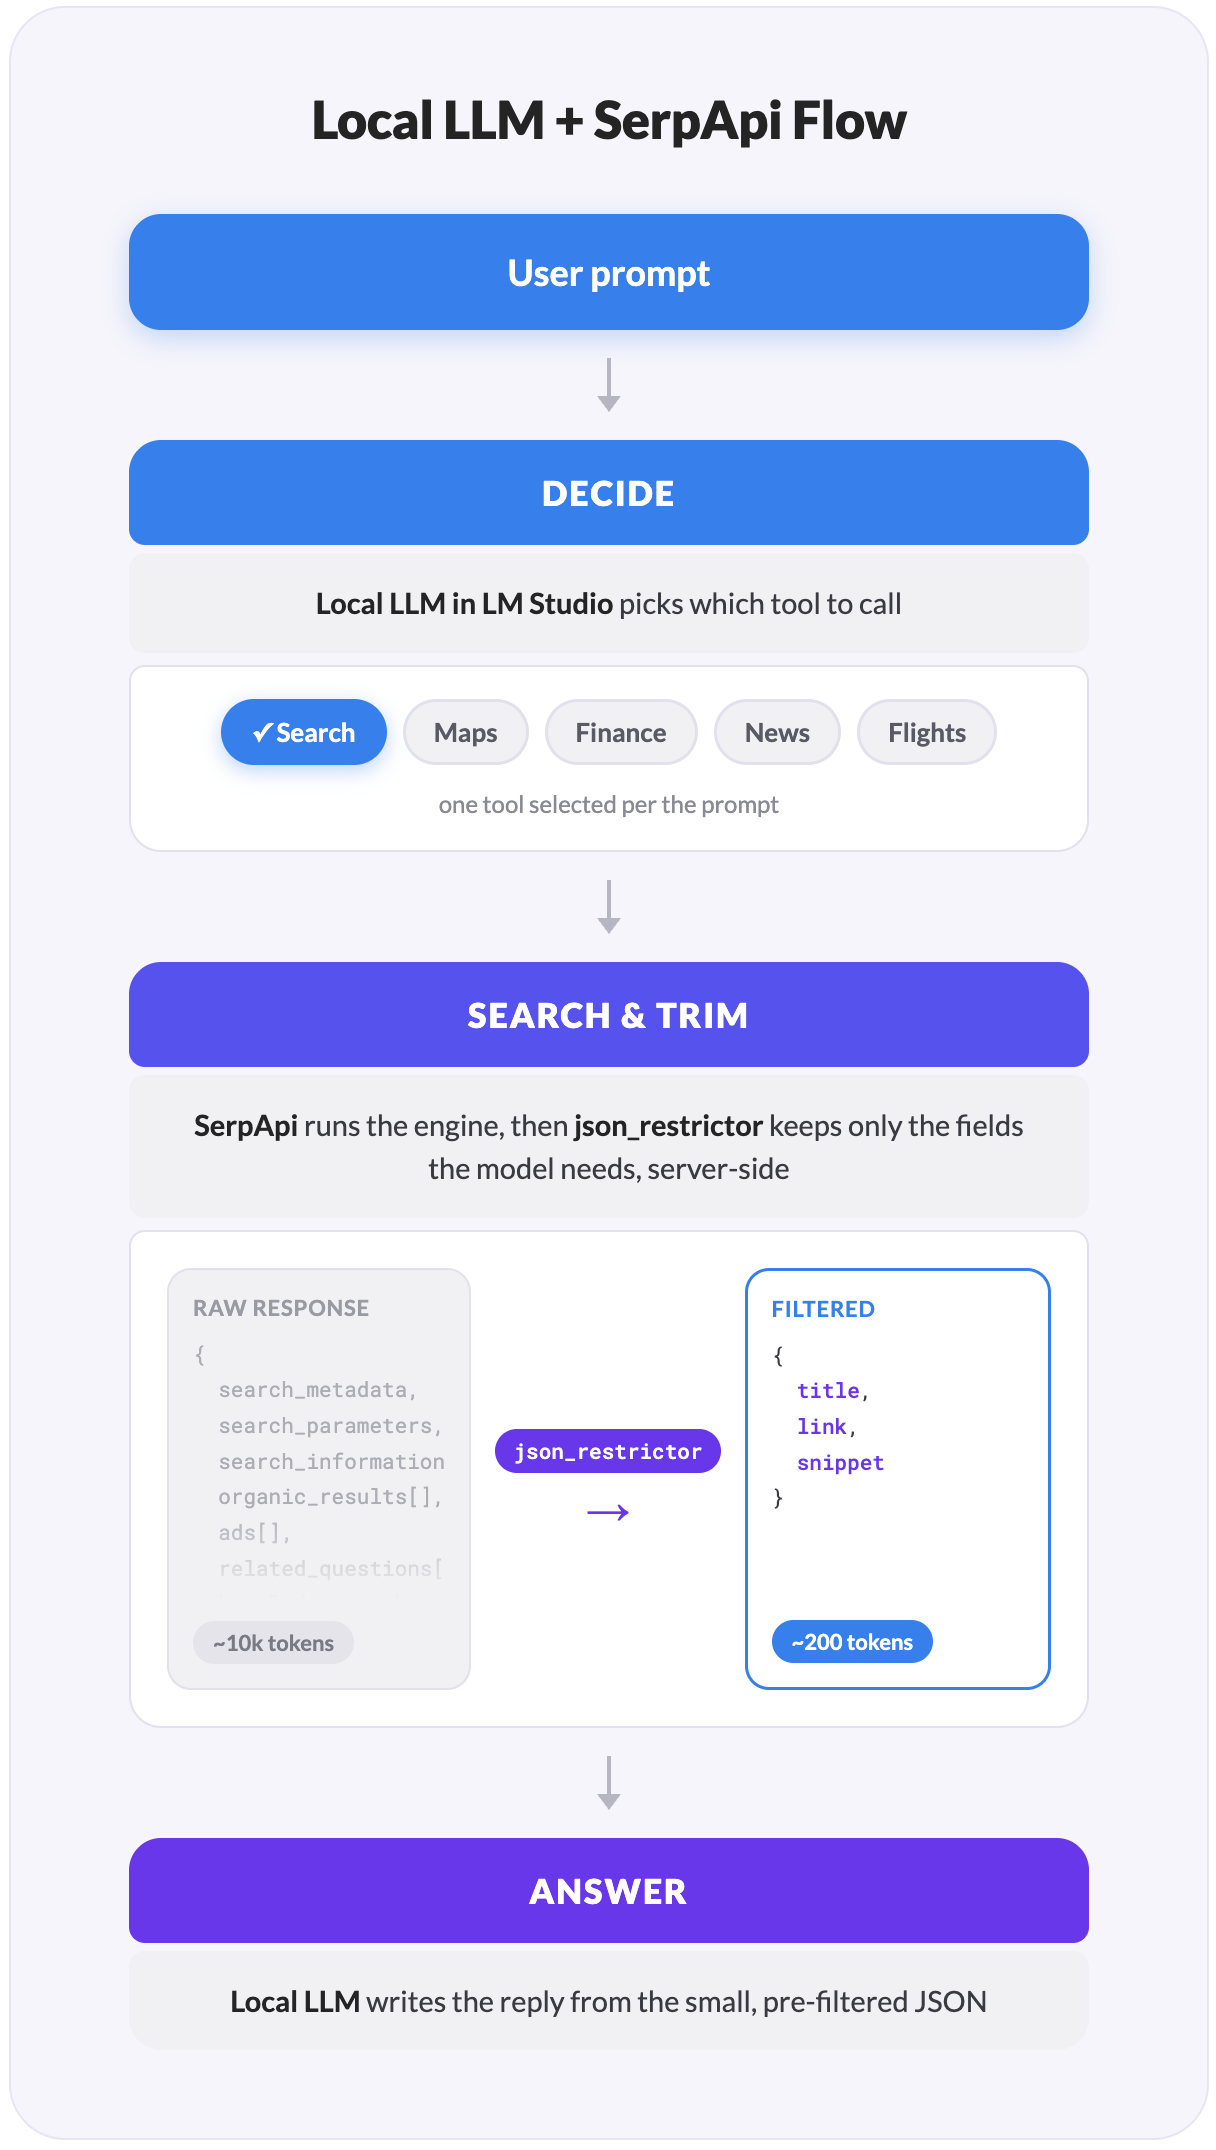
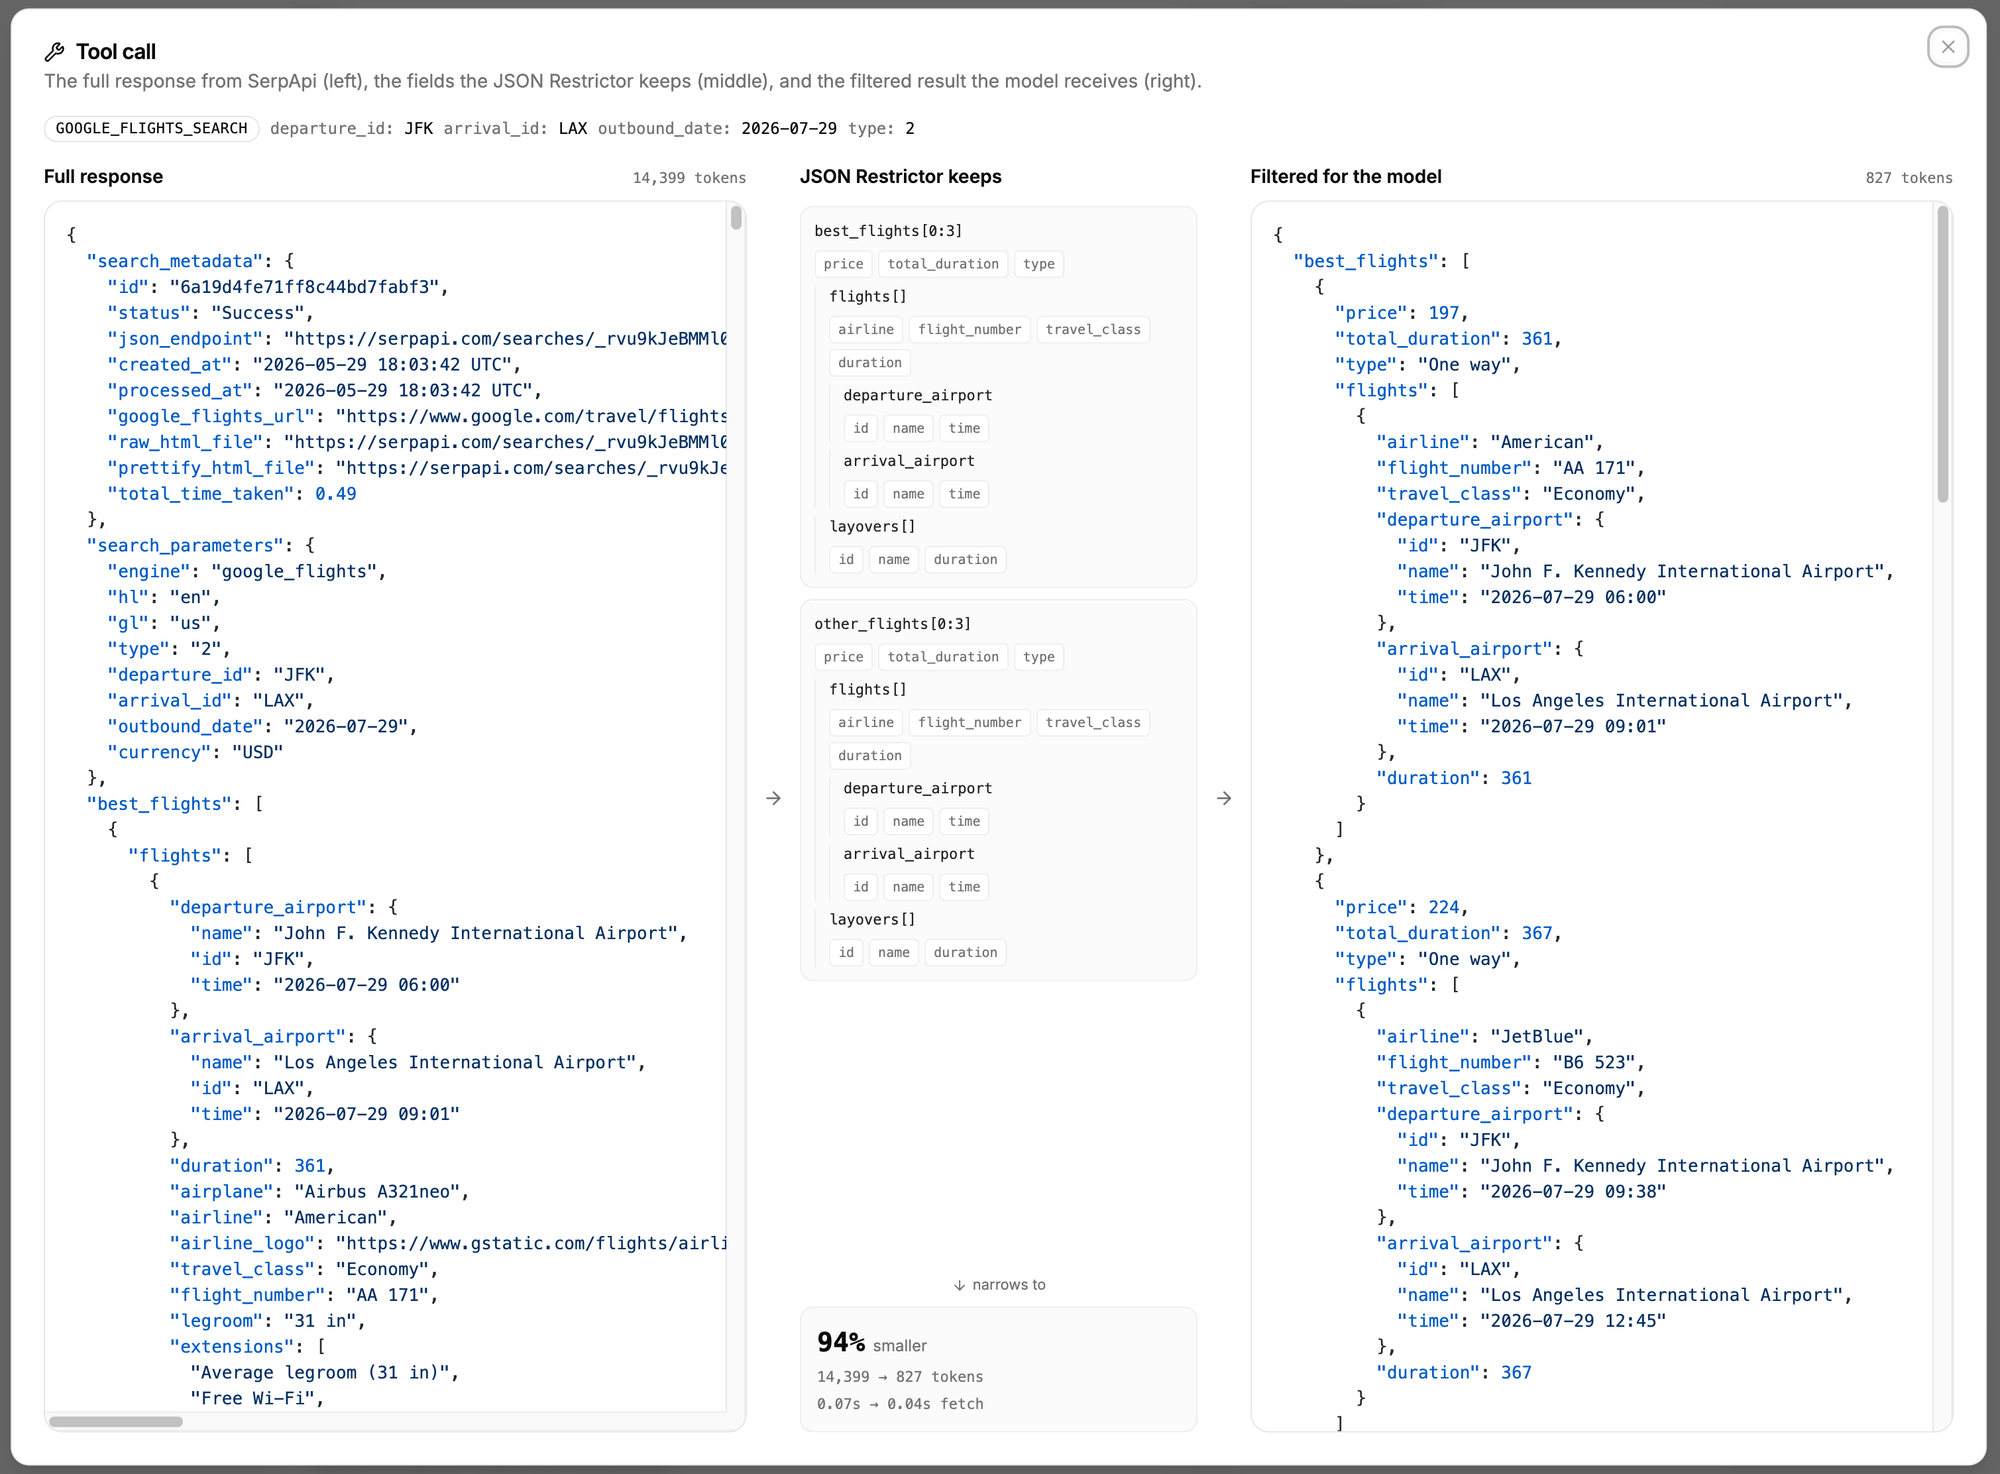
Step 4. Trim the Response with the JSON Restrictor
SerpApi returns everything an engine knows. A single Google Flights response can return over 14,000 tokens once airport metadata, every price tier, layover details, carbon estimates, and baggage policies come along. A Google Finance response can top 46,000 tokens. A Qwen3.5-9B running with a 32K context window can't carry that, especially once you add the system prompt, the conversation history, and the tool definitions themselves.
SerpApi solves this for you with the JSON Restrictor parameter. You pass a field-selector string with the request, and SerpApi filters the response on its servers before sending it back. The trimming happens before the data crosses the network, so the giant payload never reaches your machine at all. Applying it is one line:
import { getJson } from "serpapi"

// Run a tool's SerpApi call with its server-side restrictor applied.
function executeTool(name: RestrictorTool, args: ToolArgs): Promise<SerpApiJson> {
  return getJson({ ...toolParams(name, args), json_restrictor: RESTRICTORS[name] })
}
The restrictor strings live in their own file, one per engine. The syntax is jq-like: .field selects an object field, [] selects every array item, [0:5] takes a slice, and .{a, b} projects multiple fields at once:
export const RESTRICTORS: Record<RestrictorTool, string> = {
  google_search: [
    "answer_box.{answer,snippet,title}",
    "knowledge_graph.{title,type,description,source.{name,link}}",
    "organic_results[0:5].{title,link,displayed_link,snippet,date}",
  ].join(","),

  google_flights_search: [
    "best_flights[0:3].{price,total_duration,type,flights[].{airline,departure_airport.{id,time},arrival_airport.{id,time},duration},layovers[].{name,duration}}",
    "other_flights[0:3].{price,total_duration,type,flights[].{airline,departure_airport.{id,time},arrival_airport.{id,time},duration}}",
  ].join(","),

  // ...one restrictor per engine
}
A few things worth noting:
- Fields absent from a given response are silently skipped, so one restrictor can list every branch it might want (an
answer_boxfor factual queries, aknowledge_graphfor entities,organic_resultsas the fallback) without any conditional logic. json_restrictorworks on every SerpApi engine, so the pattern is the same whether you're filtering flights, finance, or maps.- No client-side formatting is needed; the response arrives already shaped for the model.
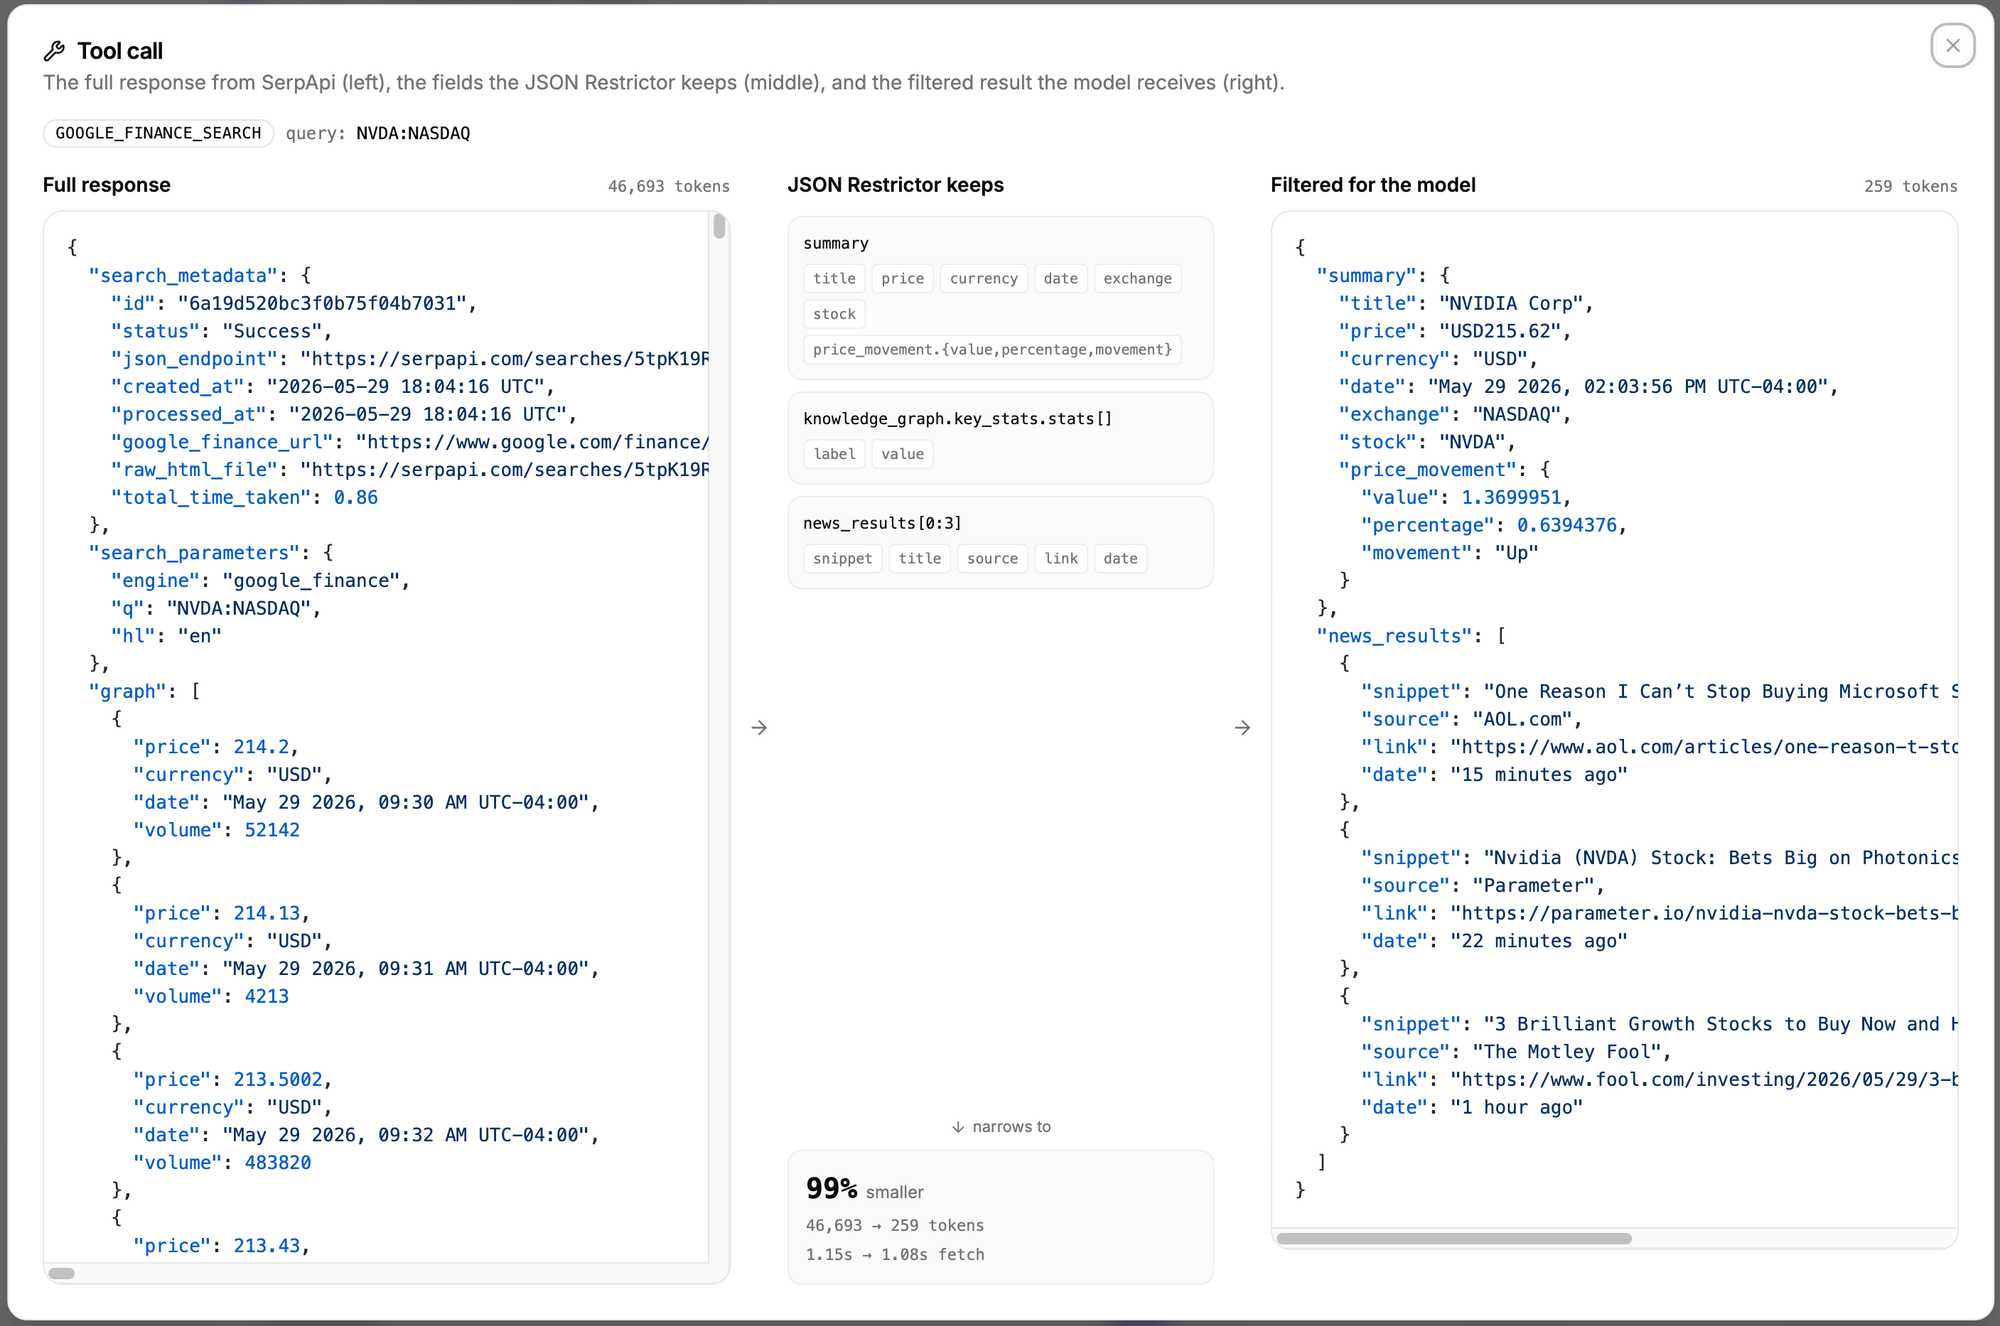
Here's an example of the before and after from the prompt "What's the current price of NVDA?":
The token reduction is the whole point. These are measured on real queries from the app's benchmark:
| Engine | Query | Raw tokens | Restricted tokens | Reduction |
|---|---|---|---|---|
| Google Search | Perplexity current CEO | 21,144 | 558 | 97% |
| Google Finance | NVDA:NASDAQ | 46,693 | 259 | 99% |
| Google News | EU AI Act | 27,121 | 671 | 98% |
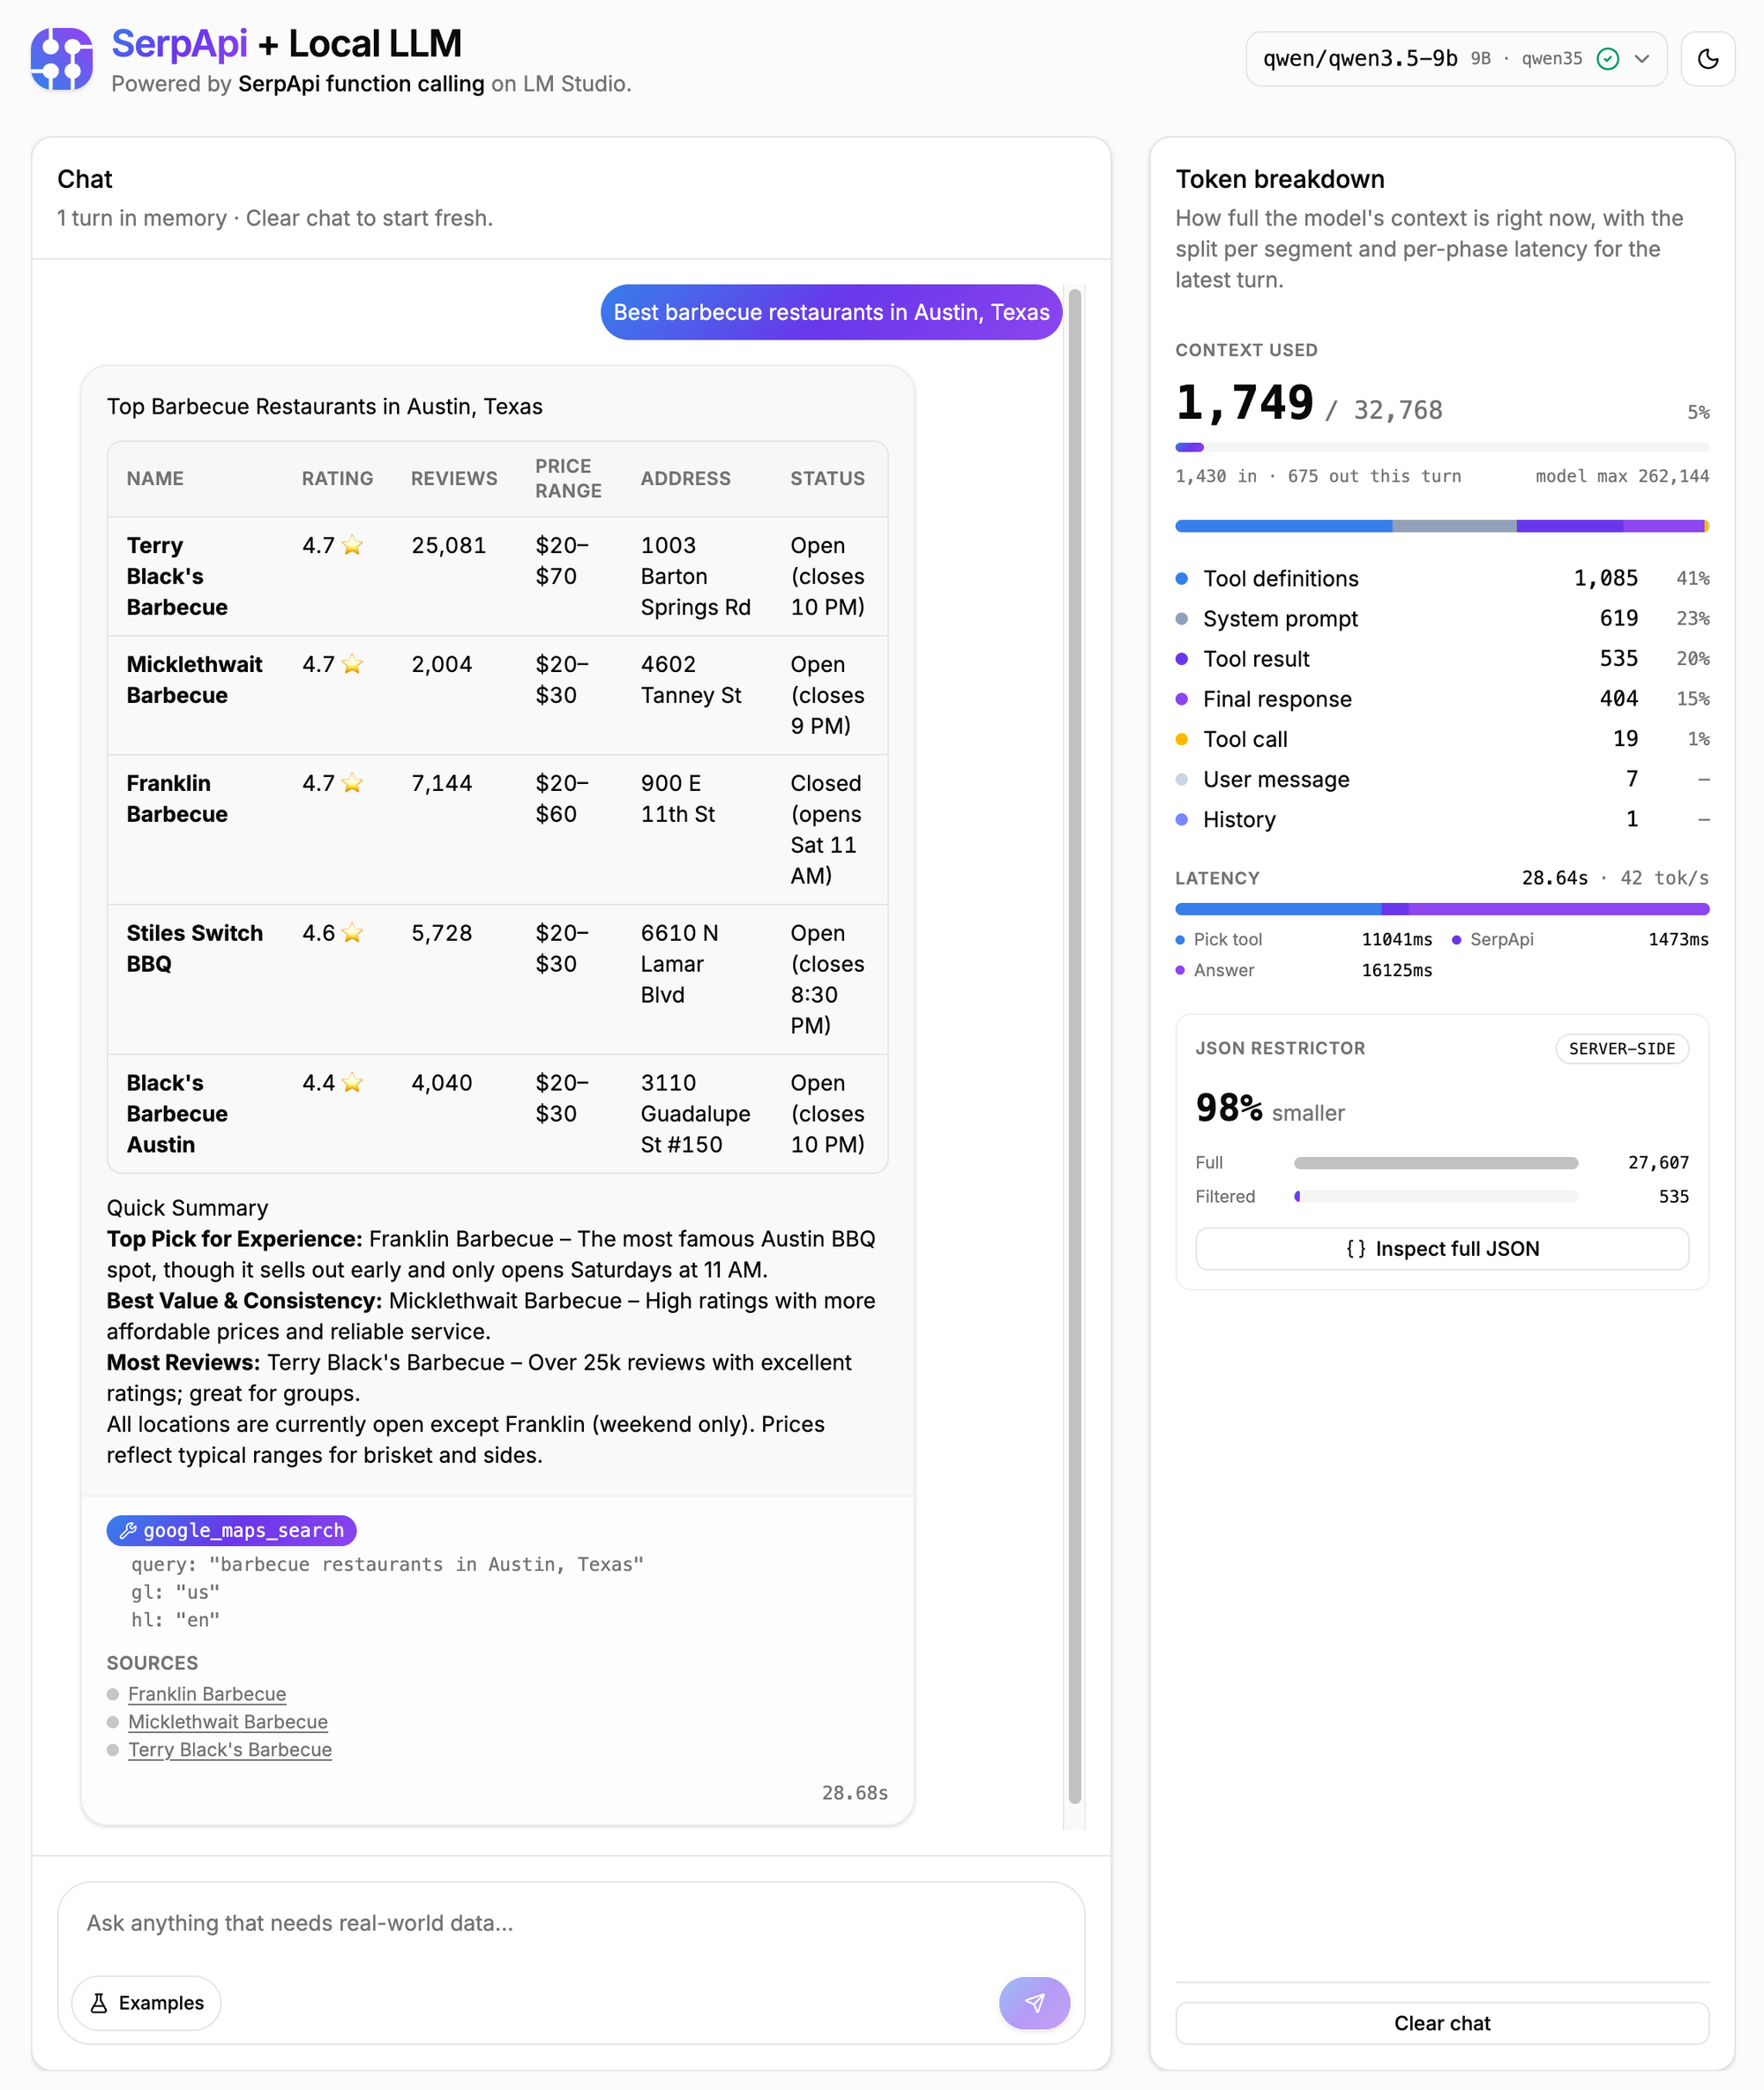
| Google Maps | BBQ restaurants in Austin, Texas | 26,111 | 535 | 98% |
| Google Flights | JFK to LAX | 14,399 | 827 | 94% |
Step 5. Send the Second Call and Get the Answer
Push the restricted results back into the conversation and send a second call. The model writes the final answer using the trimmed data:
messages.push(first.choices[0].message) // the assistant's tool_calls turn
for (const { call_id, data } of results) {
  messages.push({
    role: "tool",
    tool_call_id: call_id,
    content: JSON.stringify(data),
  })
}

const second = await client.chat.completions.create({
  model,
  messages,
  temperature: 0.3,
})

return second.choices[0].message.content
A few things worth noting:
- Send the assistant's original tool-call message before the
role: "tool"results, in that order. The model needs the call context to bind each result back to itstool_call_id. - Temperature climbs from 0.1 to 0.3 here; this is a prose-writing step, not a tool-selection step.
- Every tool result must be present before the model can answer. Miss one and the second call fails.
A Full Run: Flights from JFK to LAX
Here's the loop end-to-end with a single prompt:
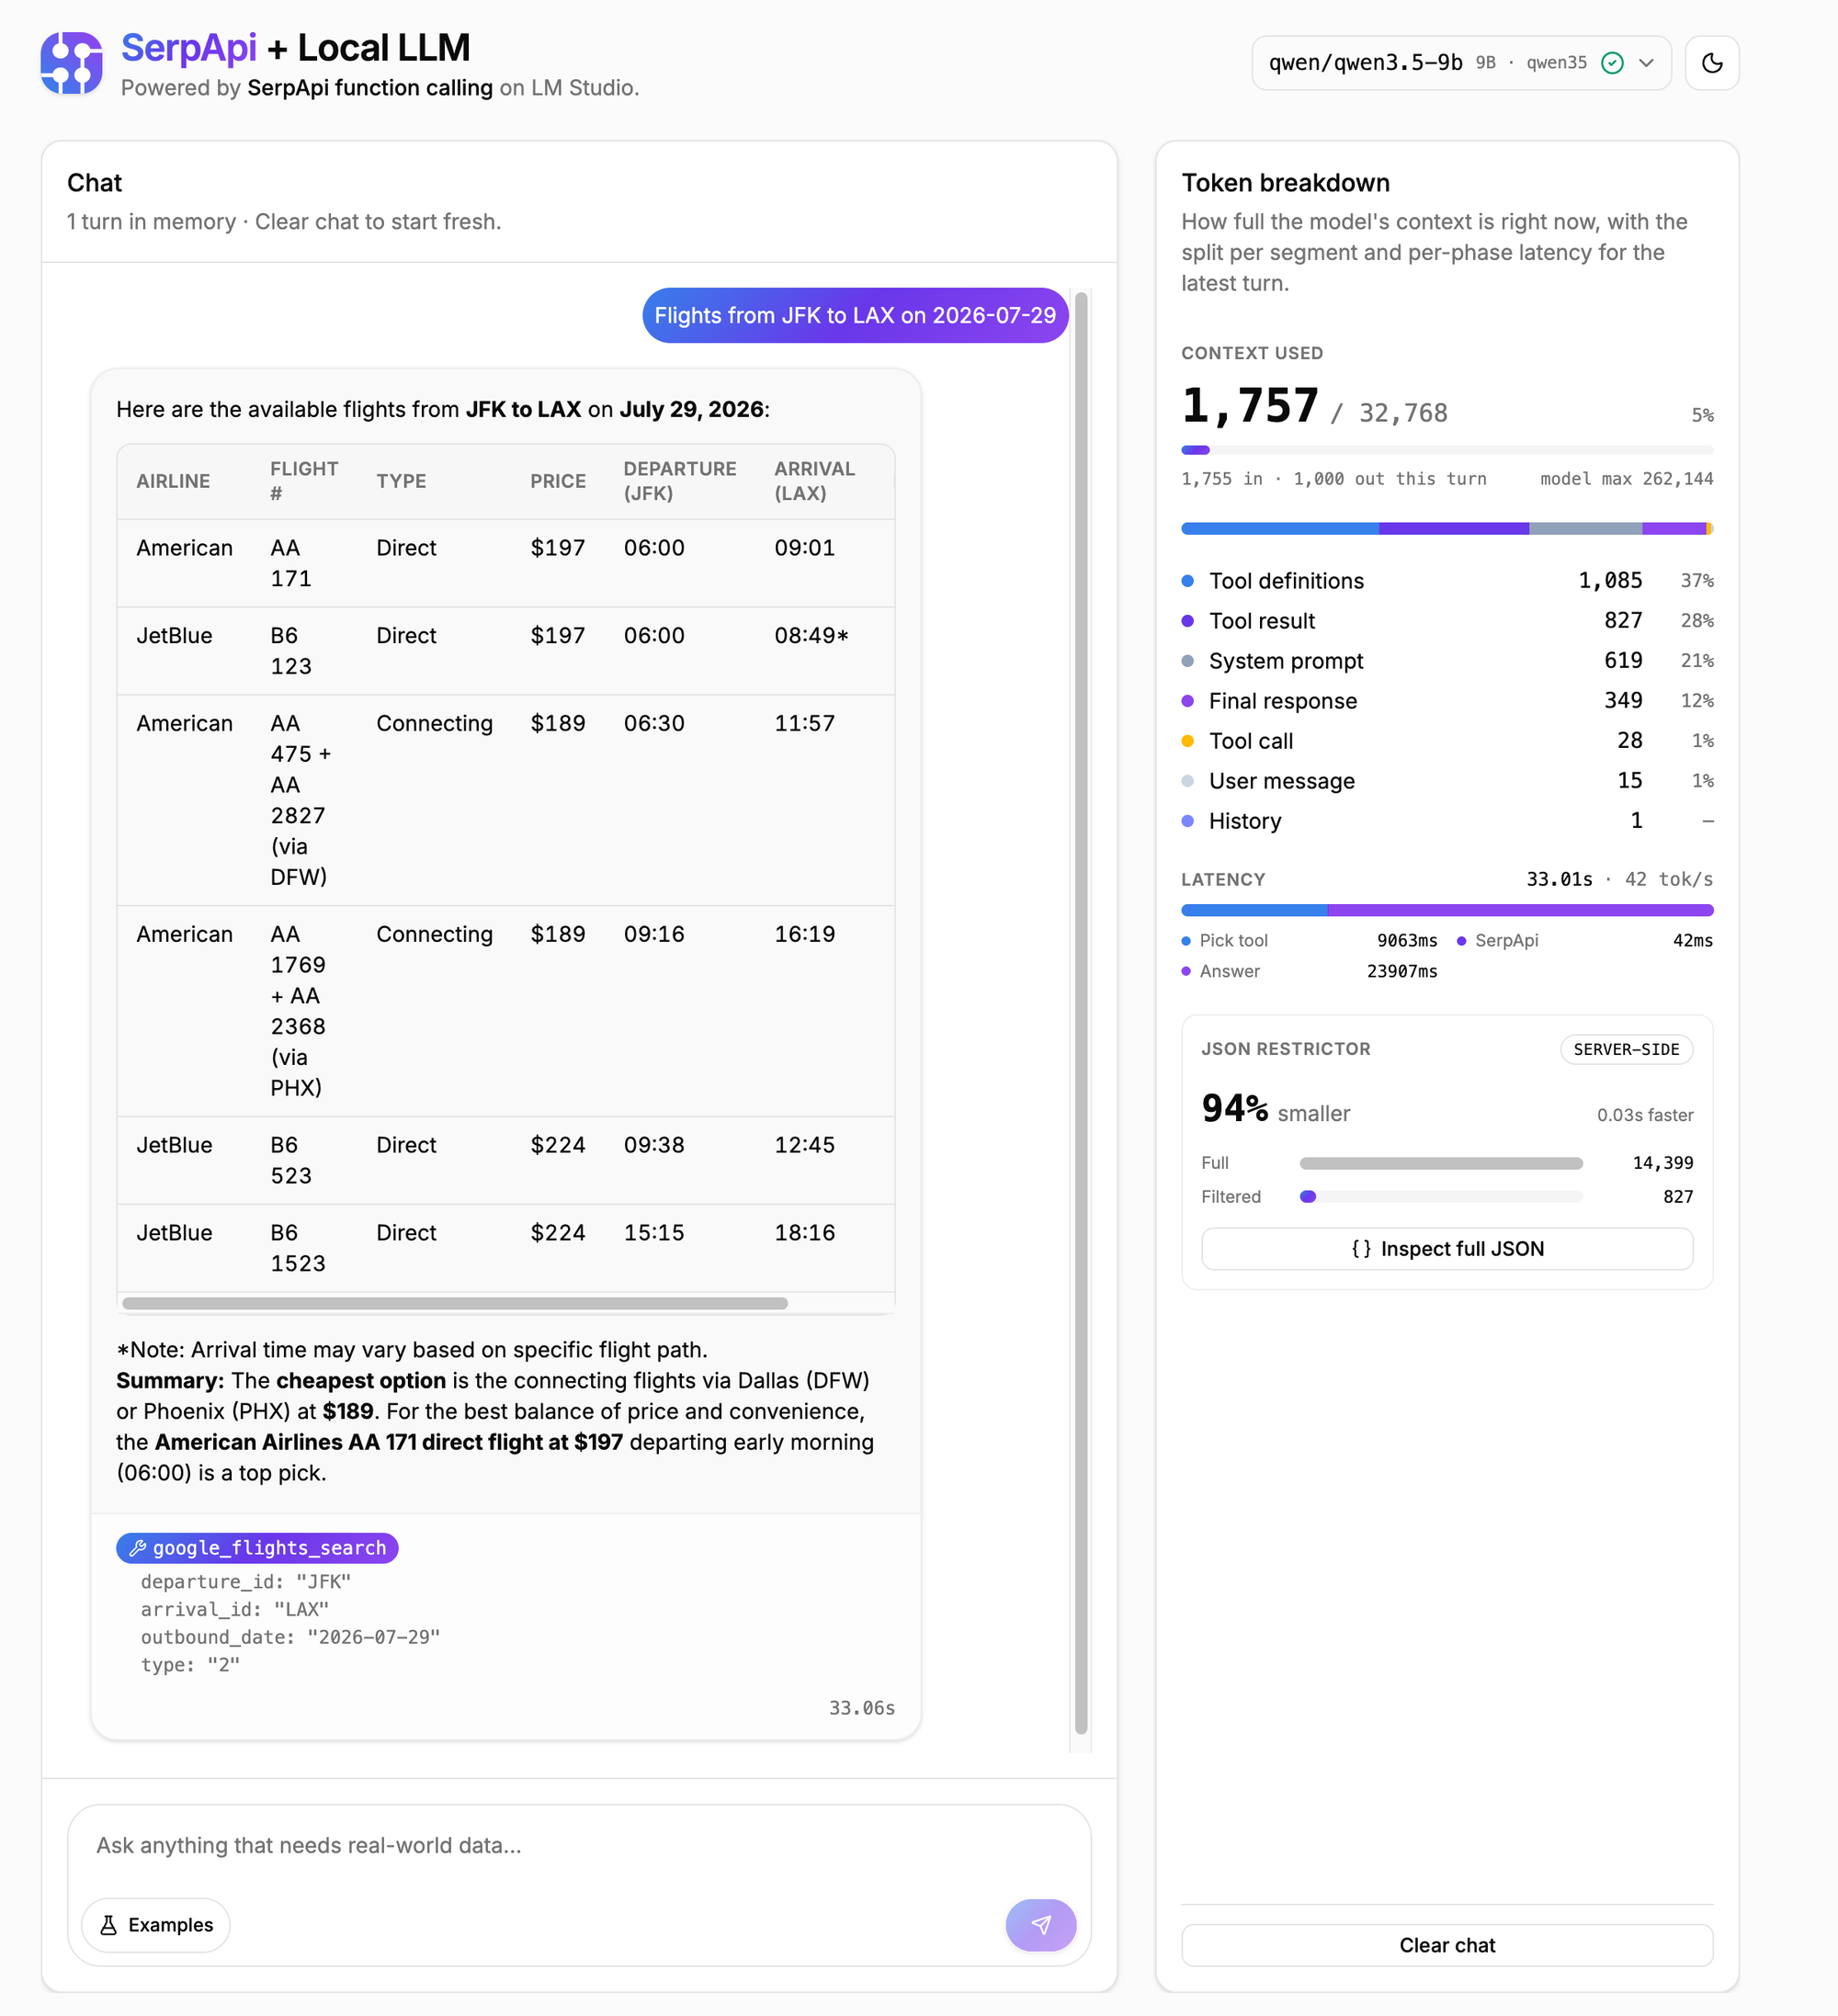
The model parses the question, picks google_flights_search, and emits one tool call with departure_id: "JFK", arrival_id: "LAX", and a date. The app validates the arguments, then calls SerpApi with the flights restrictor attached. SerpApi returns roughly 800 tokens of pre-filtered JSON instead of the 14,000+ it would otherwise send. The app pushes that into the message history and sends the second call.
The model writes a three-itinerary comparison with airline, price, schedule, duration, and stops. On an M4 Max running Qwen3.5-9B, the full turn (pick tool, fetch, write) lands in a handful of seconds, with the SerpApi call completing well inside the inference time.
One Catch: Open Models Sometimes Emit Tool Calls as Text
The OpenAI spec defines a structured tool_calls array on the model's response. Qwen3.5, gpt-oss, and several other open models will sometimes ignore the array and emit tool calls inline as <tool_call>...</tool_call> text inside message.content instead. Your code has to parse both shapes.
The fix is a fallback that runs whenever the structured array comes back empty:
function parseInlineToolCalls(content: string) {
  const calls = []
  for (const match of content.matchAll(/<tool_call>\s*([\s\S]*?)\s*<\/tool_call>/gi)) {
    try {
      calls.push(JSON.parse(match[1]))
    } catch {
      // skip malformed blocks rather than fail the whole turn
    }
  }
  return calls
}
A few things worth noting:
- Run the fallback only when the structured
tool_callsarray is empty. If both are empty, the model genuinely answered without a tool. - Swallow parse errors per block; one malformed tag shouldn't kill the turn.
- Synthesized calls need a
tool_call_id(any unique string works) so you can map results back when you push them into history.
Why Not Use The SerpApi MCP Server?
A reasonable question, since SerpApi also ships an MCP server. Both paths hit the same endpoints; the difference is who drives the loop.
The MCP server is the right transport when the user is the consumer (Claude Desktop, Cursor, or any MCP-compatible client) and the model has a large context window to spare. The client connects to the server and the model calls the tools through it; you don't write the loop yourself.
The direct API path in this guide is the right shape when you're building the agent yourself and your runtime has a tight context budget, which is exactly the case for a local model. You own the loop, so you decide what reaches the model per turn, and json_restrictor lets you make that decision per field. On a 32K context window, that control is the difference between an answer and an overflow.
Where to Go from Here
In this blog we connected a local model to live web data through a five-step loop: declare the tools, ask the model what it needs, run the searches, trim each response with json_restrictor, and send a second call for the answer. The restrictor is doing the quiet, heavy work; without it, a single flights query overflows the context window of a 9B model.
The same loop scales to any SerpApi engine. Add one tool definition and one restrictor string per engine, and the rest of the code stays exactly as it is. Clone the repo, point it at your own local model, and try swapping in an engine the app doesn't cover yet; the shape will already be familiar.
