 Ruby
Ruby
 Golang
 .Net
.Net
 MCP
MCP
 C++
C++

This is a part of the series of blog posts related to Artificial Intelligence Implementation. If you are interested in the background of the story or how it goes:
On the previous weeks we explored how to create your own image dataset using SerpApi's Google Images Scraper API automatically. This week, we'll use those images to automatically train a network using simple command object to be passed to FastAPI.
Custom CSV
We need to create a custom CSV file that has the images we need. We will be using pandas library for it. Here are the requirements:
## create.py
from pydantic import BaseModel
from typing import List
import pandas as pd
import os
We need to create a list of items we gathered from SerpApi's Google Image Scraper API, set the name of the csv document to be created, and define a fraction for the training data. What is meant by fraction here is simple. Test Data contains all the images we gathered, while training data will only take the fraction of it. For these, we need to create an object we can pass to an endpoint:
class ClassificationsArray(BaseModel):
  file_name: str
  classifications_array: List[str]
  train_data_fraction: float
Fraction mentioned here has a simple explanation. Test dataset will contain all the images, whereas the train dataset will only take a fraction of it. This is to test the model after we train it with the images we haven't trained it on, i.e. difference of the test dataset.
Now that we have defined the object responsible for our commands, let's define the CSVCreator Class:
class CSVCreator:
  def __init__(self, ClassificationsArray):
    self.classifications_array = ClassificationsArray.classifications_array
    self.file_name = ClassificationsArray.file_name
    self.rows = []
    self.train_data_fraction = ClassificationsArray.train_data_fraction

  def gather(self):
    for label in self.classifications_array:
      images = os.listdir("datasets/test/{}".format(label))
      for image in images:
        row = ["datasets/test/{}/{}".format(label, image), label]
        self.rows.append(row)

  def create(self):
    df = pd.DataFrame(self.rows, columns = ['path', 'label'])
    df.to_csv("datasets/csv/{}.csv".format(self.file_name), index=False)
    train_df = df.sample(frac = self.train_data_fraction)
    train_df.to_csv("datasets/csv/{}_train.csv".format(self.file_name), index=False)
It takes the list of arguments we gave, which are the queries we made to SerpApi's Google Images Scraper API, and creates a CSV out of each image in their corresponding folder. Once all images are done, it takes a fraction of the sample with shuffling, and creates a training CSV.
Let's define a function in the main.py to call such action:
## main.py
from create import CSVCreator, ClassificationsArray
These classes are necessary to call it in main.py
The function responsible for the action is:
@app.post("/create/")
def create_csv(arr: ClassificationsArray):
  csv = CSVCreator(arr)
  csv.gather()
  csv.create()
  return {"status": "Complete"}
To give a visual example, if you head to http://localhost:8000/docs and try out /create/ with the following parameters:
{
  "file_name": "apples_and_oranges",
  "classifications_array": [
    "Apple",
    "Orange"
  ],
  "train_data_fraction": 0.8
}
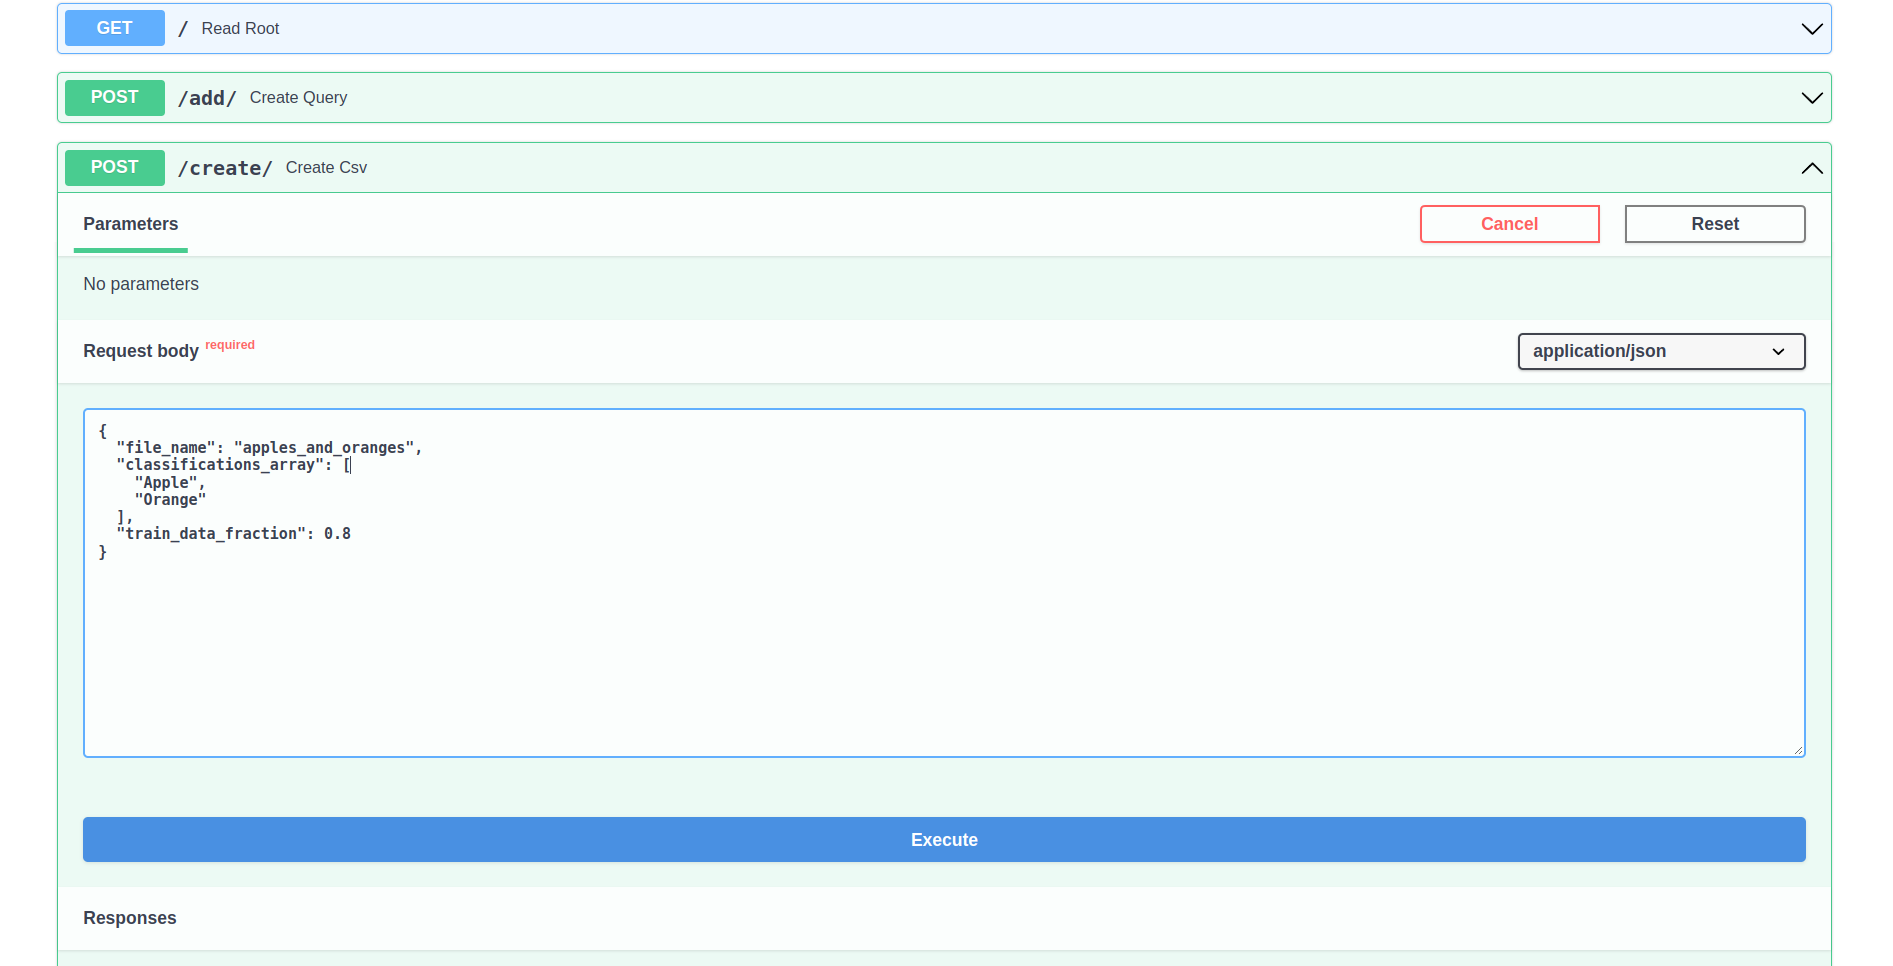
You will create two csv files in datasets/csv called apples_and_oranges.csv and apples_and_oranges_train.csv
apples_and_oranges.csv will be the test CSV, will be ordered, will have all the images, and will look like this:
| path | label |
|---|---|
| datasets/test/Apple/37.png | Apple |
| datasets/test/Apple/24.jpg | Apple |
| datasets/test/Apple/77.jpg | Apple |
| datasets/test/Apple/85.jpg | Apple |
| datasets/test/Apple/81.png | Apple |
| datasets/test/Apple/2.png | Apple |
| datasets/test/Apple/12.jpg | Apple |
| datasets/test/Apple/39.jpg | Apple |
| datasets/test/Apple/64.jpg | Apple |
| datasets/test/Apple/44.jpg | Apple |
apples_and_oranges_train.csv will be the train CSV, will be shuffled, will have 80% of the images, and will look like this:
| path | label |
|---|---|
| datasets/test/Apple/38.jpg | Apple |
| datasets/test/Orange/55.jpg | Orange |
| datasets/test/Orange/61.jpg | Orange |
| datasets/test/Apple/23.jpg | Apple |
| datasets/test/Orange/62.png | Orange |
| datasets/test/Orange/39.jpg | Orange |
| datasets/test/Apple/76.jpg | Apple |
| datasets/test/Apple/33.jpg | Apple |
These two will be used to create a Dataset item.
Custom Training Commands
We need an object to specify the training operation's details, and have shared usage among multiple classes to avoid circular imports:
## commands.py
from pydantic import BaseModel

class TrainCommands(BaseModel):
	model_name: str = "apples_and_oranges"
	criterion: str = "CrossEntropyLoss"
	annotations_file: str = "apples_and_oranges"
	optimizer: str = "SGD"
	lr: float = 0.001
	momentum: float = 0.9
	batch_size: int = 4
	n_epoch: int = 2
	n_labels: int = None
	image_height: int = 500
	image_width: int = 500
	transform: bool = True
	target_transform: bool = True
	shuffle: bool = True
Let's break down the items in this object:
| Key | Explanation |
|---|---|
model_name |
Output model name without extension |
| criterion | Criterion name for the training process |
| annotations_file | Training file without _train, and extension in it |
| optimizer | Optimizer name |
| lr | Learning rate of optimizer |
| momentum | Momentum of Optimizer |
| batch_size | Number of items fetched in Custom Dataloader at each batch |
| n_epoch | Number of epochs to run over training files |
| n_labels | Number of labels to be trained, automatically gathered in another class |
| image_height | Desired fixed image height |
| image_width | Desired fixed image width |
| transform | Whether or not input transformation should be applied |
| target_transform | Whether or not label transformation should be applied |
| shuffle | Whether or not Dataloader should shuffle the dataset to get a new item |
The fixed image height and width here is not in itself enough from time to time. Images maybe distorted. This week, we will not apply any transformations to reduce the noise. The reason for such action comes from batch loading. Batches of tensored images should have the same size.
Custom Dataset and Custom Dataloader
Now that we have the desired commands, let's head to requirements for creating a dataset and a dataloader:
## dataset.py
import os
import pandas as pd
import numpy as np
from PIL import Image
from torchvision import transforms
from torch.utils.data import Dataset, DataLoader
from commands import TrainCommands
Then let's initialize our dataset class:
class CustomImageDataset(Dataset):
	def __init__(self, tc: TrainCommands, type: str):
		transform = tc.transform
		target_transform = tc.target_transform
		annotations_file = tc.annotations_file
		self.image_height = tc.image_height
		self.image_width = tc.image_width
		if type == "train":
			annotations_file = "{}_train".format(annotations_file)
		self.img_labels = pd.read_csv("datasets/csv/{}.csv".format(annotations_file))
		unique_labels = list(set(self.img_labels['label'].to_list()))
		tc.n_labels = len(unique_labels)
		dict_labels = {}
		for label in unique_labels:
			dict_labels[label] = unique_labels.index(label)
		self.dict_labels = dict_labels

		if transform == True:
			self.transform = transforms.Compose([
				transforms.ToTensor(),
				transforms.Normalize((0.5, 0.5, 0.5), (0.5, 0.5, 0.5)),
			])
		else:
			self.transform == False
		if target_transform == True:
			self.target_transform = transforms.Compose([
				transforms.ToTensor(),
			])
		else:
			self.transform == False
We use type parameter to define if we are initializing train database or test database with the following part:
		if type == "train":
			annotations_file = "{}_train".format(annotations_file)
    self.img_labels = pd.read_csv("datasets/csv/{}.csv".format(annotations_file))
To define a list of labels to be used in model shaping, we use the following lines:
		unique_labels = list(set(self.img_labels['label'].to_list()))
		tc.n_labels = len(unique_labels)
		dict_labels = {}
		for label in unique_labels:
			dict_labels[label] = unique_labels.index(label)
		self.dict_labels = dict_labels
This gives us a dictionary of items to be classified each with their own unique integer:
## self.dict_labels
{
  "Apple": 0,
  "Orange": 1
}
We have to define certain transformations for the input and the label. These transformations define how they will be converted to a tensor to be used in training, and which operations should be applied after their transformation:
		if transform == True:
			self.transform = transforms.Compose([
				transforms.ToTensor(),
				transforms.Normalize((0.5, 0.5, 0.5), (0.5, 0.5, 0.5)),
			])
		else:
			self.transform == False
		if target_transform == True:
			self.target_transform = transforms.Compose([
				transforms.ToTensor(),
			])
		else:
			self.transform == False
Let's also define a function that gives us the number of images in a given dataset:
	def __len__(self):
			return len(self.img_labels)
Finally, we need to define what to give, a tensor of image and a tensor of label:
	def __getitem__(self, idx):
		img_path = os.path.join(self.img_labels.iloc[idx, 0])
		label = self.img_labels.iloc[idx, 1]
		label = self.dict_labels[label]
		label_arr = np.full((len(self.dict_labels), 1), 0, dtype=float) #[0.,0.]
		label_arr[label] = 1.0 #[0.,1.]
		image = Image.open(img_path).convert('RGB')
		image = image.resize((self.image_height,self.image_width), Image.ANTIALIAS)
		if not self.transform	== False:
			image = self.transform(image)
		if not self.target_transform == False:
			label = self.target_transform(label_arr)
		return image, label
Let's break it down part by part.
Following line will get the image path with a given index:
img_path = os.path.join(self.img_labels.iloc[idx, 0])
Let's say the dataset is training dataset, and the index is 0:
| datasets/test/Apple/38.jpg | Apple |
This will be our self.img_labels.iloc[0,0].
The reason the path has test in it is because we keep all the files in test directory for now. The image is taken from dataframe of apples_and_oranges_train.csv though. So it won't cause an issue.
Following lines will create a one hot vector out of the index of the label in question:
		label = self.img_labels.iloc[idx, 1]
		label = self.dict_labels[label]
		label_arr = np.full((len(self.dict_labels), 1), 0, dtype=float) #[0.,0.]
		label_arr[label] = 1.0 #[0.,1.]
The reason I commented [0., 0.] is because there are 2 labels in our example, namely Apple and Orange, so the size of the vector will be defined from it. We convert it to numpy array to be convertable to tensor.
Following lines will use PIL library to read and reshape the image to desired sizes:
		image = Image.open(img_path).convert('RGB')
		image = image.resize((self.image_height,self.image_width), Image.ANTIALIAS)
We convert the image to RGB to get a 3 dimensional vector, third being the color. Then, we resize it using ANTIALIAS method to keep it still recognizable to an eye. Like I said before, this is usually not enough. But we'll do it like this for now.
Now comes the custom dataloader:
class CustomImageDataLoader:
	def __init__(self, tc: TrainCommands, cid: CustomImageDataset):
		batch_size = tc.batch_size
		train_data = cid(tc, type = "train")
		test_data =  cid(tc, type = "test")
		self.train_dataloader = DataLoader(train_data, batch_size = tc.batch_size, shuffle = tc.shuffle)
		self.test_dataloader = DataLoader(test_data, batch_size = batch_size, shuffle = tc.shuffle)

	def iterate_training(self):
		train_features, train_labels = next(iter(self.train_dataloader))
		print(f"Feature batch shape: {train_features.size()}")
		print(f"Ladabels batch shape: {train_labels.size()}")
		return train_features, train_labels
We initialize self.train_dataloader and self.test_dataloader in it using type parameter as mentioned before. Then, we use DataLoader function of Pytorch to declare a loader. Batch size defines how many images to be fetched in a call to dataloader.
In iteration, we iterate over self.train_dataloader to give us an image and its corresponding label using the Custom Image Dataset we defined in the initialization.
train_features will be a batch of tensors of images we fetched from the dataset, and train_labels will be the batch of corresponding labels of these images.
Automatic Training
Now that we have a custom image dataset, a custom dataloader to load the images from the dataset, let's utilize the automatic training by using TrainCommands object. The requirements for the training class and the model are:
# train.py
import torch
import torch.nn as nn
import torch.nn.functional as F
from dataset import CustomImageDataLoader, CustomImageDataset
from commands import TrainCommands
Let's also declare the CNN model we want to use:
class CNN(nn.Module):
	def __init__(self, tc: TrainCommands):
		super().__init__()
		n_labels = tc.n_labels
		self.conv1 = nn.Conv2d(3, 6, 5)
		self.pool = nn.MaxPool2d(2, 2)
		self.conv2 = nn.Conv2d(6, 16, 5)
		self.flatten = nn.Flatten(start_dim=1)
		self.fc1 = nn.Linear(16*122*122, 120) # Manually calculated I will explain next week
		self.fc2 = nn.Linear(120, 84)
		self.fc3 = nn.Linear(84, n_labels) #unique label size

	def forward(self, x):
		x = self.pool(F.relu(self.conv1(x)))
		x = self.pool(F.relu(self.conv2(x)))
		x = self.flatten(x)
		x = F.relu(self.fc1(x))
		x = F.relu(self.fc2(x))
		x = self.fc3(x)
		return x
One thing to notice here is that the output size n_labels is 2 in our case since we only classify between Apple and Orange. There is one more calculation to be made which is derived from embedding size and height and width of the image which I calculated manually. Overall, this is a pretty generic function for classifying images. In the following weeks we will discuss how to automatically calculate the size I manually calculated, and also how to add more layers from the TrainCommands to automate the process further.
Now let's define the training function that uses the custom dataset, and custom dataloader:
class Train:
	def __init__(self, tc: TrainCommands, cnn: CNN, cidl: CustomImageDataLoader, cid: CustomImageDataset):
		self.loader = cidl(tc, cid)
		self.cnn = cnn(tc)
		self.criterion = getattr(nn, tc.criterion)()
		self.optimizer = getattr(torch.optim, tc.optimizer)(self.cnn.parameters(), lr=tc.lr, momentum=tc.momentum)
		self.n_epoch = tc.n_epoch
		self.model_name = tc.model_name


	def train(self):
		for epoch in range(self.n_epoch):  # how many times it'll loop over
			running_loss = 0.0
			for i, data in enumerate(self.loader.train_dataloader):
				inputs, labels = data
				self.optimizer.zero_grad()
				outputs = self.cnn(inputs)
				loss = self.criterion(outputs, labels.squeeze())

				loss.backward()
				self.optimizer.step()
				running_loss = running_loss + loss.item()
				if i % 5 == 4:
					print(
							f'[{epoch + 1}, {i + 1:5d}] loss: {running_loss / 2000:.3f}')
					running_loss = 0.0
		torch.save(self.cnn.state_dict(), "models/{}.pt".format(self.model_name))
Let's break it down part by part. Following line initializes the custom training dataset with custom dataset, using training commands.:
self.loader = cidl(tc, cid)
Next line declares the model (Convolutional Neural Network) using training commands:
self.cnn = cnn(tc)
The following line is responsible for creation of criterion:
self.criterion = getattr(nn, tc.criterion)()
This is equilavent of torch.nn.CrossEntropyLoss() in our case.
The very next line is for creating the optimizer with desired parameters:
self.optimizer = getattr(torch.optim, tc.optimizer)(self.cnn.parameters(), lr=tc.lr, momentum=tc.momentum)
This is the equivalent of torch.optim.SGD(CNN.parameters(), lr=0.001, momentum=0.9)
In the following weeks, we will have an approach on giving optional parameters with optional names to fill the optimizer and criterion without limitations. But for now, this is enough.
Finally we initalize number of epochs to run and the name of the model we will save:
self.n_epoch = tc.n_epoch
self.model_name = tc.model_name
In the following parts we iterate over epochs, declare a loss, and call an image and a label from the dataset using enumerate function:
	def train(self):
		for epoch in range(self.n_epoch):  # loop over the dataset multiple times
			running_loss = 0.0
			for i, data in enumerate(self.loader.train_dataloader):
The data will come in tuples:
inputs, labels = data
Then we zero the gradients in optimizer:
self.optimizer.zero_grad()
Run a prediction:
outputs = self.cnn(inputs)
Then compare the prediction to real label to calcualte loss using our criterion:
loss = self.criterion(outputs, labels.squeeze())
Labels are squeezed here to match the shape of inputs to be calculated in criterion function.
Then we run a backpropagation to automatically reaccumulate the gradients:
loss.backward()
We step the optimizer:
self.optimizer.step()
Then update the running_loss:
running_loss = running_loss + loss.item()
Following lines are for output of the process at every 5 steps:
				if i % 5 == 4:
					print(
							f'[{epoch + 1}, {i + 1:5d}] loss: {running_loss / 2000:.3f}')
					running_loss = 0.0
Finally we save the model to a desired location:
torch.save(self.cnn.state_dict(), "models/{}.pt".format(self.model_name))
Now that we have everything in place, let's declare an endpoint we can get our training commands from in main.py. Final form of the main.py will be:
# main.py
from fastapi import FastAPI
from add import Download, Query
from create import CSVCreator, ClassificationsArray
from dataset import CustomImageDataLoader, CustomImageDataset
from train import CNN, Train
from commands import TrainCommands

app = FastAPI()

@app.get("/")
def read_root():
  return {"Hello": "World"}

@app.post("/add/")
def create_query(query: Query):
  ## Create unique links
  serpapi = Download(query)
  serpapi.download_all_images()
  return  {"status": "Complete"}

@app.post("/create/")
def create_csv(arr: ClassificationsArray):
  csv = CSVCreator(arr)
  csv.gather()
  csv.create()
  return {"status": "Complete"}

@app.post("/train/")
def train(tc: TrainCommands):
  trainer = Train(tc, CNN, CustomImageDataLoader, CustomImageDataset)
  trainer.train()
  return {"status": "Success"}
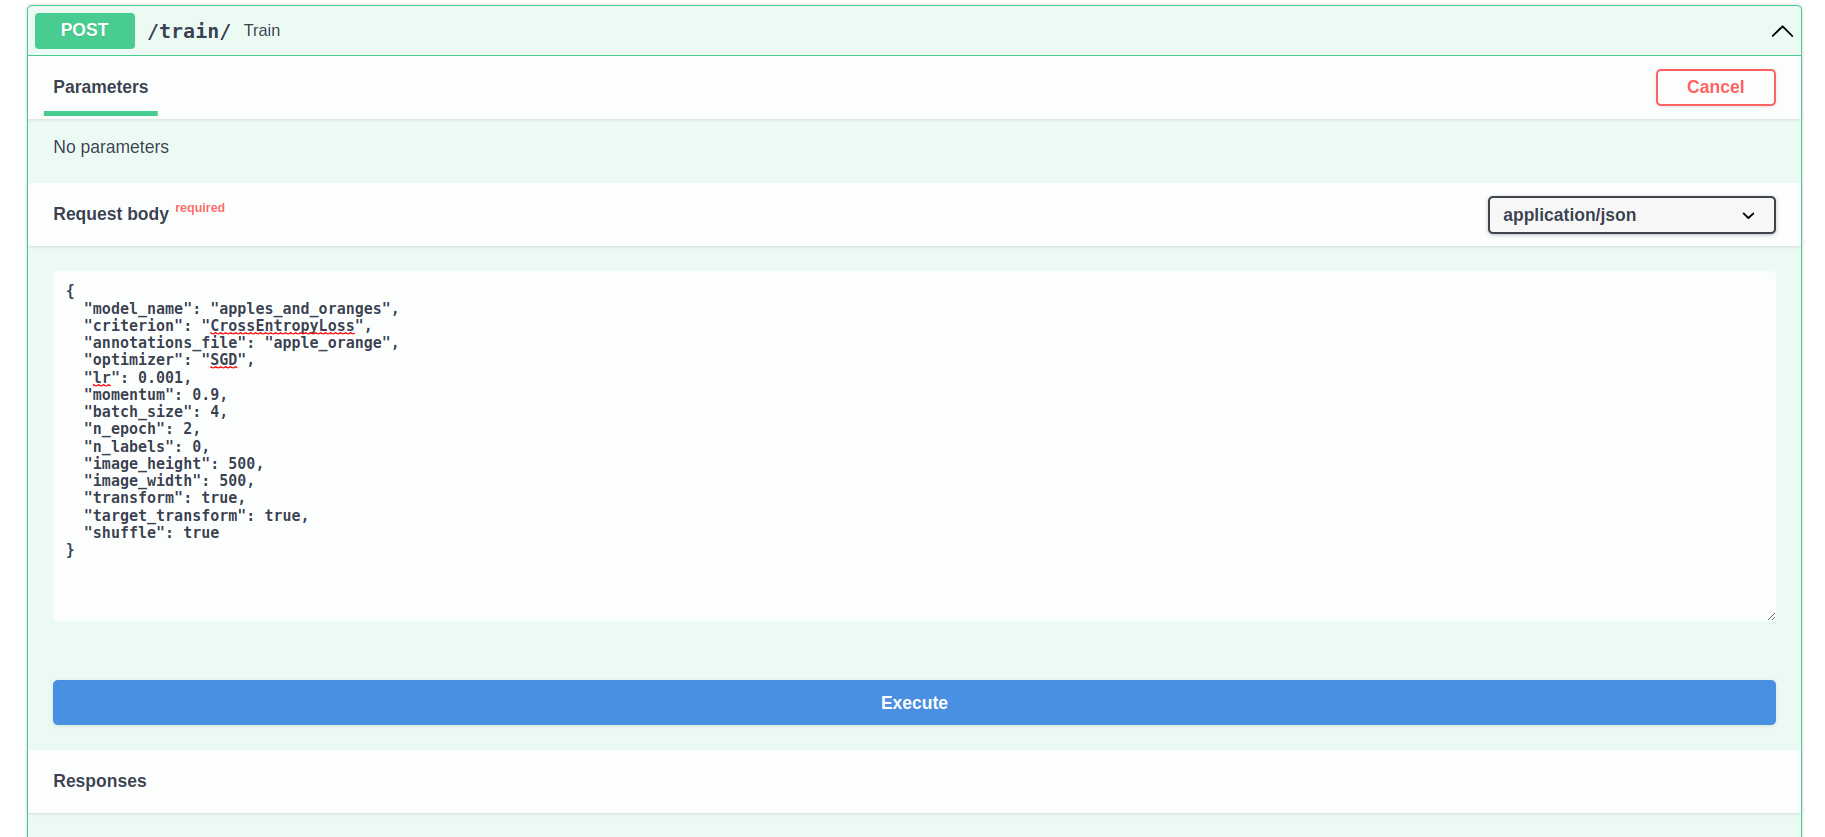
/train/ endpoint will take our commands and automatically train a model for us:
Now if you head to localhost:8000/docs and try our /train/ with the following parameters:
{
  "model_name": "apples_and_oranges",
  "criterion": "CrossEntropyLoss",
  "annotations_file": "apple_orange",
  "optimizer": "SGD",
  "lr": 0.001,
  "momentum": 0.9,
  "batch_size": 4,
  "n_epoch": 2,
  "n_labels": 0,
  "image_height": 500,
  "image_width": 500,
  "transform": true,
  "target_transform": true,
  "shuffle": true
}
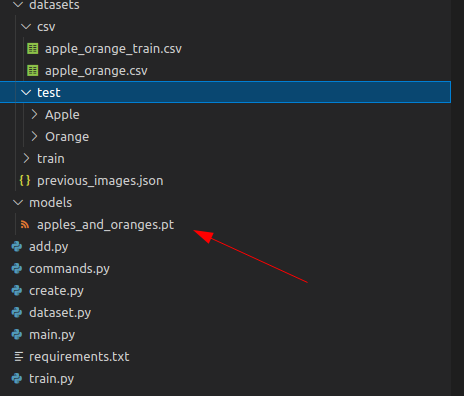
You can observe the training process from the terminal since we declared print functions for epochs:

Once the training is over, you'll have a saved model in models folder with the desired name you have given:
Conclusion
I am grateful to the brilliant people of SerpApi for making this blog post post possible, and I am grateful to the reader for their attention. In the following weeks, we will discuss how to make some parts mentioned here to be more efficient, and more customizable. Also we'll discuss more about async handling of FastAPI for all the processes, and cuncurrent calls to SerpApi's Google Images Scraper API.