 Ruby
Ruby
 Golang
 .Net
.Net
 MCP
MCP
 C++
C++

We launched our n8n verified community node just the other day, and I wanted to share an AI Agent workflow I've had a lot of fun playing around with: an AI Travel Agent.
If you don't know about SerpApi, we specialize in scraping public search engine data and packaging up the results into easy-to-consume APIs.
As for n8n, they offer an open-source workflow automation platform both for users who can and cannot code.
We'll link these up along with OpenAI for the AI processing to create an agent that can help research travel information.
Prerequisites
You will need to be set up on SerpApi, n8n and OpenAI.
You can sign up for SerpApi and get 100 free searches per month here: https://serpapi.com/users/sign_up
Once you're registered, you can grab your SerpApi API key here: https://serpapi.com/manage-api-key
For n8n, you can use their Cloud service or set it up as a local install on your computer. Their Cloud service has a two-week free trial and then requires payment after that. For a free long-term option, use the local installation.
For OpenAI, create an account here: https://platform.openai.com
Unfortunately, OpenAI no longer gives away much free credit. As a new user, you'll be able to run a few API calls for free to start, but this won't get you very far. I recommend adding the minimum $5 of credit to your account.
Basic AI Agent Workflow Setup
We'll get started by hitting "Create Workflow".

You'll then be presented with a blank workflow editor where you can add your first step.
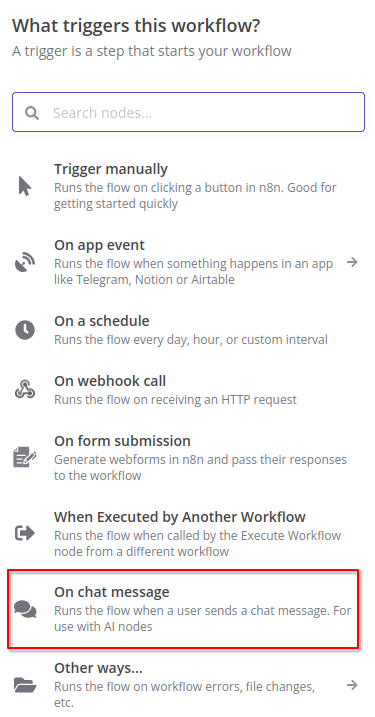
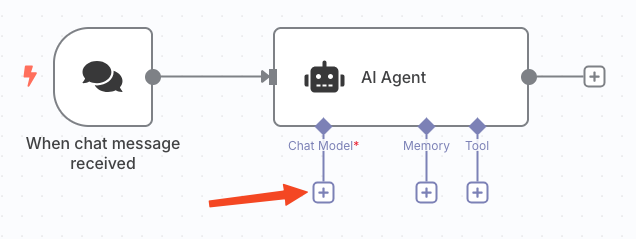
We need to start the workflow with a trigger that kicks off the automation. We'll select "On chat message" as this will be a chatbot.
Hit the "+" button to add the next node to execute after receiving a chat message.

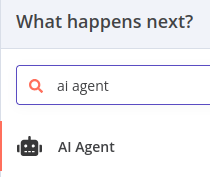
Here we'll add our agent. Search for ai agent and add the "AI Agent" node.
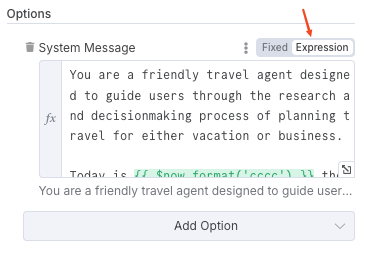
We can leave everything else as default except we'll add a basic initial prompt. Click "Add Option" and then select "System Message".
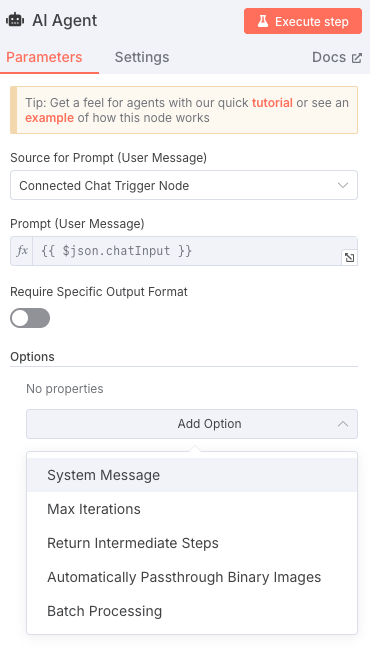
We'll use the following "System Message". There's a tiny bit of code here to let our agent know what day of the week it is and the current date and time.
You are a friendly travel agent designed to guide users through the research and decisionmaking process of planning travel for either vacation or business.

Today is {{ $now.format('cccc') }} the {{ $now.format('yyyy-MM-dd HH:mm') }}.
Be sure to switch to "Expression" mode or the date code won't work and our agent will be stuck in 2024.
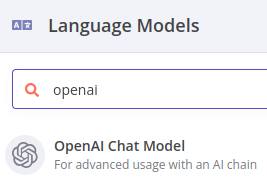
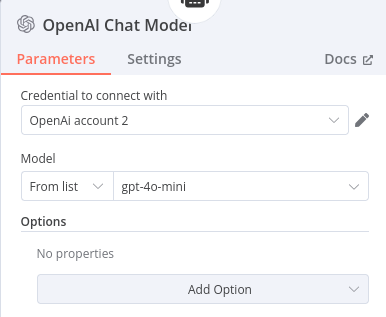
We can't quite test this yet because the AI Agent requires a connection to a chat model. Click the "Chat Model" "+" button to add one.
We'll use OpenAI's model.
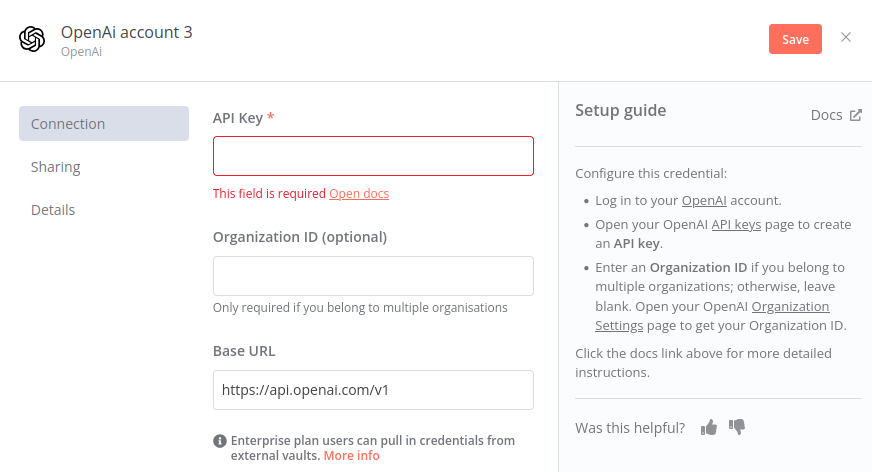
Here we'll add our OpenAI API key. Click "Create new credential" if you don't have this saved in n8n already.

The form to create credentials is fairly straightforward. You only need to paste in your OpenAI API key. Follow the links n8n provides if you have any doubts on where to get your key.
I'll stick with default model of "gpt-4o-mini".
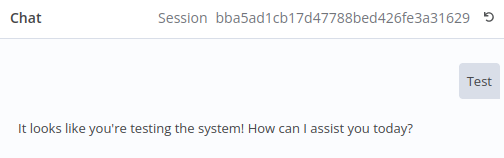
Now, we can give our agent a test by clicking the "Open chat" button.

Looks good!
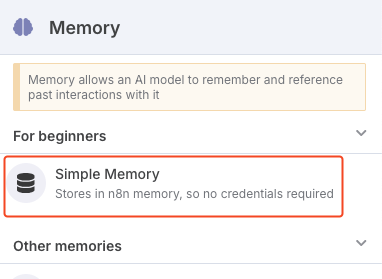
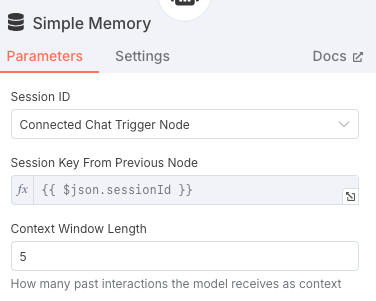
You're now ready to give the agent some memory to remember past messages. Click the "+" under "Memory".
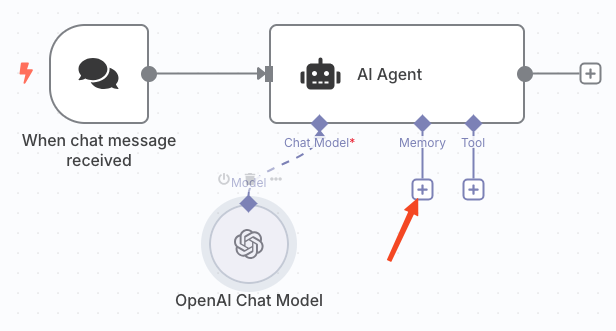
Let's opt for the simple and aptly named "Simple Memory" option since it requires no credentials or special setup.
We can leave all the default memory settings.
Adding Google Search to the AI Agent
So far our agent can only respond with information already known to ChatGPT/OpenAI. To get the most current information, we'll need to add SerpApi as "Tool".
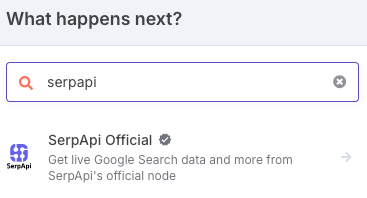
But first, we need to install SerpApi's verified community node. Hit the "+" sign to the right of the AI Agent.
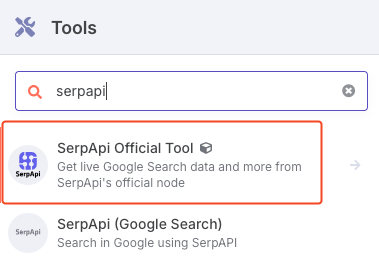
Search for serpapi and select "SerpApi Official".
Click "Install node".
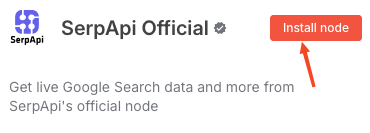
Eventually the node will show as "Installed" and you can go back to the workflow. You shouldn't select anything under "Actions".
Now we add SerpApi as a tool by hitting the "+" button under "Tool".
Search for serpapi and select the "SerpApi Official Tool." The other tool also uses SerpApi, but is a much more limited tool compared to our official one.
Click "Add to workflow".

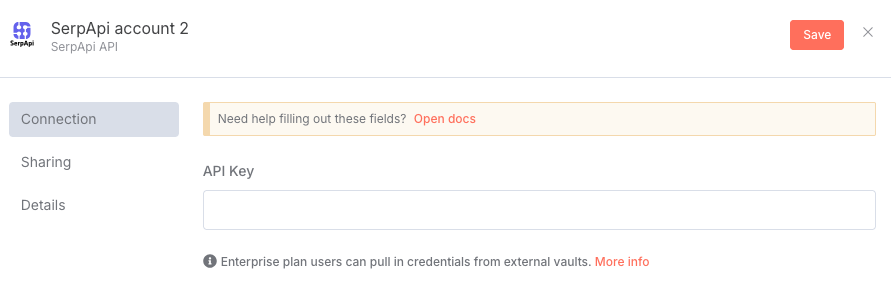
Now you'll be presented with setup for SerpApi. First, you need to add or select a SerpApi credential.
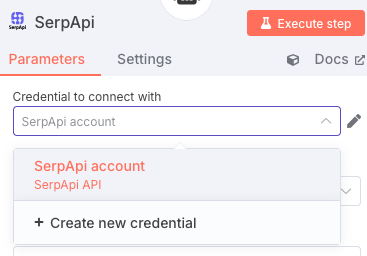
If you're creating a credential, you just need to paste your API key in the form and hit "Save". n8n will test the connection and let you know if there are any errors.
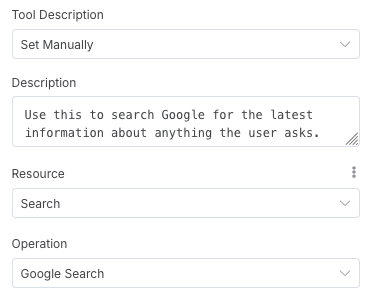
Next, we'll switch the "Tool Description" to "Set Manually". We'll use the following description:
Use this to search Google for the latest information about anything the user asks.We also need to make sure "Operation" is set to "Google Search". This is the default so you shouldn't need to touch this.
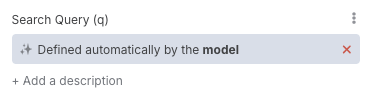
Scrolling down, we see a "Search Query (q)" field. This is the q parameter in our API that accepts the query you want to search Google for. In this case, we want our agent to automatically set this. We'll click the button at the far right of the text box to "Let the model define this parameter".

Once set, the field will look like this:
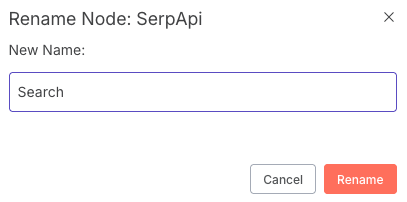
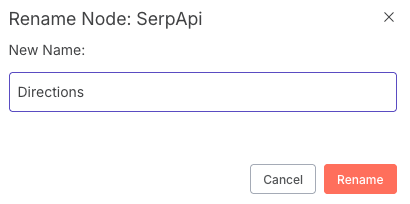
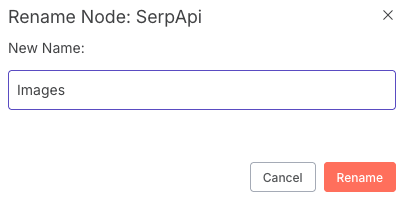
Since we'll be adding 5 different SerpApi nodes to this workflow, let's change the name from the generic "SerpApi" to something more descriptive of this node like "Search".
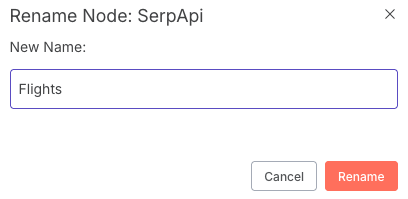
Click the ellipsis ... next to the node and select "Rename".
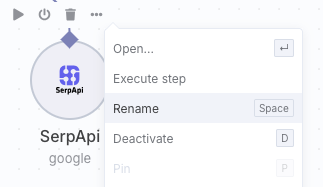
Give the node a new name.
Finally, we can do a test search. I'll ask the agent to find family vacation destinations in Alaska. If all goes well, you'll get a handy list of popular vacation spots in Alaska.
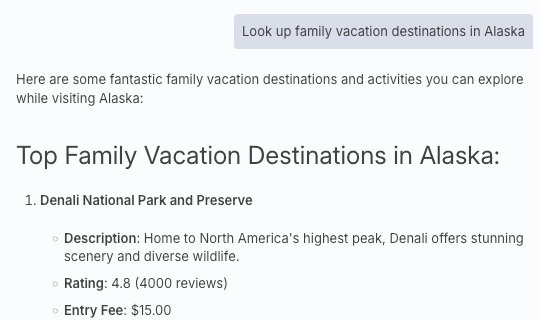
Okay that looks good, but how can we be sure the agent used SerpApi and not what OpenAI/ChatGPT already knows?
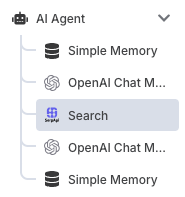
We check the agent's log to see the steps it took. If SerpApi ever doesn't appear in this list, it means the agent didn't use SerpApi.
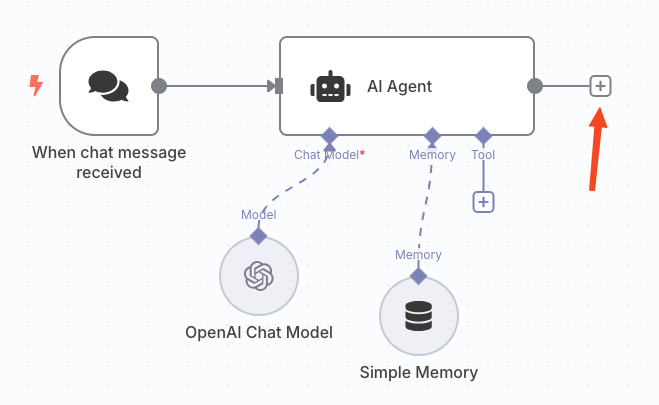
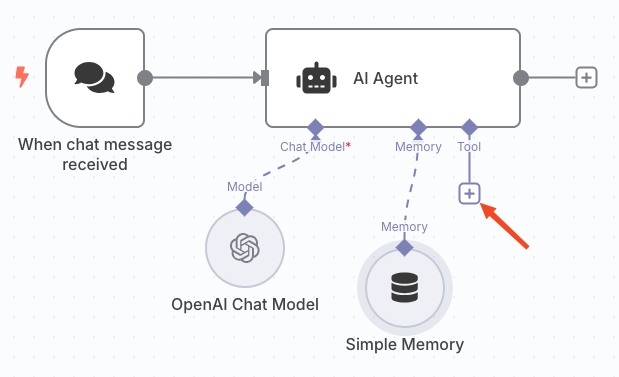
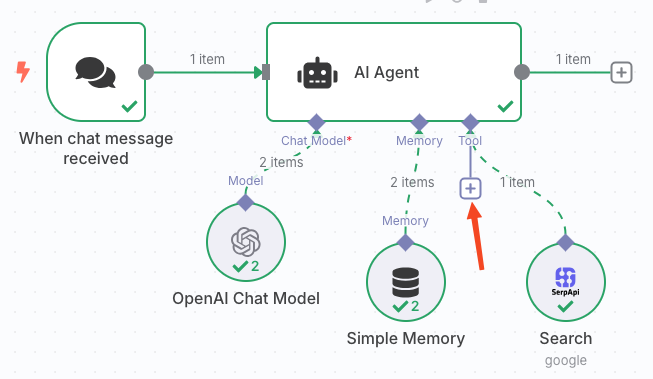
Our workflow should now look like the below image. Let's add another node by hitting "Tool" again.
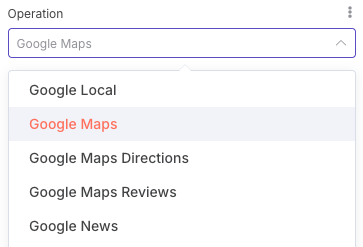
Finding Local Businesses with the Google Maps API
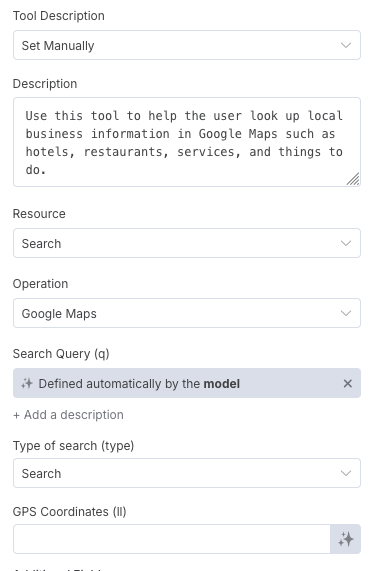
This time we'll update the "Operation" to be "Google Maps". We'll use this node to find local business information like hotels or restaurants.
Once again, we'll set the "Tool Description" manually. We can use the following:
Use this tool to help the user look up local business information in Google Maps such as hotels, restaurants, services, and things to do.We'll also let the model define the "Search Query (q)" field again.
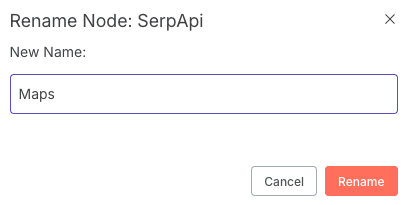
I'll rename this node as "Maps".
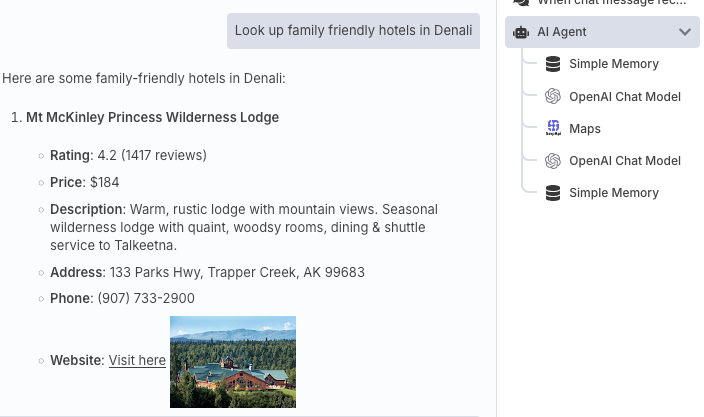
We can now use the Google Maps node to look up hotels. The agent will automatically pull in other relevant data like the rating, number of reviews, price, address, and more.
Three more nodes to add. We can move a little faster now that you should be more familiar with the steps.
Getting Travel Times and Directions with the Google Maps Directions API
Let's add the ability for our agent to look up travel times and directions.
Add another SerpApi tool node and switch "Operation" to "Google Maps Directions".
We'll use the following description:
Use this tool to help the user get directions and calculate travel times between locations from Google MapsThis API doesn't have a search query. Instead, we need to set a starting and ending address. We'll let the model define these automatically of course.
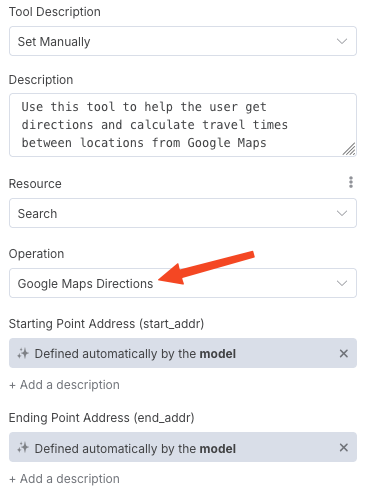
We'll rename this node as "Directions".
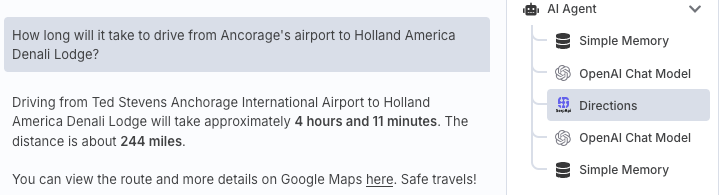
Now we can see how long it will take to drive from the Anchorage airport to one of the hotels from the previous request.
Searching for Flights with the Google Flights API
We'll need a flight to get us to Alaska of course. We'll add another SerpApi node to query Google Flights.
Here we'll switch the "Operation" to "Google Flights". We'll use this simple description:
Use this tool to help the user look up flight options.There's a lot more for the agent to define this time. At a minimum, they need to set the airport codes for the departure and arrival airports plus the outbound and return dates. I've also added a couple additional fields for the number of adults and children traveling. Let all of these be defined by the model.
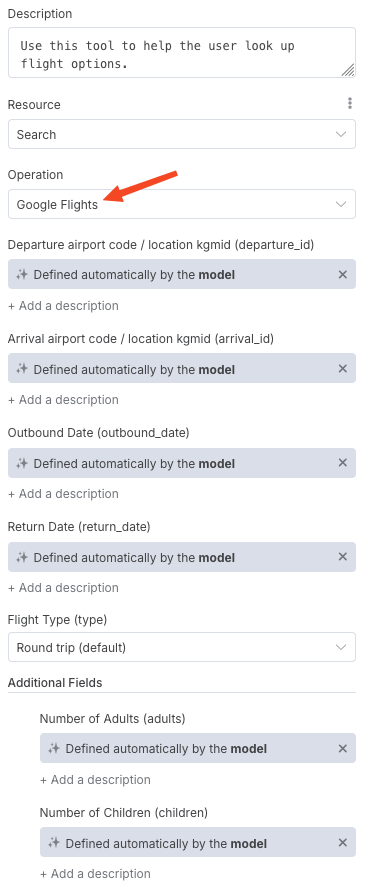
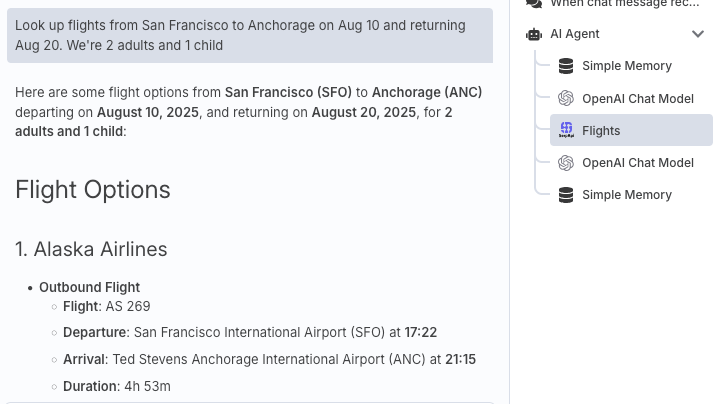
I'll rename this node "Flights".
Let's give it a somewhat challenging request for 2 adults and 1 child.
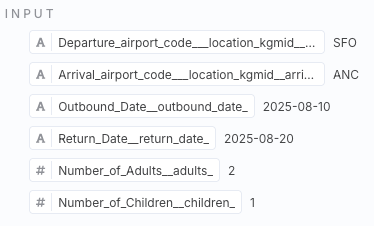
The above results look good, but we can always check the "Input" tab for the Flights node to make sure the model constructed the query correctly. Fortunately, it all looks correct here:
I should note this node can error out sometimes when the model can't correctly figure out all the above parameters. You may encounter the below error occasionally. If you do see this error, just try again. The failed attempts don't consume any SerpApi search credits.
[ERROR: Received tool input did not match expected schema]
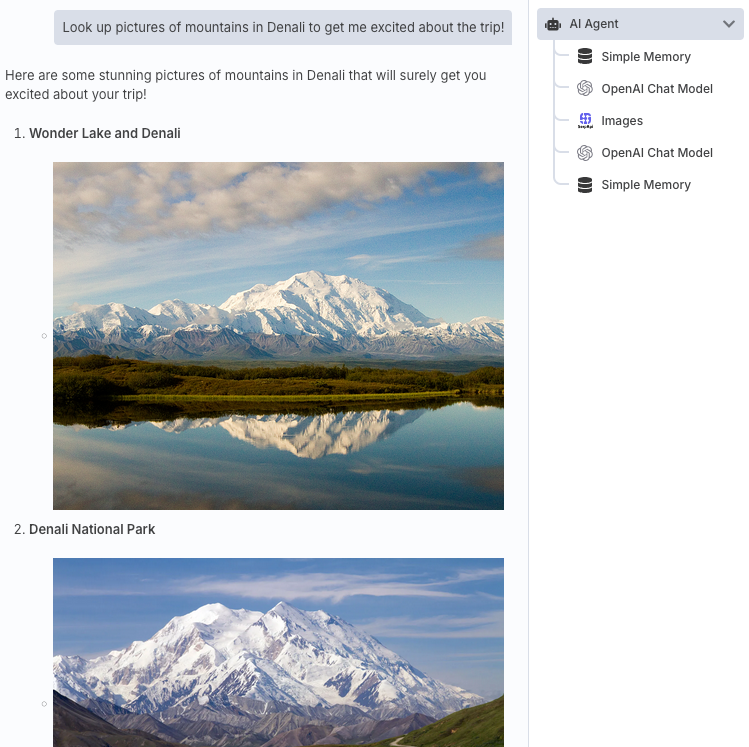
Fetching Images from the Google Images API
On to our final node. We've done some initial planning research. Let's now get excited about where we're going by looking up some pictures of Denali.
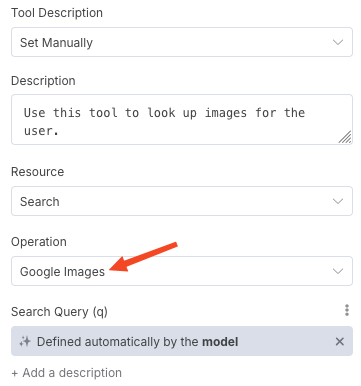
We'll add one last node and set the "Operation" to "Google Images" with the below description.
Use this tool to look up images for the user.The model just needs to set a query like Google Search and Google Maps.
We'll call this node "Images".
Let's see those stunning mountains in Denali.
Discover Destinations with the Google Travel Explore API (2026 Update)
Since this post was originally published, we launched a Google Travel Explore API. This API is ideal when you don't know where you want to go yet. You can pop in as little as a departure airport code to get a long list of potential destinations with travel dates and prices. You can also customize the search with things like the number of travelers, max price, travel month, and much more.
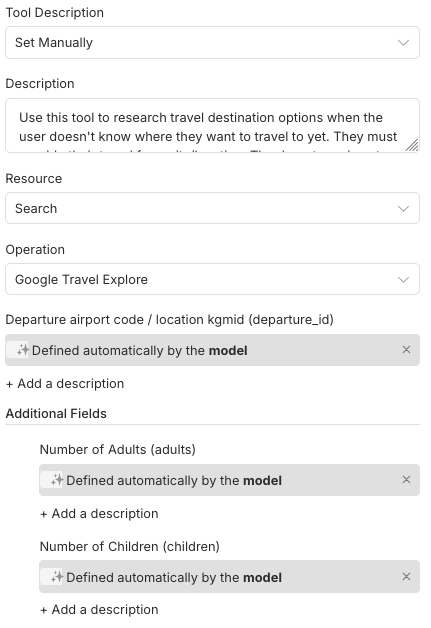
Let's add another SerpApi tool node and select "Google Travel Explore".
We'll set this description:
Use this tool to research travel destination options when the user doesn't know exactly where they want to travel to yet. They must provide their travel from city/location. The departure airport code field should use the 3 character airport code for the closest major airport to the user's location. They can also optionally provide the number of adults and children.Let the model define the departure airport code, number of adults, and children. There are loads of other additional fields you can add. Feel free to add more if relevant to your use case.
This API has quite a large response body so I would suggest restricting the response fields using the json_restrictor field. This will reduce the number of tokens used.

I've set mine as:
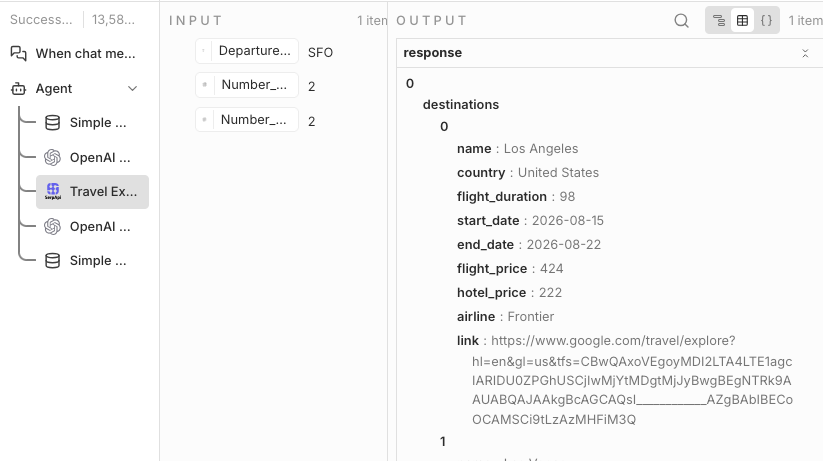
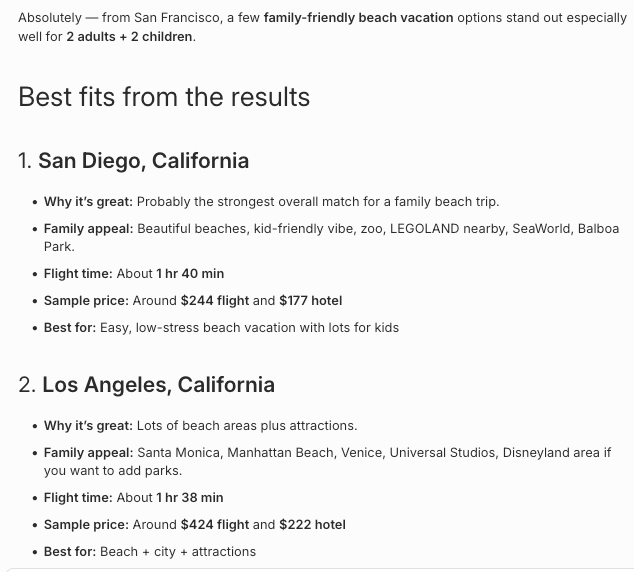
search_parameters.{currency},destinations[].{name,country,flight_duration,start_date,end_date,flight_price,hotel_price,airline,link}Now imagine we don't have any idea where to go, but we want to find vacation options for 2 adults and 2 children traveling from San Francisco. We'll also suggest a destination with a beach.
Where could we travel to from San Francisco for a family friendly vacation? We're 2 adults and 2 children. Somewhere with a beach would be ideal.Checking the logs we see the model successfully defined our airport code and number of travelers.
The AI response looks good too.
The Google Travel Explore API defaults to not have any restrictions on destination. However we can let the model set some loose restrictions like country or region by adding the arrival_area_id parameter. This parameter accepts a Knowledge Graph Machine ID, also known as a kgmid. We'll add a field description to help the model understand when and how they should set this parameter.
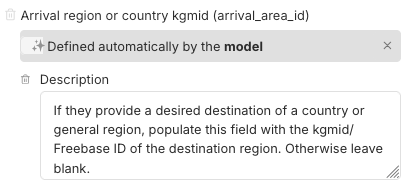
Description:
If they provide a desired destination of a country or general region, populate this field with the kgmid/Freebase ID of the destination region. Otherwise leave blank.Now we can specify how we want options for Alaska. For example:
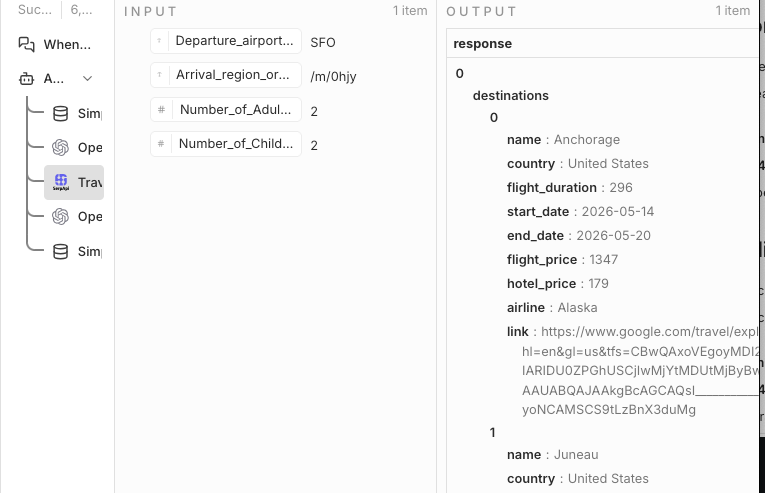
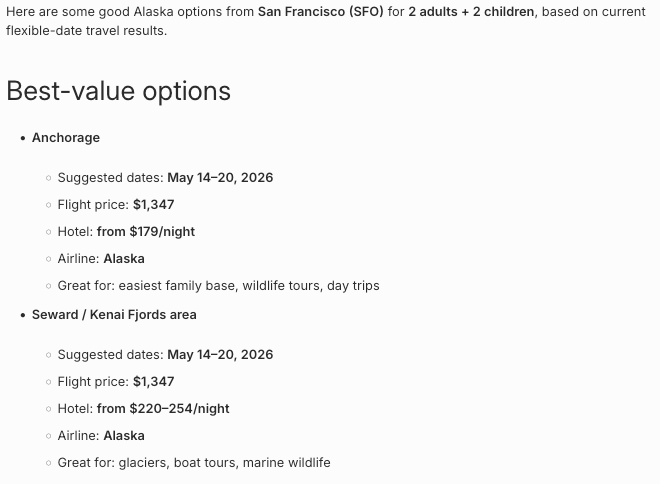
Find travel options for 2 adults and 2 children to traveling to Alaska from San Francisco. I don't know when we would goThe model successfully set the kgmid for Alaska and we now get Alaska results only covering Anchorage, Juneau, and more.
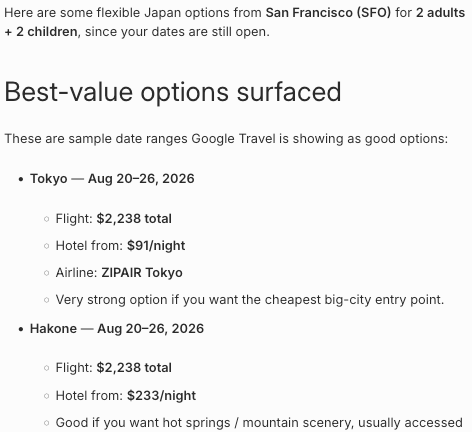
We can also specify a country instead. Let's try Japan.
Find travel options for 2 adults and 2 children traveling to Japan from San Francisco. We don't know when we would go yet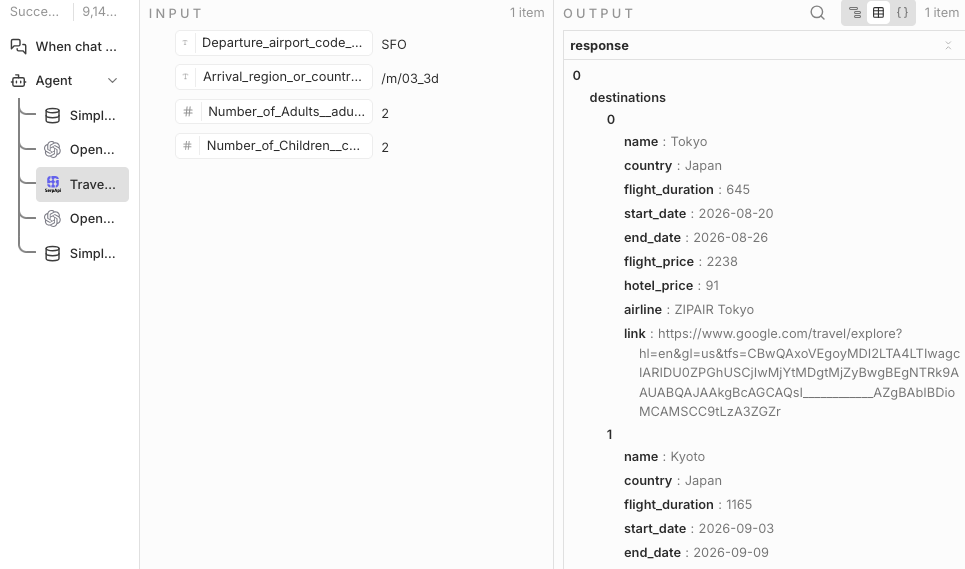
Conclusion
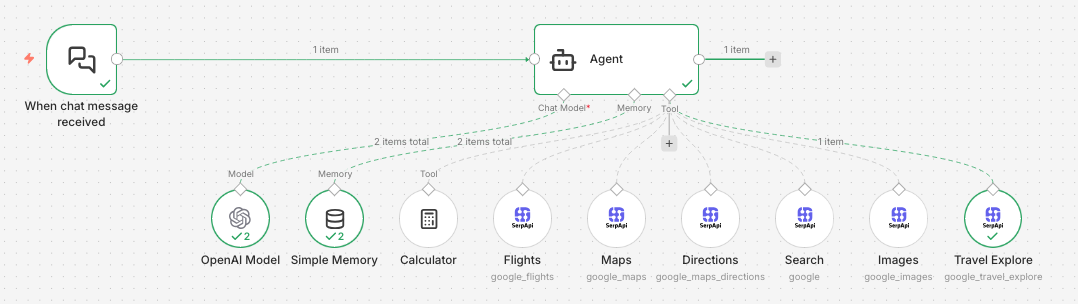
There is lots more we could play around with, but let's call it here. The complete workflow should look like this:
I hope this was fun. If you have any trouble or just want to share what you're building on n8n with SerpApi, please let us know at contact@serpapi.com.
Happy scraping!