 Ruby
Ruby
 Golang
 .Net
.Net
 MCP
MCP
 C++
C++

We will explore how to extract data from websites that rely on JavaScript to load their content, making them challenging to scrape with traditional methods. We will be using two powerful tools for this task: Puppeteer and Node.js.
We also have a complete tutorial on web scraping with Javascript.
What is Puppeteer?
"Puppeteer is a Node.js library that provides a high-level API to control Chrome/Chromium. Puppeteer runs in headless mode by default but can be configured to run in full ("headful") Chrome/Chromium." - pptr.dev
Why use Puppeteer for web scraping?
Puppeteer allows us to interact with the website just like a human would, enabling us to retrieve the data we need even if it is generated by JavaScript. We will cover different cases where we can utilize Puppeteer.
So, grab a cup of coffee, and let’s get started on learning how to scrape dynamic web content with Javascript (Node.js)!

Getting started with Puppeteer
This is a step-by-step tutorial on how to use Puppeteer in Node.js. So, make sure you already have Node.js installed.
Step 1: Initialize a new project and install Puppeteer
Create a new folder and initialize npm .
mkdir js-puppeterr
cd js-puppeteer
npm init -y

npm i puppeteer
# package manager alternative:
yarn add puppeteer # or using yarn
pnpm i puppeteer # or using pnpm
When you install Puppeteer, it also download Chrome for Testing version.
Create a new file to start writing our code
touch main.jsStep 2: Hello world for Puppeteer
This is the basic setup for running a browser.
import puppeteer from 'puppeteer';

(async () => {
  // Launch the browser and open a new blank page
  const browser = await puppeteer.launch();
  const page = await browser.newPage();

  // Navigate the page to a URL
  await page.goto('https://google.com/');

  // Set screen size
  await page.setViewport({width: 1080, height: 1024});
})
Now we have a browser we can play with!
Step 3: Plan what actions need to be done
Let's say we want to fill out and submit a form on google.com. I'll open the actual URL in my real browser and find out what HTML tag or CSS selector this element is on.
Then, start to build up from there. If you want to click a button, then find out what's the button id or class.
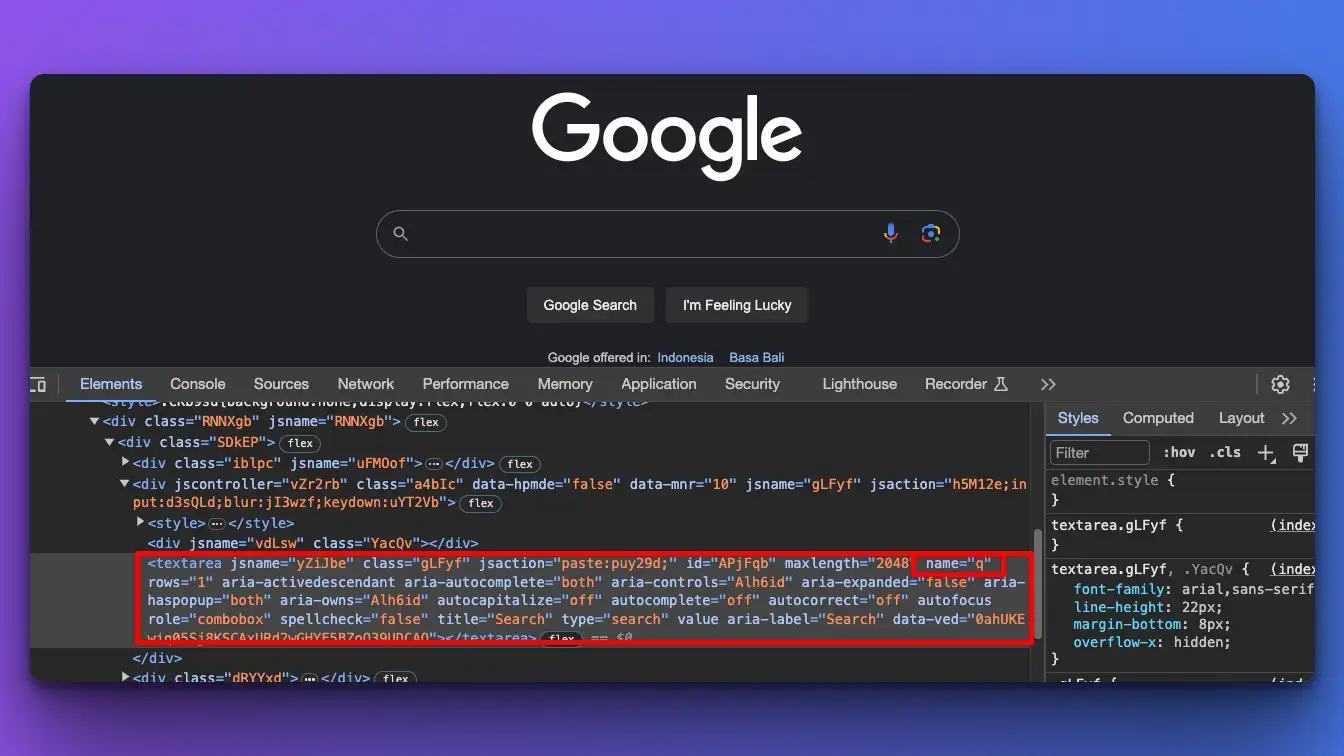
Step 4: Sample program type and submit a form
Now we already know where these HTML elements are located, we can use the puppeteer selector and action for this.
const puppeteer = require('puppeteer');

(async () => {
  // Launch the browser and open a new blank page
  const browser = await puppeteer.launch();
  const page = await browser.newPage();

    // Navigate the page to a URL
    await page.goto('https://www.google.com');

    // Set screen size
    await page.setViewport({width: 1080, height: 1024});

    // Typing and submitting the form
    await page.type('textarea[name="q"]', 'cat');

    // evalue input[type=submit] before click
    const submitBtn = await page.$('input[type=submit]');
    await submitBtn.evaluate(btn => btn.click());


    // console log the next page results
    await page.waitForNavigation();
    console.log('New page URL:', page.url());

  await browser.close();
})();
Run this program with:
node main.jsCode explanation
- We type 'cat' into the textarea with name=q as an attribute. (You can type anything instead of cat)
- We need to wait for the input element to be ready, so we're using evaluate the method for this case.
- Then run a click action on that selected button.
That's a basic example of how to use Puppeteer. Don't worry. We'll learn more actions and tips in this post.
(Maybe put actions on h3, with h2: other actions with Puppeteer)
How to do things in Puppeteer
What can you do with Puppeteer? Well, everything you normally manually do in the browser can also be done with Puppeteer. From generating screenshots to automating form submission, it is all possible! Let's see how to do each of these actions.
Query Selectors
Query selectors in Puppeteer are used to select DOM elements on a page, much like you would in the browser using JavaScript. They are the foundation for interacting with the web page's content, enabling you to retrieve, manipulate, and evaluate nodes in the DOM.
To select an element, we can use page.$(selector)
const element = await page.$('.class-name'); You can select based on an id, class, text, x-path or even the aria label.
Read more about Puppeteer selector here.
How to scroll a page with Puppeteer?
Scrolling to a specific section in Puppeteer can be done by selecting an element representing that section and scrolling into its view. One common method is to use the ElementHandle to find the DOM element and then use scrollIntoView method to scroll the element into view.
Here is an example of how you could scroll to a certain section with an id:
const puppeteer = require('puppeteer');

(async () => {
  // Launch the browser
  const browser = await puppeteer.launch();
  const page = await browser.newPage();

  // Navigate to the page
  await page.goto('https://example.com');

  // Select the section by ID or any selector
  const sectionSelector = '#section-id'; // Replace with the actual selector

  // Wait for the selector to appear in the page
  await page.waitForSelector(sectionSelector);

  // Scroll into view
  await page.evaluate((selector) => {
    const element = document.querySelector(selector);
    if (element) element.scrollIntoView();
  }, sectionSelector);

  // Rest of your code...

  // Close the browser
  await browser.close();
})();
How to scroll to the bottom
You can use the window.scrollBy method for this.
await page.evaluate(() => {
  window.scrollBy(0, window.innerHeight
});
How to fill and submit a form using Puppeteer?
We've seen this on the initial sample. We can use .type method to typing on the selector in the first parameter, with value in the second. The targeted element can be an input or textarea.
await page.type('textarea[name="q"]', 'Your input...');For ticking a checkbox or choosing a radio input, we can use click
await checkboxEl.click();How to click a button with Puppeteer?
We can use click() method for clicking on a button. For example:
const submitBtn = await page.$('input[type=submit]');
await submitBtn.evaluate(btn => btn.click());
How to take screenshots in Puppeteer?
Taking screenshots is one of the essential features that Puppeteer provides, allowing you to capture a visual snapshot of the page at any point in time. Here's how you can take a screenshot with Puppeteer:
- Basic Screenshot:
To capture the whole page, you can use thescreenshotmethod on thepageobject.
const puppeteer = require('puppeteer');

(async () => {
  const browser = await puppeteer.launch();
  const page = await browser.newPage();
  await page.goto('https://example.com');

  // Takes a screenshot of the full page
  await page.screenshot({ path: 'screenshot.png' });

  await browser.close();
})();
- Element Screenshot:
To capture a screenshot of a specific element, you first have to select that element and then call thescreenshotmethod on the element handle.
const element = await page.$('#element-id');
// Replace '#element-id' with the selector of the element you want to capture.
await element.screenshot({ path: 'element-screenshot.png' });
- Full Page Screenshot:
If the content of the page is longer than the viewport, set thefullPageproperty totrueto capture the entire page.
await page.screenshot({ path: 'fullpage-screenshot.png', fullPage: true });
- Screenshot settings
Puppeteer allows you to define other options such astypeto specify the image format (pngorjpeg),quality(forjpegonly), andomitBackgroundto make the background transparent (forpngonly)
await page.screenshot({
  path: 'options-screenshot.jpeg',
  type: 'jpeg',
  quality: 80,
  fullPage: true,
  omitBackground: false
});
- How to save screenshot on specific path?
You can change thepathvalue including adirectoryname. Just make sure the directory is already exists, otherwise it will throw an error.
await page.screenshot({ path: 'screenshots/fullpage.png', fullPage: true });Collecting data from scraped data and export to CSV
We probably want to store the data we're collecting from web scraping. Let's learn how to collect a data and save them in CSV format so we can view it in application like Microsoft Excel or Numbers. With CSV format, we can also easily import or convert it to database engine like MySQL.
For this sample, we'll collect an organic search results from Google.
There is an easier way to collect Google search results data like this, take a look at our Scrape Google search results with Python post.
Get the raw HTML data
First, let's launch a browser that visit the Google search result, fee free to change the keyword to anything you like by adjusting the value at q=...
Normally, you can skip this step if the actual HTML and CSS class is always the same on the targeted website. But if the site is very dynamic like Google, then we need to find a pattern first.
const puppeteer = require('puppeteer');

(async () => {
  const browser = await puppeteer.launch();
  const page = await browser.newPage();
  await page.goto('https://www.google.com/search?q=learn+web+scraping&gl=us');

//   print raw html
  const html = await page.content();
 console.log(html);

  await browser.close();
})();
Finding Pattern
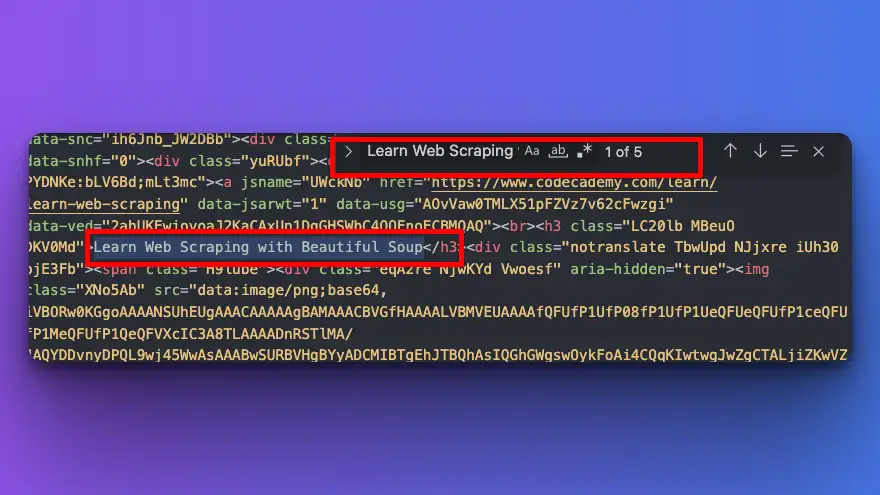
We'll get a very hard to read raw HTML data in our console. I will copy this data and paste it to a text-editor, so I can analyze where my data is located. To make it easier, you can compare the real result from an actual browser, then finding some a certain text in your raw HTML data in text-editor, so you don't have to go through each line from top to bottom.
For example, here is the real Google result from "learn web scraping" keyword
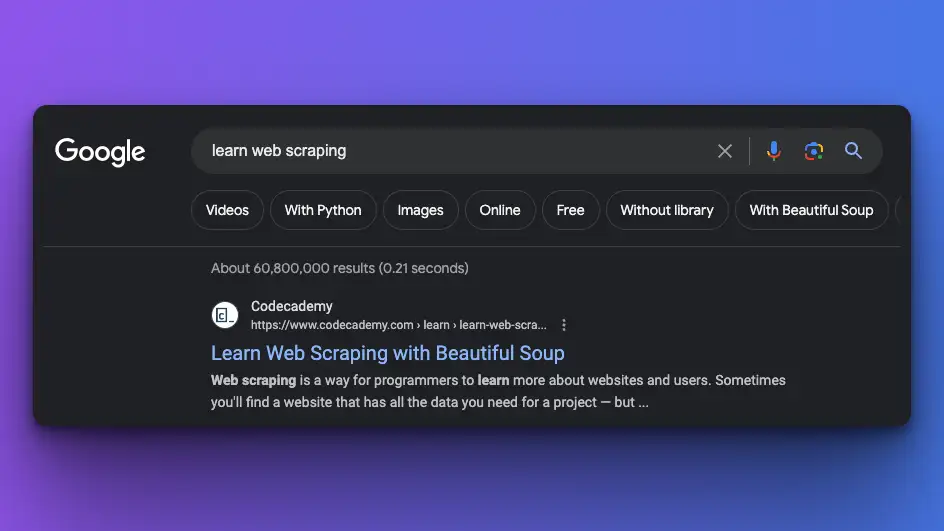
Now, I know that one of the organic results include "Learn Web scraping with Beautiful Soup" text. I will then search this text on my text-editor.
Collect the data programmatically
Since, we already get the targeted result, we can start build up from here. See what HTML element or CSS classes this organic results in. Then, implement it in our Puppeteer code.
The selected class here could be very different from your result, that's why you need to find a pattern like the previous step mentioned.
....
await page.goto('https://www.google.com/search?q=learn+web+scraping&gl=us');


    const results = []

    const organicResult = await page.$$('.N54PNb.BToiNc.cvP2Ce');
    for (let i = 0; i < organicResult.length; i++) {
        const title = await organicResult[i].$eval('h3', el => el.innerText);
        const url = await organicResult[i].$eval('a', el => el.href);

        // Prepare try catch for snippet, since sometimes it's missing
        let snippet = '';
        try {
            snippet = await organicResult[i].$eval(
                '.VwiC3b.yXK7lf.lyLwlc.yDYNvb.W8l4ac.lEBKkf',
                el => el.innerText
            );
        } catch (error) {
            // If the element doesn't exist, snippet will remain an empty string
            // Handle the error if needed, for example:
            // console.error('Element not found', error);
        }
        results.push({title, url, snippet});
    }

    console.log(results);

  await browser.close();
Try to run this program in your terminal, then you'll see the organic results that we need.
Perform a pagination to get all the data, not just the first page
Google has changed, it doesn't use a pagination in number anymore, but it rather detect scrolling to get more data. So we need to scroll to the bottom first for this.
I'll use the code snippet from this GitHub issue. The idea is auto scroll the browser until the end of the page every X ms.
 ....
await autoScroll(page);
 const results = []
  ....
 // collecting data like before
  ...

  await browser.close();
})

async function autoScroll(page){
    await page.evaluate(async () => {
        await new Promise((resolve, reject) => {
            var totalHeight = 0;
            var distance = 100;
            var timer = setInterval(() => {
                var scrollHeight = document.body.scrollHeight;
                window.scrollBy(0, distance);
                totalHeight += distance;

                if(totalHeight >= scrollHeight){
                    clearInterval(timer);
                    resolve();
                }
            }, 250);
        });
    });
}
Time to export the data
First, import fs and path modules, to create the CSV file
const fs = require('fs');
const path = require('path');
const puppeteer = require('puppeteer');
Now, put this code after you get al the results. I change the delimiter from , to semicolon ; since our text could include a ,. Other way around this, is to escape your data first.
...
const csvContent = [
    ['Title', 'URL', 'Snippet'], // CSV header
    ...results.map(item => [item.title, item.url, item.snippet]) // CSV rows
  ].map(e => e.join(';')).join('\n');

  // Write CSV to a file
  const filePath = path.join(__dirname, 'data.csv');
  fs.writeFile(filePath, csvContent, (err) => {
    if (err) {
      console.error('Error writing CSV file', err);
    } else {
      console.log('CSV file saved:', filePath);
    }
  });
Now take a look at your directory, you'll find your generated data.csv file.
Warning
Puppeteer has a lot of tools that let you do tricky things with a web browser right away. Because of this, it's easy for bad habits to sneak into your code. Read "Avoiding Puppeteer Antipattern" to avoid some mistakes when using Puppeteer.
FAQ around Puppeteer
- Can we use Puppeteer in Python?
No, Puppeteer is a Node library and is designed to be used with JavaScript (or TypeScript). There are other alternatives for Python, such asPyppetteerandPlaywright-Python. - What are some Puppeteer alternatives?
Selenium and Playwright are also popular choices when you need a headless browser for web scraping. Take a look at other JavaScript libraries for web scraping.
