 Ruby
Ruby
 Golang
 .Net
.Net
 MCP
MCP
 C++
C++

ChatGPT is great, but what if you need a more customizable AI that can easily be integrated into your application? Sam Altman has the answer for you, a new feature announced at the OpenAI Dev Day called "Assistant API".
The final repository of this tutorial is available at https://github.com/hilmanski/assistant-API-openai-nodejs-sample
What is Assistant API?
The Assistant API is designed to integrate AI assistants into your applications. Previously, we had to develop a custom solution, such as using LangChain. Now, it's possible to have an assistant that can understand the context of a past conversation with a simple API.

It's also possible to feed external knowledge to this model using PDF files or connecting to a 3rd party (external API).
Link: Assistants API Documentation
Want to watch a video instead?
Basics of Assistant API
Before diving into the coding tutorial, we need to understand the basics of the Assistant API.
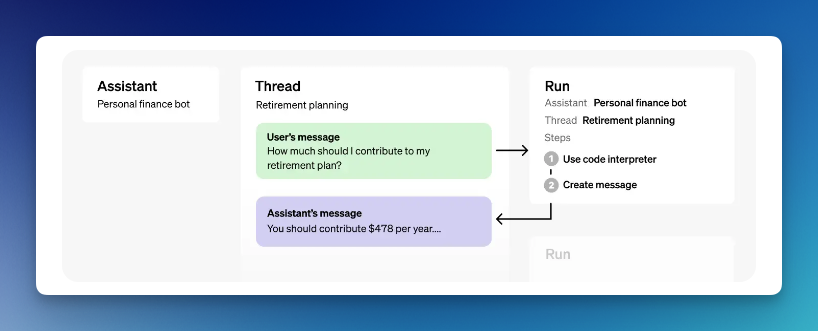
The Assistant API consists of:
- Assistant
- Thread
- Message
- Run
Assistant
We can create as many assistants as we want. Each assistant has a specific purpose. For example, an assistant for coding, a financial bot, etc..
Thread
A session to store the conversation between a user and an assistant. It's useful so that the assistant can understand the context of each message.
Message
A message from a user or an assistant. The message can be a text, image, or other file. Messages are stored as a list on the thread.
Run
A method to run a thread with all the messages. It's sending the messages to the assistant (OpenAI).
Tools and preparation
- NodeJS (with Express)
- OpenAI API (JS library)
Since we will use an API, it's expected to be familiar with coding. We will use NodeJS (with Express) in this sample for simplicity. Feel free to use any language you know, such as Python.
If you're looking for a no code solution to build a custom AI, you can read our basic tutorial on creating custom GPT and how to connect customGPT to the internet.
Make sure to also sign up to OpenAI to get your API key.
Assistant API coding tutorial
Here is a step-by-step tutorial on running assistant API by OpenAI
Step 1: Project setup
Create a fresh directory and install the necessary package. We're going to use the OpenAI JS library.
mkdir assistant-api && cd assistant-api //create and move to a new dir
touch server.js //create main file
npm init -y //Prepare an NPM project
npm install --save openai //Install OpenAI package
npm install --save express //Install express js
# or yarn add openai
You can initialize the OpenAI in this file.
require("dotenv").config();
const OpenAI = require('openai');
const express = require('express');
const { OPENAI_API_KEY } = process.env;

// Setup Express
const app = express();
app.use(express.json()); // Middleware to parse JSON bodies

// Set up OpenAI Client
const openai = new OpenAI({
    apiKey: OPENAI_API_KEY,
});
Don't forget to store your OpenAI API key in the .env file. Name it OPENAI_API_KEY
Step 2: Create an assistant
There are two ways to create a new assistant: Via GUI (no code) or with code.
a. Via GUI
Visit platform.openai.com and navigate to the "assistants" tab.
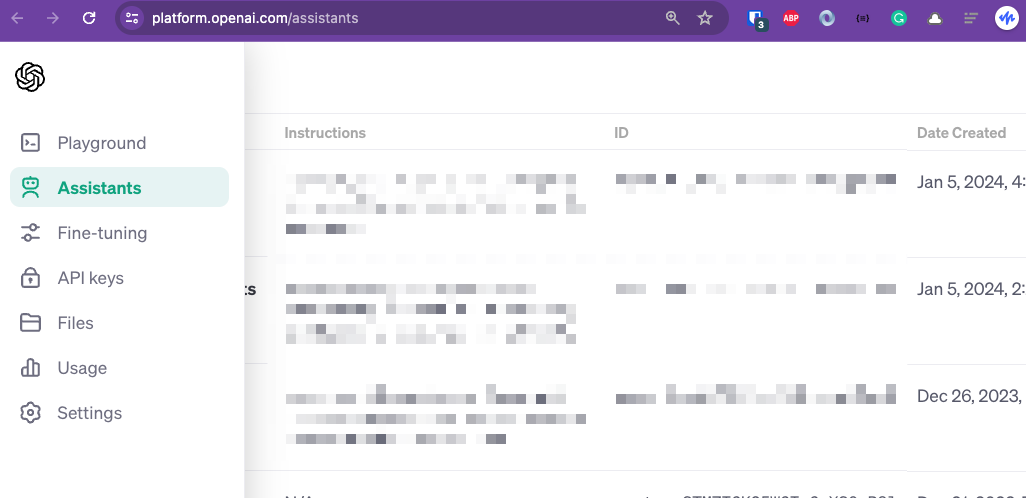
Then click the "+ create" button at the top right corner.
You'll need to enter some information:
- Name (Name of your assistant)
- Instructions (Specific instructions about what the capability of your AI is, how they talk, and so on)
- Model (Choose one OpenAI Model like GPT-3 or GPT-4)
You can leave the tools section for now. It's helpful if you want to add external knowledge to your AI.
b. Via code
You can use this code in your file to create your assistant programmatically.
Make sure to not run this multiple times, since it will create multiple assistants for you. You can always verify it at your OpenAI dashboard.
const assistant = await openai.beta.assistants.create({
  name: "Demo Psychologists",
  description: "You're a very good Psychologists. Answers my problem in a friendly way and based on facts. You can talk with psychology terms.",
  model: "gpt-4-1106-preview"
});
Whatever method you choose, you'll need to save the assistant id. If you're using the first method (via GUI), you can copy the assistant id from the GUI. Then assign it to a variable in your code. If you choose the second method (programmatically), you can get the value from assistant.id .
const assistantId = "YOUR_ASSISTANT_ID";Step 3: Creating a Thread
Next, you need to create a thread. Make sure to separate this thread for each user/conversation since a thread will share the conversation's context.
I'll wrap it in a function so it's easier to see
// Set up a Thread
async function createThread() {
    console.log('Creating a new thread...');
    const thread = await openai.beta.threads.create();
    return thread;
}
Step 4: Adding message
Now we need to add a message to this thread
async function addMessage(threadId, message) {
    console.log('Adding a new message to thread: ' + threadId);
    const response = await openai.beta.threads.messages.create(
        threadId,
        {
            role: "user",
            content: message
        }
    );
    return response;
}
As you can see, I need to pass a thread upon adding this message; so it knows which thread it belongs to.
Imagine if two users are using the same assistant; this is how to ensure the assistant knows which problems belong to which person.
Step 5: Running the assistant
This is how to run the assistant API thread.
async function runAssistant(threadId) {
    console.log('Running assistant for thread: ' + threadId)
    const response = await openai.beta.threads.runs.create(
        threadId,
        {
          assistant_id: assistantId
          // Make sure to not overwrite the original instruction, unless you want to
        }
      );

    console.log(response)

    return response;
}
Again, we need to pass the thread id to ensure we're running the correct thread.
Notes: Upon running an assistant, you have an option to add a key instruction as a parameter, if you want to give a custom instruction to the assistant. In my experience, it will overwrite the original instruction we've provided before. So, use it carefully.Step 6: Polling the update
As of January 2024, we have to check the status of our run.
In order to keep the status of your run up to date, you will have to periodically retrieve the Run object. You can check the status of the run each time you retrieve the object to determine what your application should do next. We plan to add support for streaming to make this simpler in the near future. - OpenAI documentation
Here is the big picture and list of all status possibilities of the run:
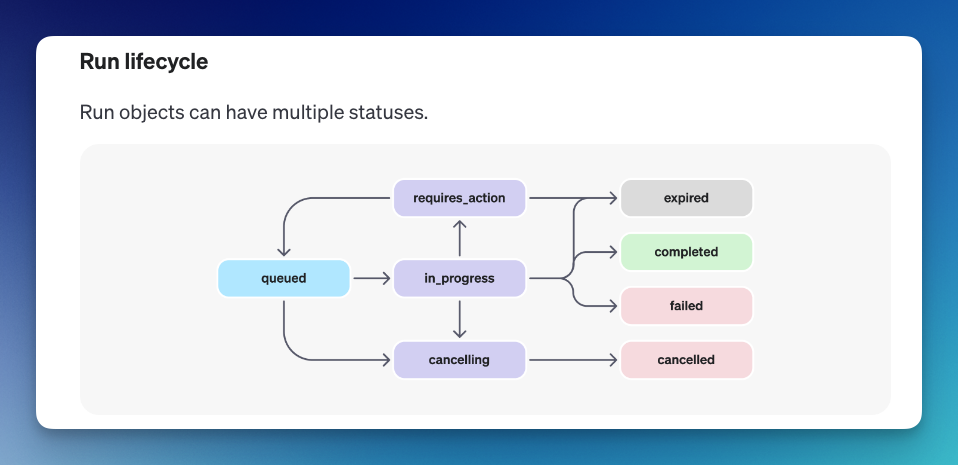
So, I'll add a setInterval method to poll for updates.
// Check the status
pollingInterval = setInterval(() => {
    checkingStatus(res, threadId, runId);
}, 5000);
Here is what my checkingStatusupdates method looks like:
async function checkingStatus(res, threadId, runId) {
    const runObject = await openai.beta.threads.runs.retrieve(
        threadId,
        runId
    );

    const status = runObject.status;
    console.log(runObject)
    console.log('Current status: ' + status);

    if(status == 'completed') {
        clearInterval(pollingInterval);

        const messagesList = await openai.beta.threads.messages.list(threadId);
        let messages = []

        messagesList.body.data.forEach(message => {
            messages.push(message.content);
        });

        res.json({ messages });
    }
}
We can add a conditional logic for all possible values like expired, failed, and so on. But for this sample, I'll show what we can do when the status is completed.
- I clear the interval
- Output the message content
- Return the response
Preparing a route
We've seen the individual method. Now let's see how it actually works.
Route for creating a new thread
I create a route for creating a new thread:
app.get('/thread', (req, res) => {
    createThread().then(thread => {
        res.json({ threadId: thread.id });
    });
})- Make sure to only call this method once per user
- You can save the threadId or session in the frontend part of your code as well, so you can always pass your thread id for the next request
Route for adding a message
Here is what my route looks like when adding a message:
app.post('/message', (req, res) => {
    const { message, threadId } = req.body;
    addMessage(threadId, message).then(message => {
        // Run the assistant
        runAssistant(threadId).then(run => {
            const runId = run.id;

            // Check the status
            pollingInterval = setInterval(() => {
                checkingStatus(res, threadId, runId);
            }, 5000);
        });
    });
  });
In this route, I'm calling multiple functions:
- addMessage, to add the message I received from the frontend
- runAssistant
- checkingStatus in interval
I'm passing the res from express to the checkingStatus method, to make sure we return a proper response and end the request once it's completed or failed.
Start the server
Finally, we can run the Express server with:
// Start the server
const PORT = process.env.PORT || 3000;
app.listen(PORT, () => {
  console.log(`Server is running on port ${PORT}`);
});
Then run the server with:
node server.js //Or your file nameTest endpoint with Postman
Now, let's try this endpoint via Postman.
You can use any HTTP client you want. Including creating a real client app. I'll just use Postman for testing purposes.
Thread endpoint
First, imagine a user entering a chat room or opening a chat box. We'll assume this is a new thread. So we will hit this endpoint /thread with GET method.
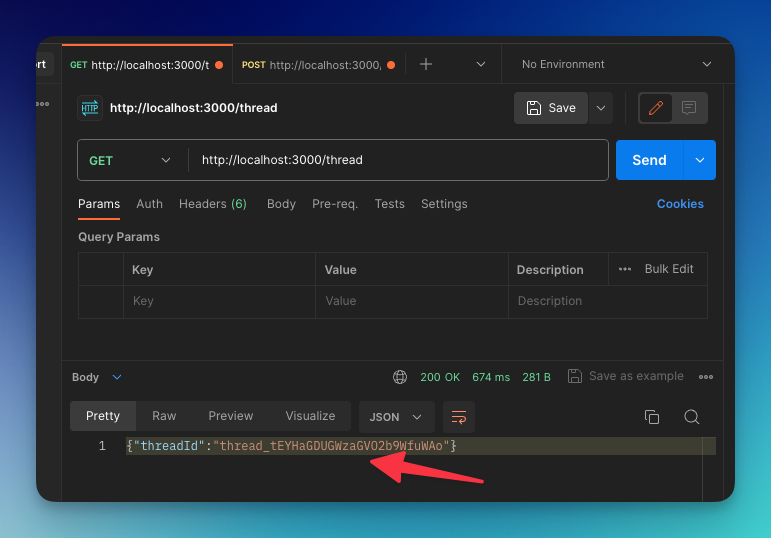
It will return the threadId. We can copy and paste this ID to attach for the next request.
Message endpoint
Now, let's hit the message endpoint with POST method. To do this, we need two parameters:
- threadId
- what message you want to send
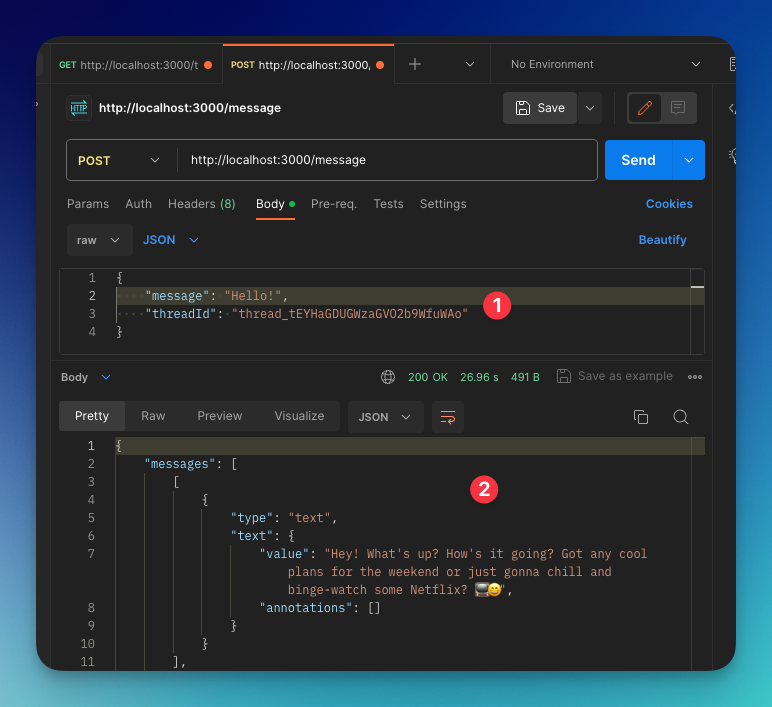
- 1. We're sending both parameters in the Body section in JSON format.
- 2. We receive the response of the messages in an array.
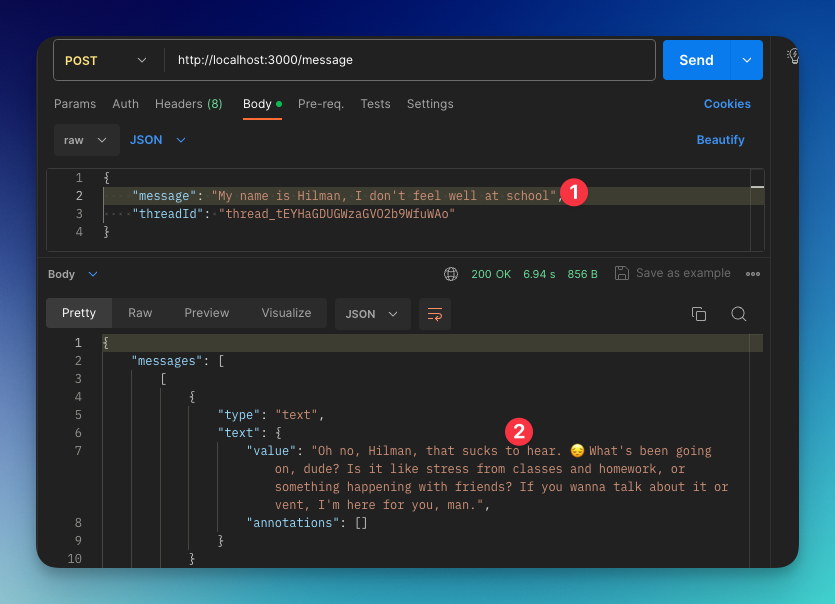
Second message
Let's add the second message to the assistant. Make sure to still share the same threadId as before.
Third message
Now, to make sure the assistant has the context, I'm sending a new message.
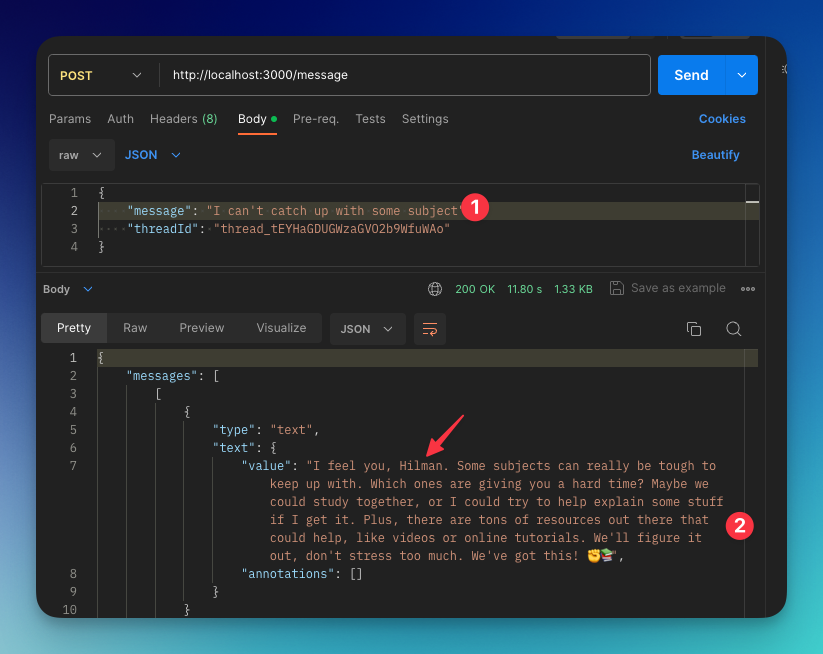
As you can see, the assistant still remembers my name. This means our assistant has the context of our conversation.
Our messages are still returned in an array, so if you scroll down, you can still see all of our old conversations.
That's it!
Thank you for reading this post. I hope it helps you build your very own custom assistant. In the next post, you'll learn how to connect OpenAI assistant with an external API using function-calling feature.
We are using function calling to connect our Assistant to the world. You can read our blog post on the basics of function calling to use external API.
Feel free to contact me if you have any questions at hilman(d0t)serpapi(dot)com
