 Ruby
Ruby
 Golang
 .Net
.Net
 MCP
MCP
 C++
C++

We don't allow access to SerpApi's API directly from the front-end side of your app. It's because the API Key will be visible to users of your application, which can be dangerous.
If you try to run an AJAX request to our API, you'll see this error in your console:
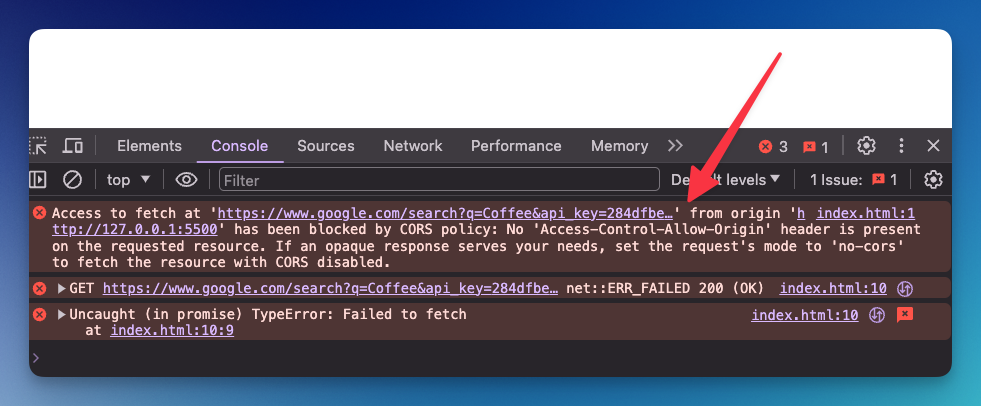
This is known as a CORS issue. CORS, which stands for Cross-Origin Resource Sharing, is a web security feature that controls how web applications running at one origin (domain) can request resources from a different origin.
In this blog post, we'll learn how to create a simple backend application to run your SerpApi call and use this backend app from your front end instead.
Building a NodeJS App
You can use any programming language you want, but we'll learn how to run a NodeJS (Javascript) App for your backend for this tutorial. I'll also provide a GitHub link and instructions so you can still use it even if you don't want to learn the whole part.
My colleague Ryan wrote a blog on building a reverse proxy using Express(NodeJS). You may want to check it out as well: Building a NodeJS app to handle API from Frontend.
- Install NodeJS
Make sure to install NodeJS on your computer. NodeJS is a backend "programming language" using Javascript.
Installation instructions: https://nodejs.org/en
- Create a new server file
Create a new file for your program. You can name it whatever you want with .js extension. For example: server.js
You can copy and paste this code to this file:
const { createServer } = require('node:http');

const hostname = '127.0.0.1';
const port = 3000;

const server = createServer((req, res) => {
  res.statusCode = 200;
  res.setHeader('Content-Type', 'text/plain');
  res.end('Hello World');
});

server.listen(port, hostname, () => {
  console.log(`Server running at http://${hostname}:${port}/`);
});
This is a way to create a new server in Nodejs.
- Run NodeJS program
From your terminal, navigate to this directory (where you have this file). Then, run node server.js .
If there is no error message, you can try accessing your program at localhost:3000 from your browser. You'll see a Hello World message!
Congrats! Now you have a running server!
- Install SerpApi
To use SerpApi, we can use this package: https://serpapi.com/integrations/javascript
From your terminal, run:
npm install serpapi --saveWe're installing a new package called serpapi in this project. So you can easily use our API.
Add this line at the top of your server.js file to use the package
const { getJson } = require("serpapi");- Implement a search
I'll add this code block to perform a request to SerpApi inside the createServer method we have.
const server = createServer((req, res) => {
    const response = await getJson({
        engine: "google",
        api_key: API_KEY, // Get your API_KEY first
        q: "coffee", // anything you want to search for
        location: "Austin, Texas",
      });

  // I'm also updating the response
  res.statusCode = 200;
  res.setHeader('Content-Type', 'application/json');
  res.end(JSON.stringify(response));
});
The key and value pairs (parameters) in thegetJsonfile might be different, depending on your needs. In this example, we're performing a simple search oncoffee.
Try to restart (quit and re-run) your program in the terminal and visit localhost:3000 again. This time, you'll see the response from our API.
To make sure we can catch if there is any error, I'll implement a try-catch block for our program:
const server = http.createServer(async (req, res) => {
  try {
        const response = await getJson({
            engine: "google",
            api_key: "YOUR_API_KEY", // Get your API_KEY first
            q: query,
            location: "Austin, Texas",
        });

        res.statusCode = 200;
        res.setHeader('Content-Type', 'application/json');
        res.end(JSON.stringify(response));
    } catch (error) {
        // handle any error
        res.statusCode = 500;
        res.setHeader('Content-Type', 'application/json');
        res.end(JSON.stringify({ error: error.message }));
    }
});- Make the keyword dynamic
Right now, our program will only run a search for coffee. Let's make it dynamic! We need a NodeJS server that can read a parameter from a request.
We want to request a search like this: http://localhost:3000/?query=tea or http://localhost:3000/?query=milk (*or any other keywords).
We can read a parameter in NodeJS like this
// read query parameters
const url = new URL(req.url, `http://${req.headers.host}`);
const searchParams = url.searchParams;
const query = searchParams.get('query');
So this is what our createServer method looks like:
const server = http.createServer(async (req, res) => {
    // read query parameters
    const url = new URL(req.url, `http://${req.headers.host}`);
    const searchParams = url.searchParams;
    const query = searchParams.get('query');

    try {
        const response = await getJson({
            engine: "google",
            api_key: "API_KEY", // Get your API_KEY first
            q: query,
            location: "Austin, Texas",
        });

        res.statusCode = 200;
        res.setHeader('Content-Type', 'application/json');
        res.end(JSON.stringify(response));
    } catch (error) {
        res.statusCode = 500;
        res.setHeader('Content-Type', 'application/json');
        res.end(JSON.stringify({ error: error.message }));
    }
});
7 Allow CORS
We can also add a specific CORS rule to allow access to a certain domain. You can put this code block at the beginning of the createServer method:
const allowed_domain = '*'  // Adjust with your domain or localhost port
res.setHeader('Access-Control-Allow-Origin', allowed_domain);
res.setHeader('Access-Control-Allow-Methods', 'GET');
res.setHeader('Access-Control-Allow-Headers', 'Content-Type');
In this example, we allow everything (*) or every request to this server. Later on, you might want to restrict this from a certain domain.
Don't forget to restart your server!
- (Optional) Multiple dynamic parameters
You might need to add more dynamic parameters to make the search more dynamic. To do this, add another line to catch additional parameters.
const query = searchParams.get('query'); // for query
const location = searchParams.get('location'); // for location
So, you can access the endpoint like this:http://localhost:3000/?query=tea&location=indonesia
Here is the GitHub link for this node.js code example
You can also find a step-by-step instruction on how to run it from the readme file.
 hilmanski
Access the API from frontend
Now, the moment we've been waiting for. Let's access that program from our HTML.
- Create a new HTML file.
Create a simple HTML file that performs this fetch request to our NodeJS API:
<!DOCTYPE html>
<html lang="en">
<body>
    <script>
        fetch('http://localhost:3000/?query=tea')
        .then(response => response.json())
        .then(data => console.log(data));
    </script>

</body>
</html>- Test the result
Open your HTML file in the browser and check the console tab. Here is what the response looks like:

Feel free to make a user interface with HTML and CSS depending on your needs. You can make for example, the query coming from a user input, instead of hardcode it in the fetch URL.
That's it! That's how you can perform a request to SerpApi's API from HTML.
