Ruby
Ruby
 Golang
 .Net
.Net
 C++
C++

Intro
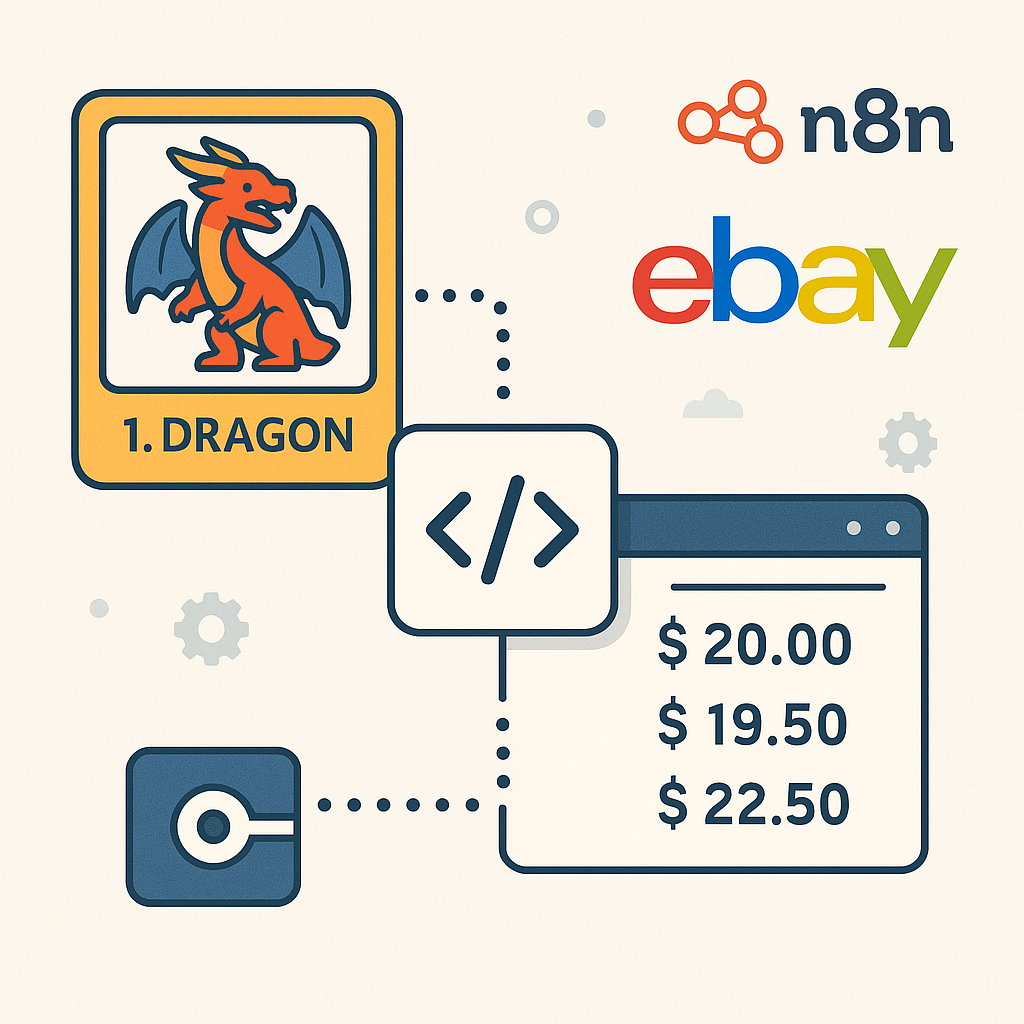
Selling collectibles—like trading cards, vinyl records, and action figures—online can be challenging, especially when you’re unsure exactly what you have. In this tutorial, we’ll build an automation that identifies an item using visual search. By leveraging Google Lens (via SerpApi) for image recognition, you can quickly determine the exact name of a card or collectible. This approach is incredibly useful: instead of manually guessing keywords, you use image searches combined with AI to pinpoint an item’s title directly from a photo, saving you time and improving your listings.
What You’ll Need
- SerpApi account & API key: Sign up for an API key (they offer a free tier of 100 searches/month).
- n8n: an automation workflow tool (self-hosted or cloud).
- Amazon Web Services (AWS): an AWS account with an S3 bucket to store images. We’ll use this to host the image for Google Lens to analyze.
Workflow Overview
In the workflow below, we’ll connect several powerful tools to automate identifying products from images. We’ll begin by receiving an image through a webhook, processing and uploading it to AWS S3, performing a visual search using Google Lens (via SerpApi), and finally extracting potential titles (or names) for the product.
Step-by-Step Setup
Below, we’ll walk through each component of the workflow in detail, starting from triggering the workflow all the way through extracting potential item titles. Follow along to build your automation step-by-step:
Workflow Triggers
n8n provides several methods for starting a workflow. Below, I’ve highlighted some additional trigger options you might consider depending on your specific needs:
- Webhook Trigger (used in this tutorial): Send images directly to your workflow using an HTTP webhook, suitable for automation from external scripts or apps.
- Manual Trigger: Ideal if you want full control to initiate your workflow manually, especially when retrieving images from specific sources at specific times.
- Application Triggers: Automatically start your workflow based on events from integrated apps, such as:
- Google Sheets: Trigger workflows when a new row is added or updated.
- Email Trigger: Initiate workflows from emails containing images sent to a designated inbox.
- Google Drive: Start workflows based on file changes within a specific folder.
- Scheduled Trigger: Automate workflows at specified intervals. This is useful for regularly processing images collected over a set period.
- Local File Trigger: For self-hosted n8n instances, monitor a local directory for new or updated image files to automatically kick off workflows.
In this guide, we’ll use the Webhook Trigger for simplicity and flexibility. Let’s continue with setting it up.
Create a workflow in your n8n instance and add the first step (trigger), as mentioned above, we’ll select “On webhook call”:
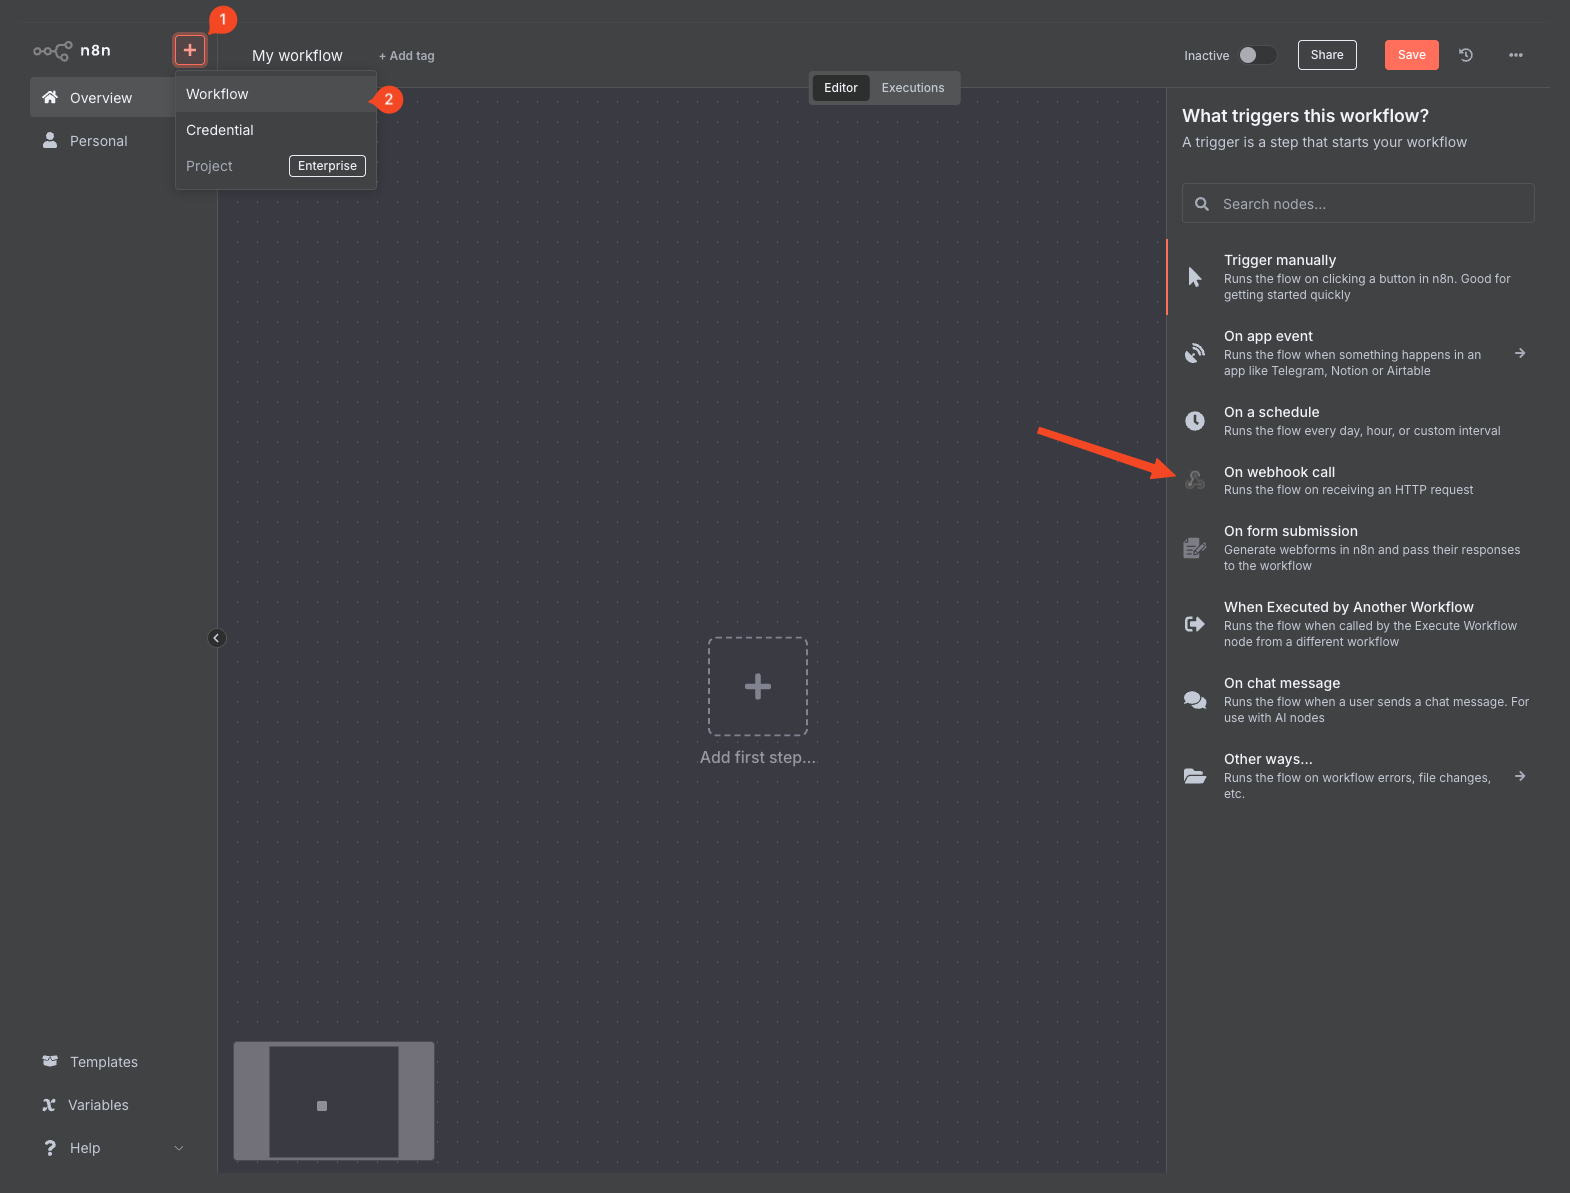
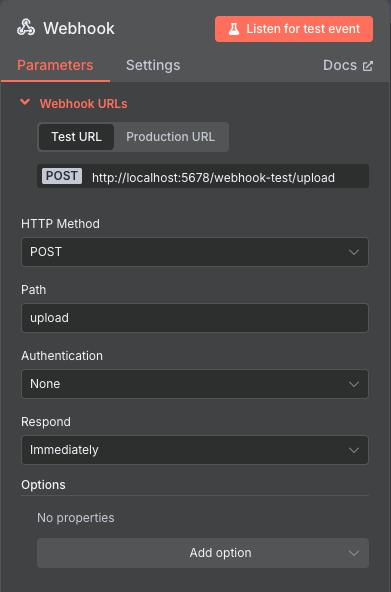
Once the webhook trigger is set, we can configure the HTTP Method we will use when calling the webhook, the Path we want for the webhook, the authentication you would like to use, and when the webhook should respond. We’ll set the following parameters:
- HTTP Method: POST
- We will be POSTing image data to the webhook.
- Path: upload
- You can set this to your preference, but make sure to keep this in mind later when we start sending image data to the webhook.
- Authentication: None
- While I won’t be using authentication for my tutorial, refer to Webhook credentials for more information on setting up each credential type.
- Response: Immediately
- As most of our processing will occur independently of our upload script, we want the workflow to simply confirm receipt of the request. However, you can adjust this to your liking if integrating more closely with existing systems.
While n8n offers additional configuration options, these will be all we should need for the time being. Once complete, your webhook configuration should look like this:
Upload Script
Now that our webhook is set up, we need to be able to send images to the webhook. While there are many ways to do this, for testing and my simple use case, we’ll use a Node.js script to send local images to the webhook as Base64 strings.
I’ve created a repository for the script I will be using for the rest of this post, which I recommend you clone and use to follow along. I won’t walk through setting up the upload script; please refer to the README to install it locally. I will, however, review how the script works in case you want to write your own or make adjustments to mine.

processImages()
async function processImages() {
  try {
    console.log(`Looking for images in ${IMAGES_DIR}`);

    try {
      await fs.access(IMAGES_DIR);
    } catch (error) {
      console.error(
        `Error: Directory ${IMAGES_DIR} does not exist or is not accessible.`
      );
      return;
    }

    const files = await fs.readdir(IMAGES_DIR);

    const imageFiles = files.filter((file) =>
      IMAGE_EXTENSIONS.includes(path.extname(file).toLowerCase())
    );

    console.log(`Found ${imageFiles.length} image(s) in the images directory`);

    // Process each image file
    for (const imageFile of imageFiles) {
      const imagePath = path.join(IMAGES_DIR, imageFile);
      await postImageToWebhook(imagePath);
    }

    console.log("All images have been processed");
  } catch (error) {
    console.error("Error processing images:", error);
  }
}
This is the main driver function of the script. It checks for an images directory, finds all supported image files within it, and sends them one by one to the webhook. It includes basic validation (ensuring the directory exists), filters out non-image files, and passes each valid image to a helper function for uploading. It also logs progress throughout, which is helpful during testing or debugging.
postImageToWebhook()
async function postImageToWebhook(imagePath) {
  try {
    const imageBuffer = await fs.readFile(imagePath);
    const filename = path.basename(imagePath);

    console.log(`Posting ${filename} to webhook...`);

    const payload = {
      filename: filename,
      size: imageBuffer.length,
      imageData: imageBuffer.toString("base64"),
    };

    const response = await fetch(WEBHOOK_URL, {
      method: "POST",
      headers: {
        "Content-Type": "application/json",
      },
      body: JSON.stringify(payload),
    });

    if (response.ok) {
      console.log(`Successfully posted ${filename}`);
    } else {
      console.error(
        `Failed to post ${filename}: ${response.status} ${response.statusText}`
      );
    }
  } catch (error) {
    console.error(`Error posting ${path.basename(imagePath)}:`, error);
  }
}
This helper function handles the actual upload of an image. It reads the file into memory, converts it into a base64 string, and builds a JSON payload that includes the filename and file size. It then sends the payload as a POST request to the webhook URL. If the request fails or throws an error, it also logs that information.
By splitting the logic into these two async functions, the script stays modular and easy to extend, for example, to add rate limiting, error retries, or metadata tagging. Feel free to adapt this structure to fit your use case.
Test
Once you're ready to send images as Base64 strings to the webhook, click the "Listen for test event" button, and the webhook will start listening.
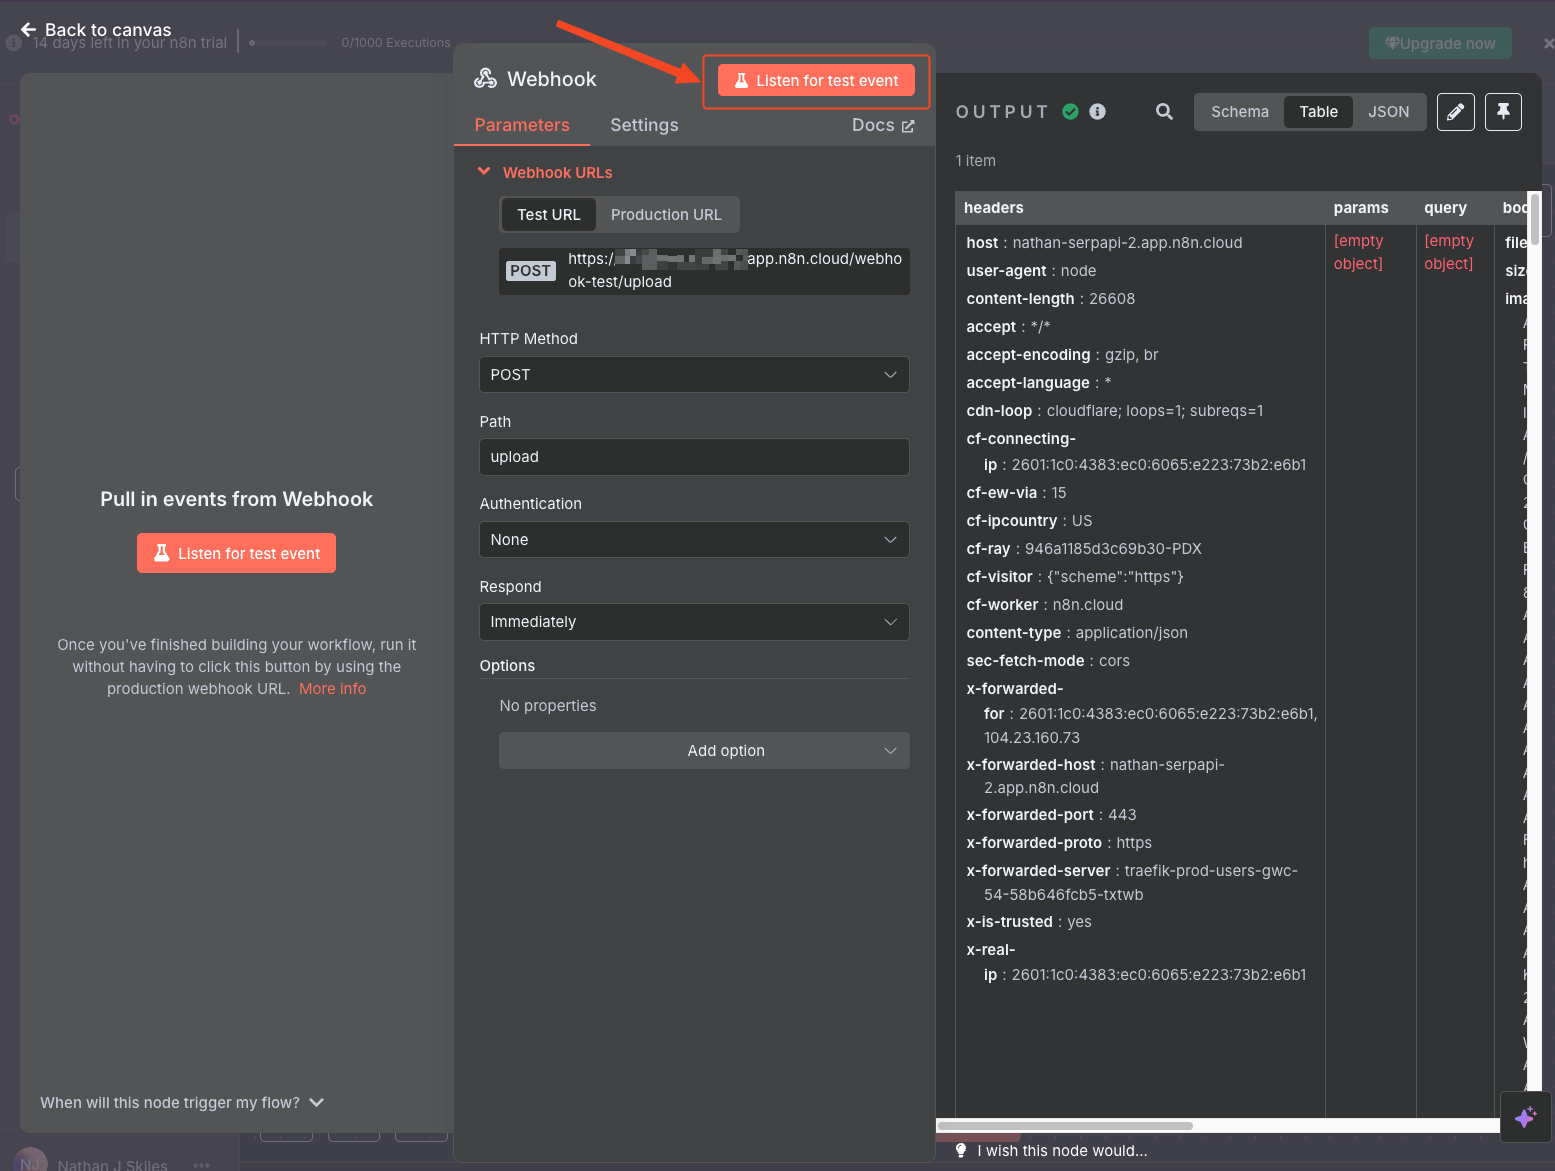
In the screenshot above, I've successfully sent a request to the webhook.
Convert Base64 to File
Because our images are being sent to the webhook as Base64 strings, we’ll need to convert that string back into a binary file before uploading to AWS S3. Fortunately, n8n provides a built-in “Convert to File” node that handles this for us.
Start by adding a new node, then search for and select “Convert to File.”
From the list of operations, choose “Move base64 string to file.”
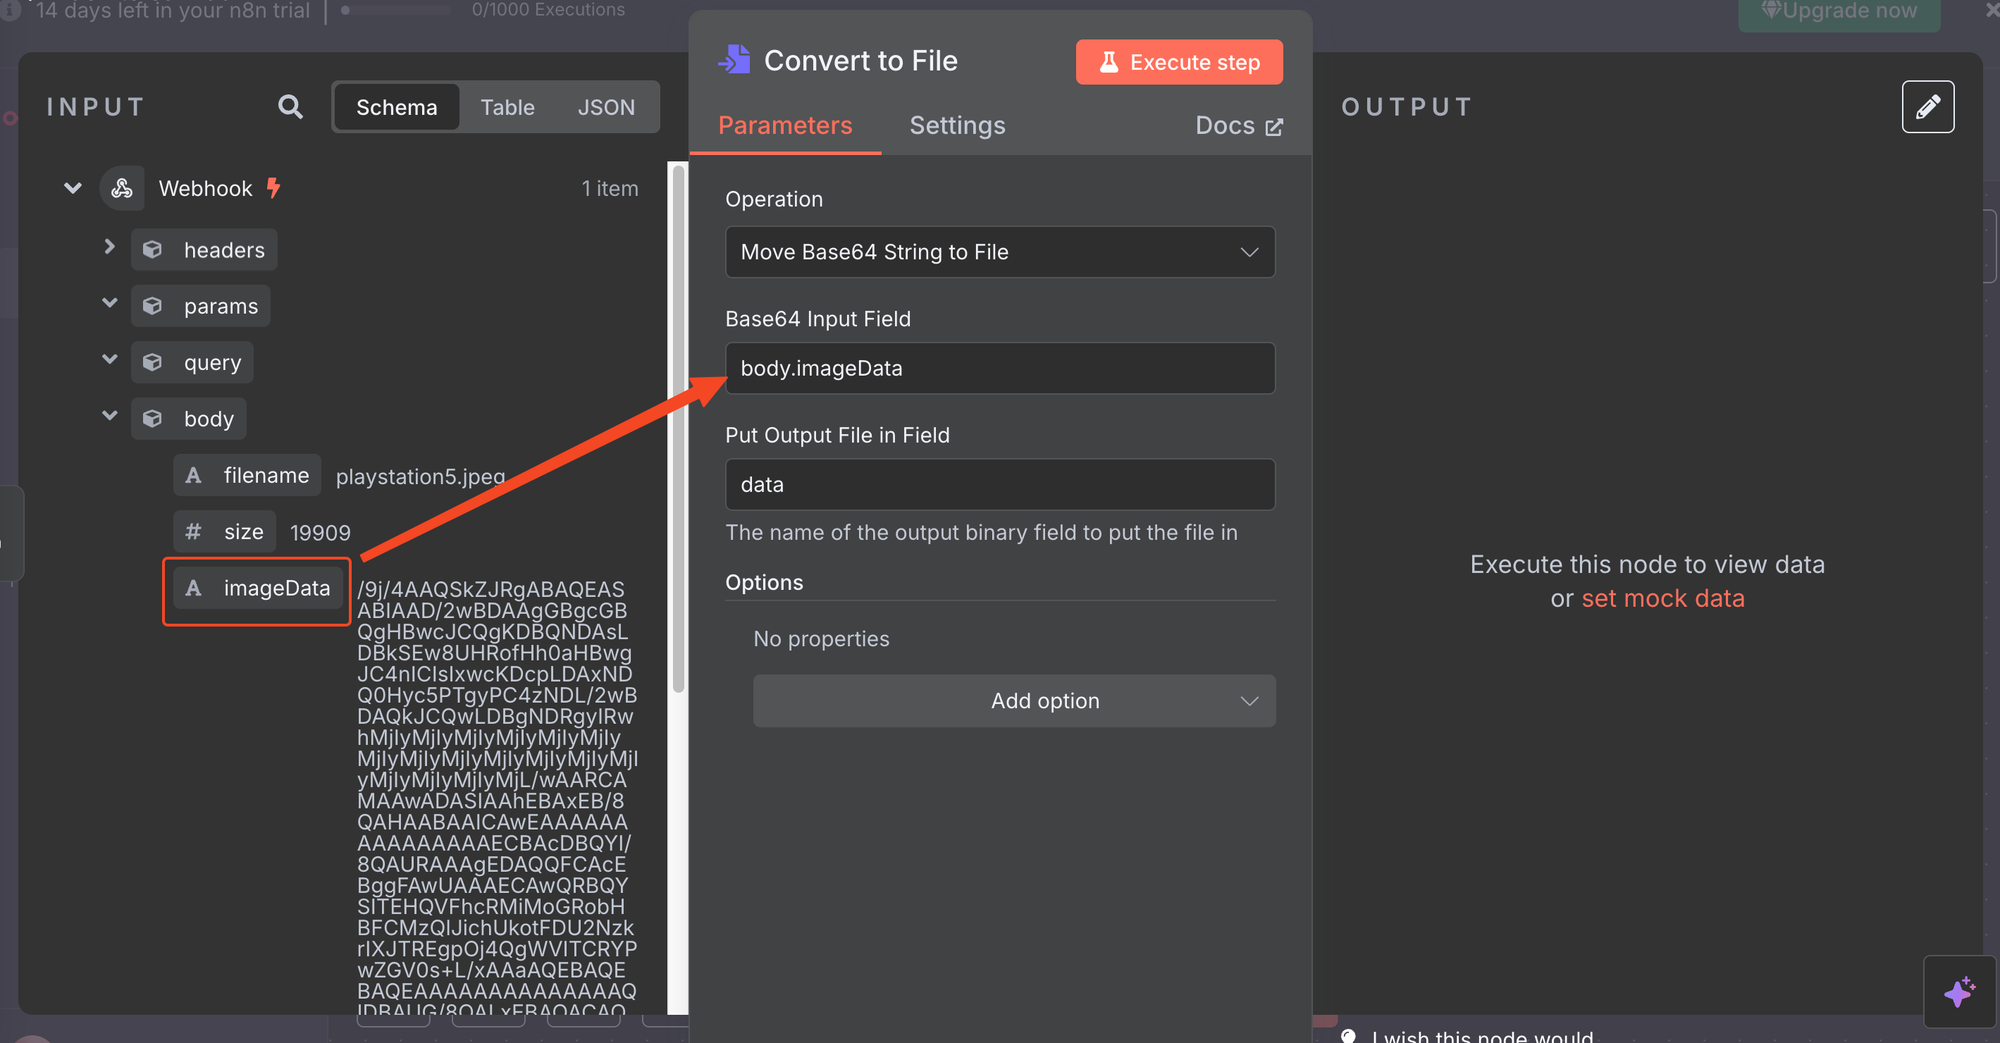
Next, drag the imageData field from the body of the webhook request into the Base64 input of this node.
Once added, execute the node. You should now see the resulting image file in the output preview.
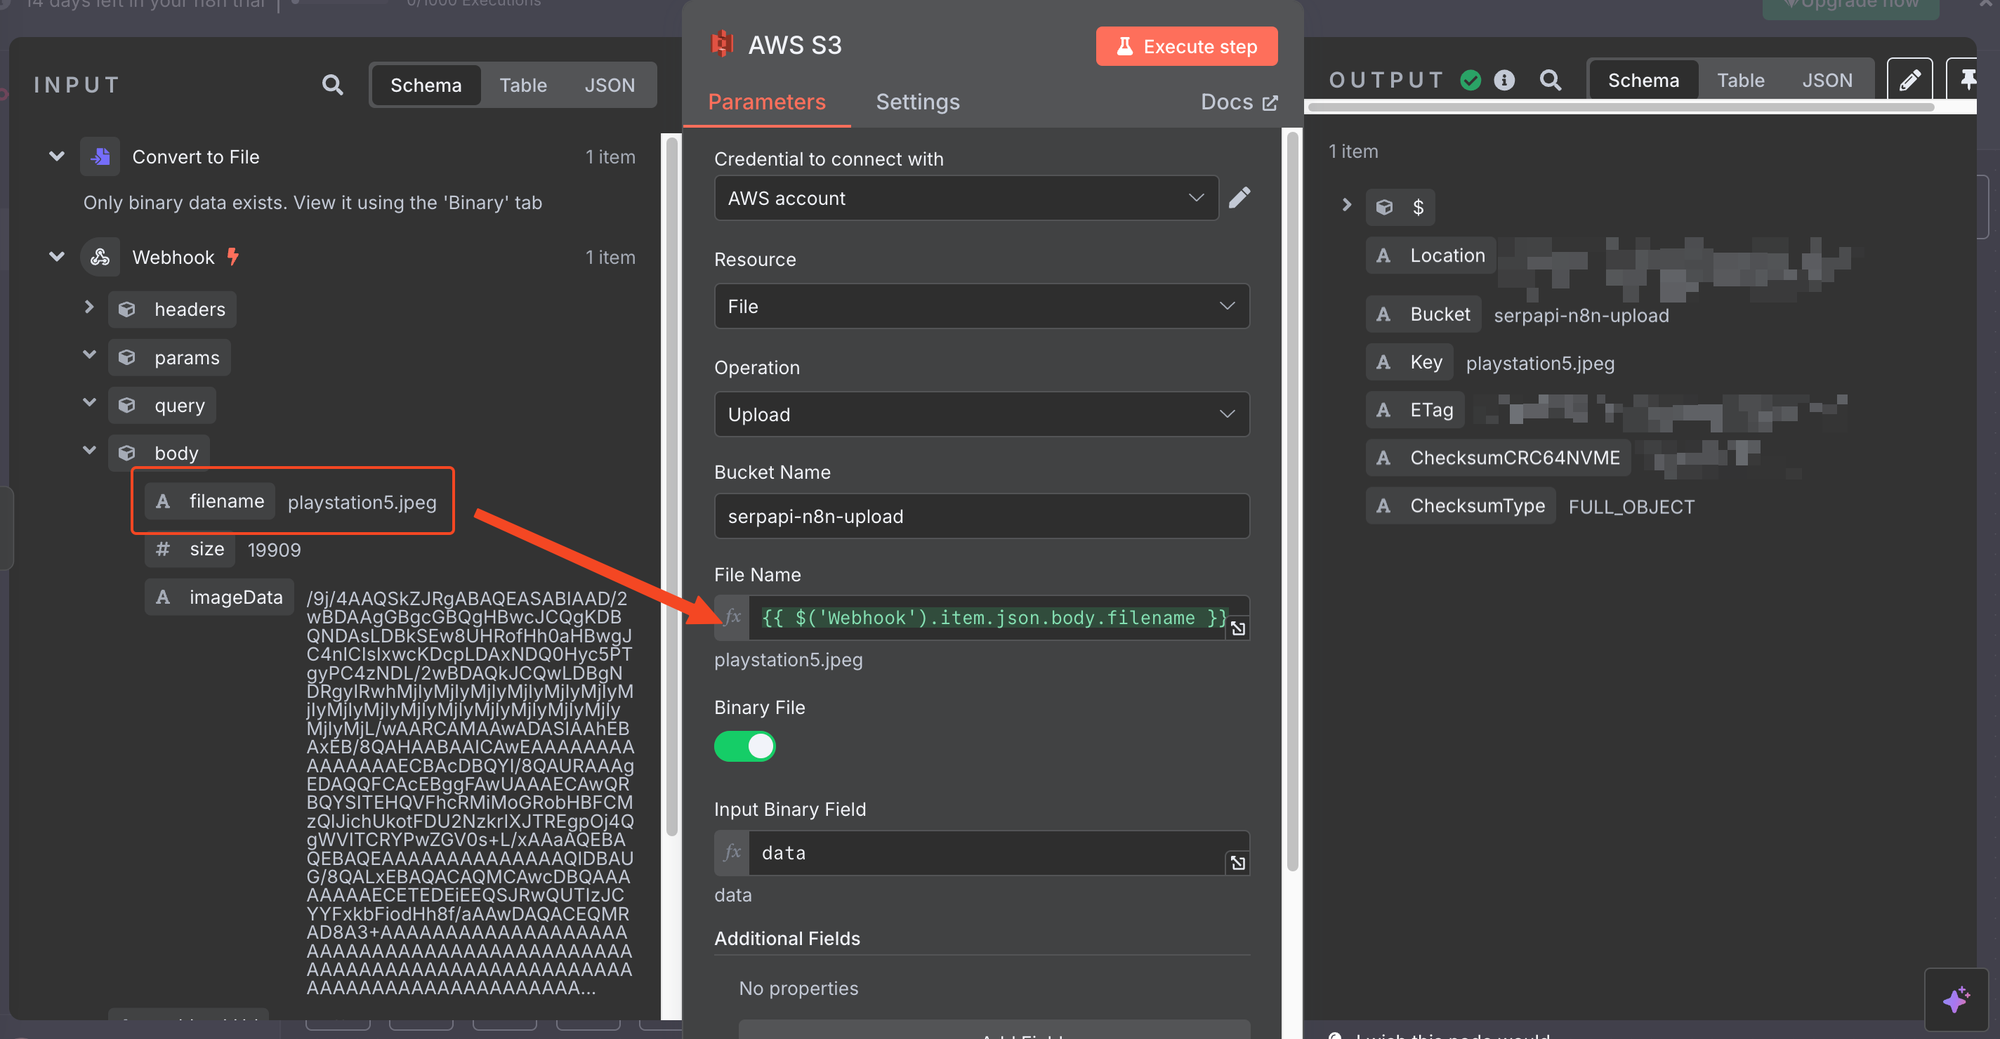
Upload to AWS S3
Congratulations! You’ve completed the hard part; images are now successfully sent and received by your n8n instance. The next step is to upload those images to cloud storage so they can be publicly accessed via a URL, which we’ll need when using SerpApi’s Google Lens API in the next section.
For this tutorial, we’ll use AWS S3, a widely adopted storage service that integrates seamlessly with n8n via the AWS S3 node.
If you don’t already have an S3 bucket set up, refer to AWS’s documentation to get started:
Before using the AWS S3 node, you’ll need to connect your AWS account to n8n. You can follow the official guide here:
Once your credentials are added:
- Add the AWS S3 node to your workflow.
- Set Resource to File, and Operation to Upload.
- Enter the bucket name where your images will be stored.
By default, the Input Binary Field should already point to the output of the previous “Convert to File” step. You’ll also need to specify a name for the uploaded file.
You can either:
- Drag the filename field from the Webhook step, or
- Use an expression like this:
{{ $('Webhook').item.json.body.filename }}
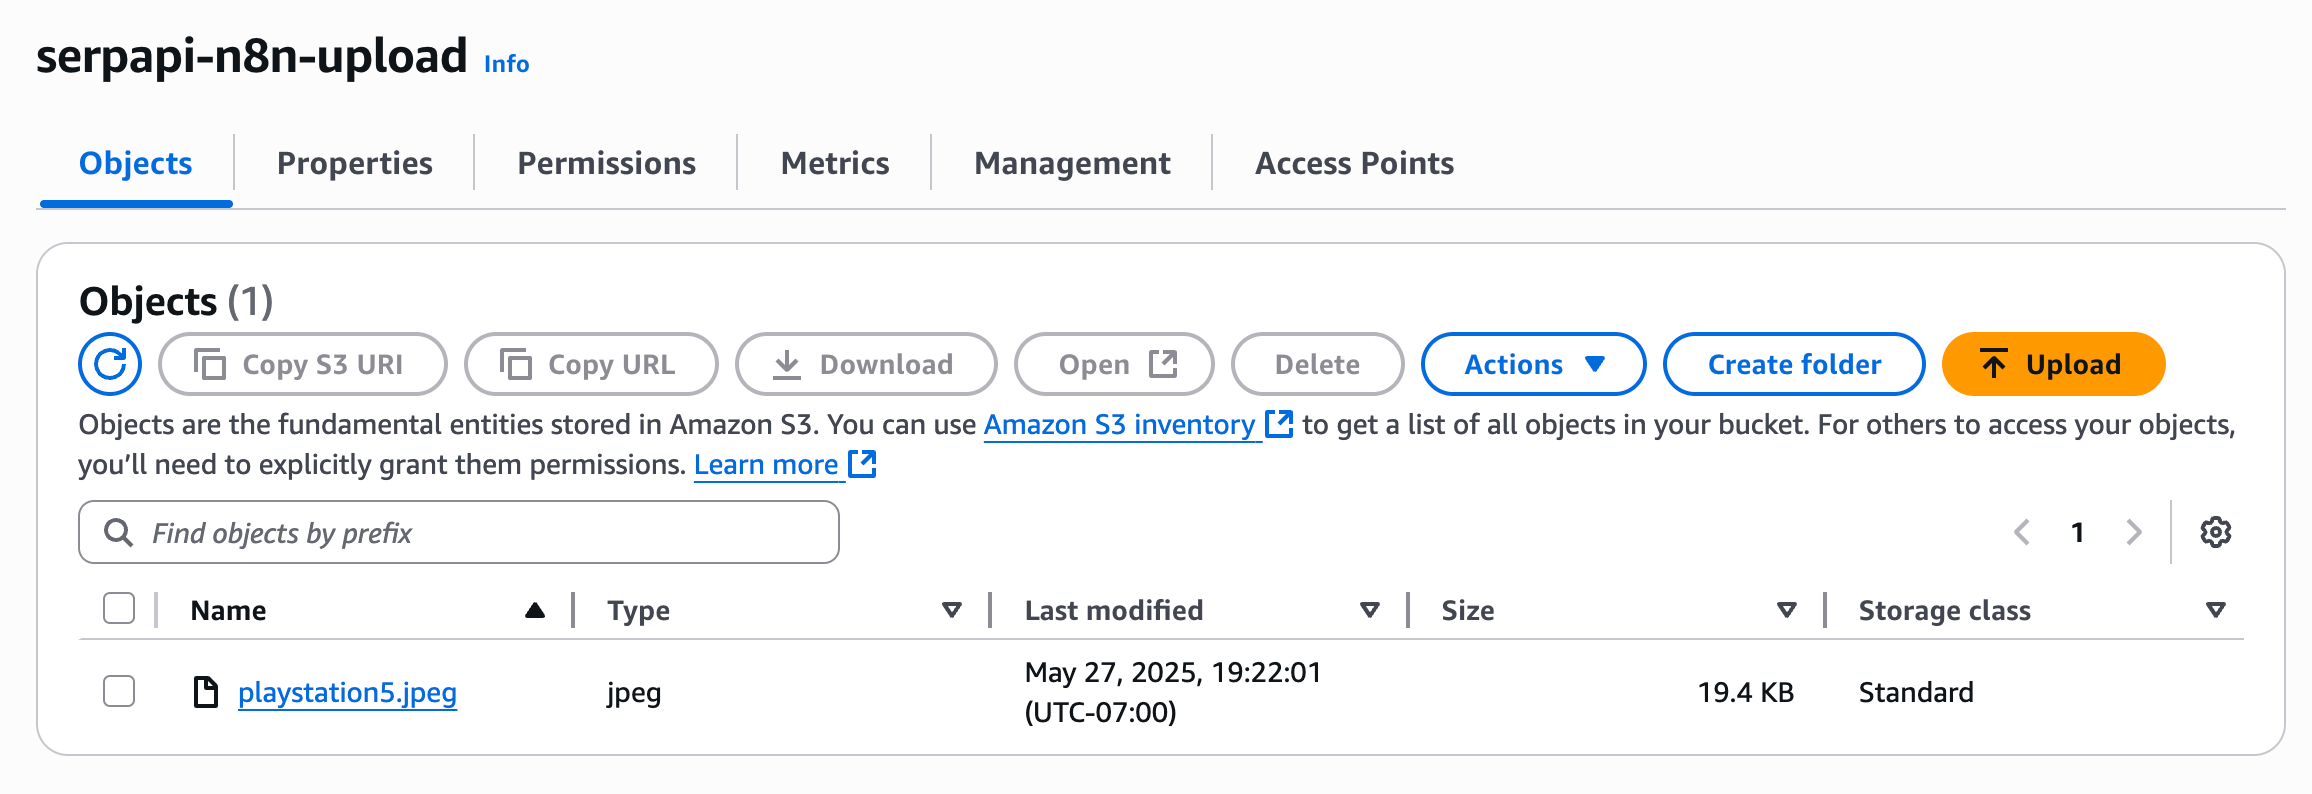
Execute the step and ensure the file is uploaded correctly to S3.
Google Lens Search via SerpApi
SerpApi recently released an official n8n node that simplifies integration with our APIs. While you can still use the generic HTTP Request node to interact with SerpApi, this tutorial will use the SerpApi Official node to streamline configuration and reduce setup time.
For instructions on how to install the SerpApi node in your n8n instance, refer to our announcement post:

Set Up the SerpApi Node
- Add a new node and search for “SerpApi Official.”
- Add your SerpApi API key to the node’s credentials. You can find your key here: https://serpapi.com/manage-api-key
- Select the Google Lens operation.
- In the Image URL field, drag the Location attribute from the AWS S3 step (this is the public URL of the image you uploaded).
In the example below, I’ve also set the language parameter to English and the country parameter to United States:

Once configured, execute the node and confirm that SerpApi returns data based on the image URL.
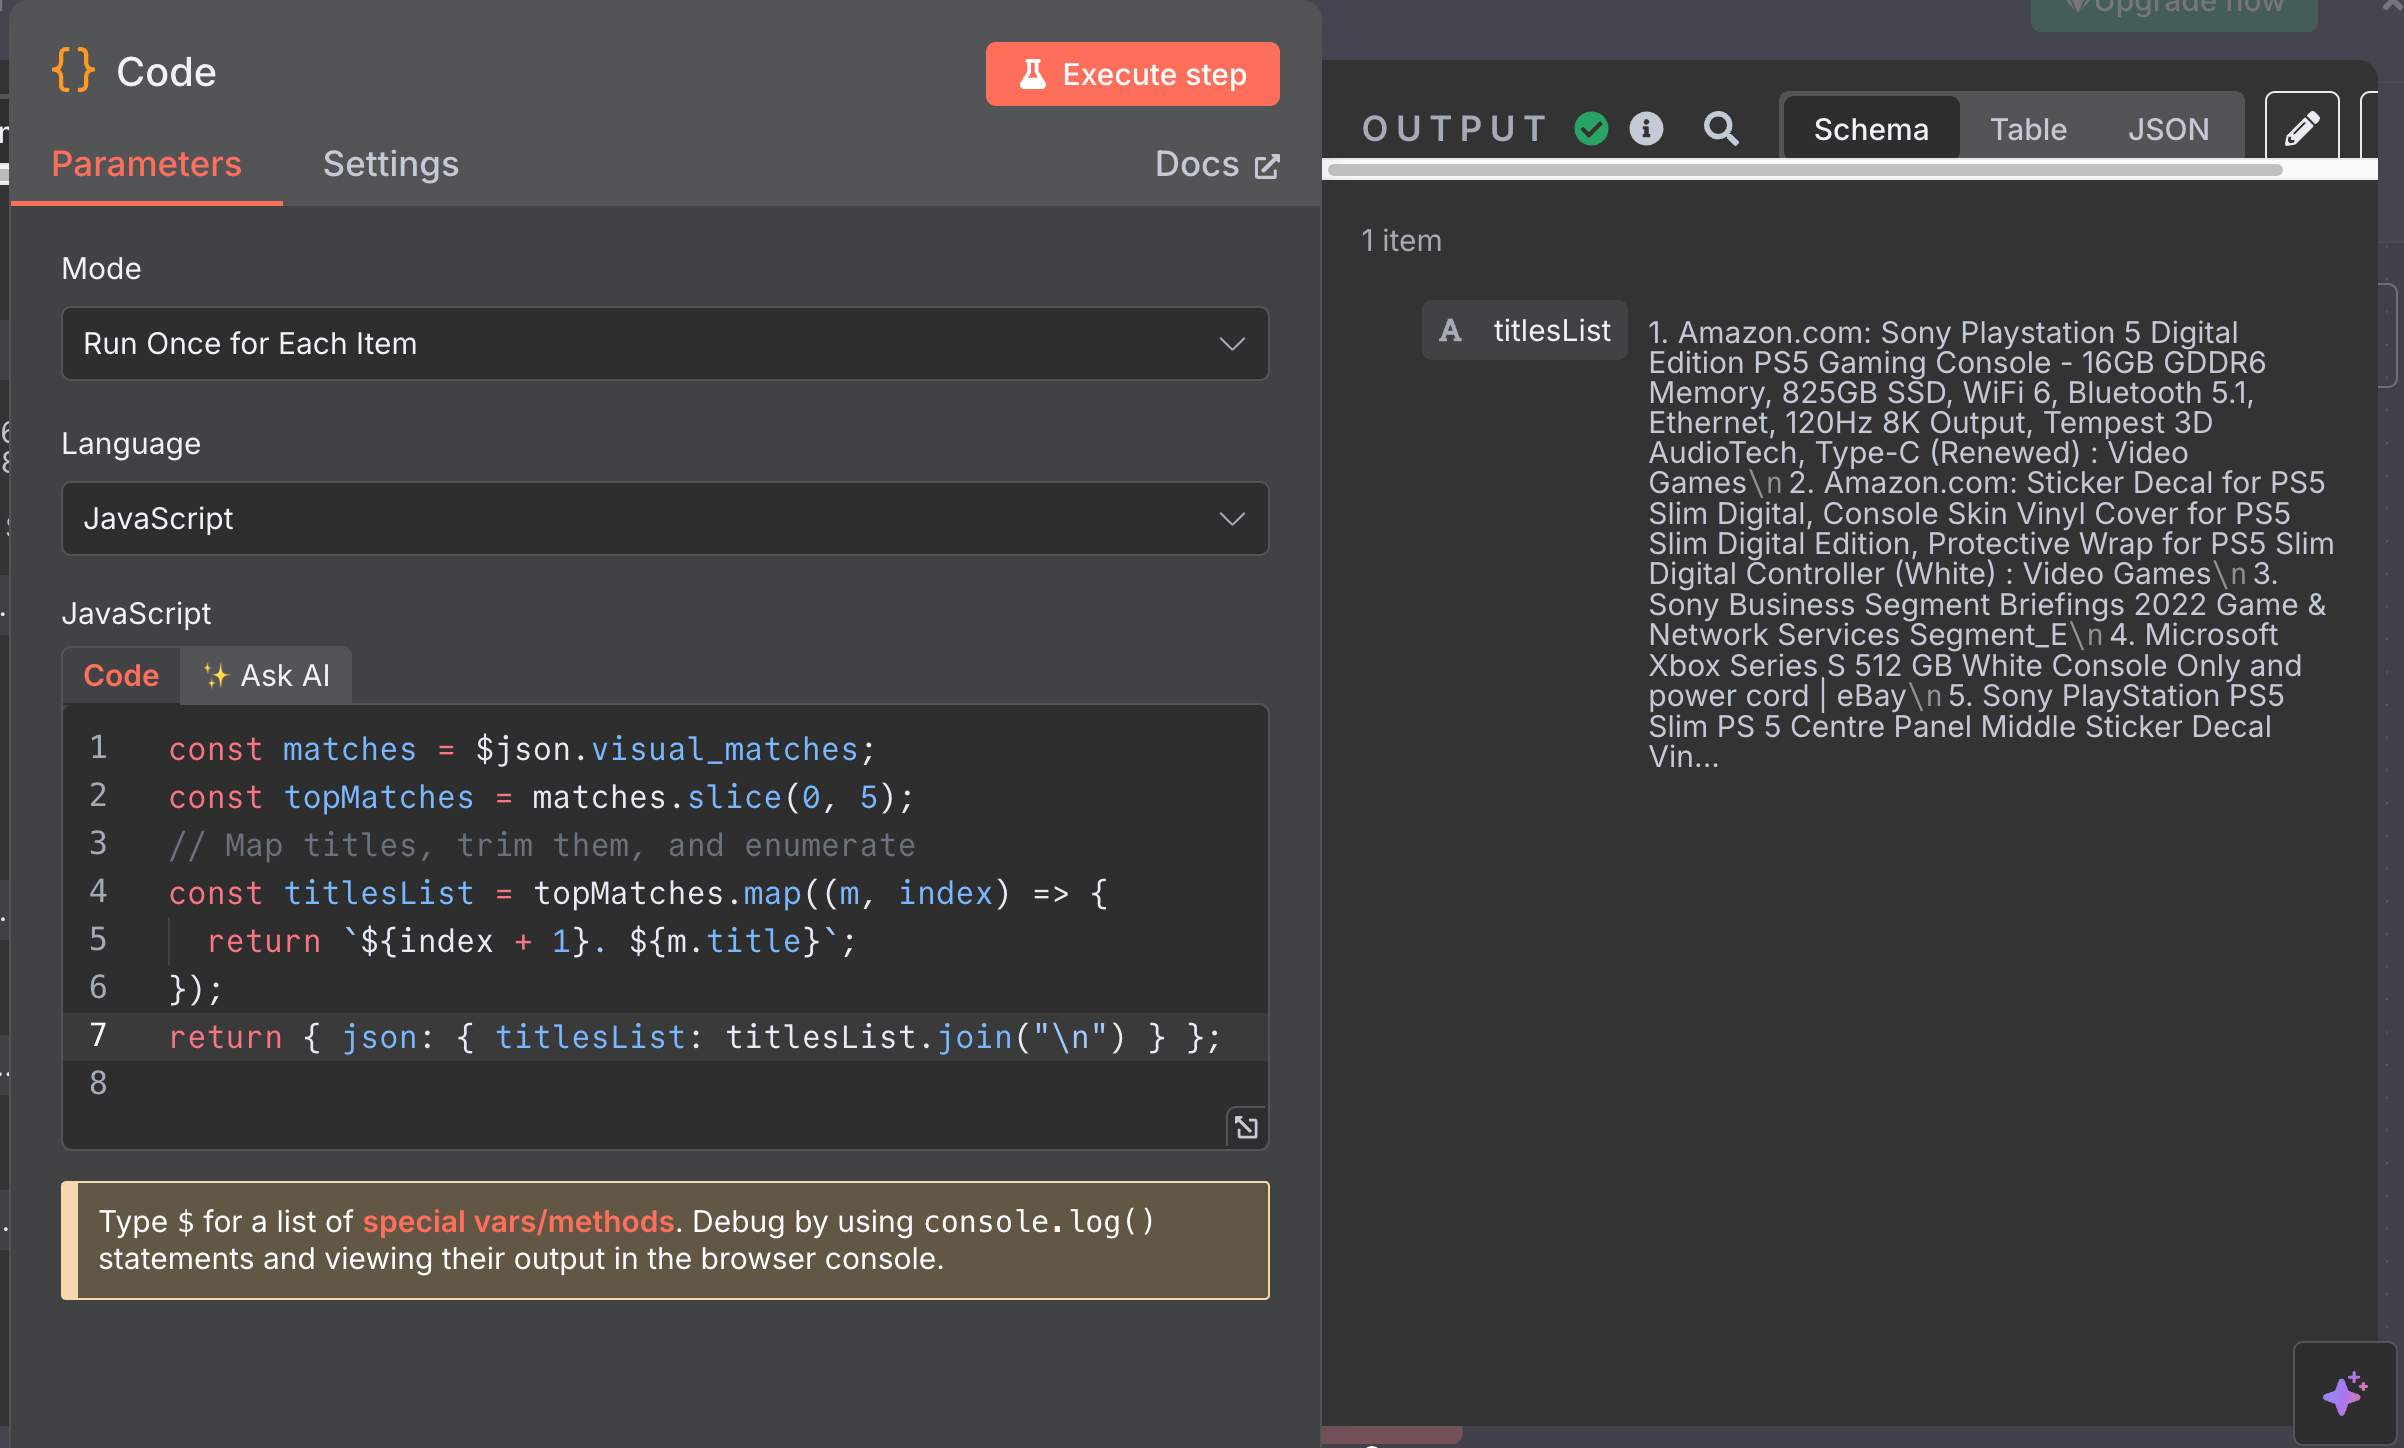
Extract Matching Titles
At this point, you can begin branching out based on your specific use case. In my case, I want to determine the name of the product I uploaded, so I’ll extract a list of possible product names from the visual matches returned by SerpApi’s Google Lens API.
To do this, we’ll use the Code node in n8n to process and format the results with JavaScript.
- Search for and add the Code node to your workflow.
- Set the Mode to “Run Once for Each Item.”
- Paste the following JavaScript into the code editor:
const matches = $json.visual_matches;
const topMatches = matches.slice(0, 5);
// Map titles, trim them, and enumerate
const titlesList = topMatches.map((m, index) => {
  return `${index + 1}. ${m.title}`;
});

return { json: { titlesList: titlesList.join("\n") } };
Finally, execute the node and confirm that the titles of the top 5 visual match results are returned in a clean, readable list.
Wrap-Up
In this first part, we built the foundation of our visual search workflow. Starting with a Base64-encoded image, we uploaded it to generate a public URL and used the Google Lens API (via SerpApi) to identify what the item could be. This gave us a shortlist of possible product names, no manual searching required.
Now that we have these possible titles, what’s next? In Part 2, we will bring in AI to decide which title is the best match for our item and then automate an eBay search for that exact product. With that, we’ll be able to fetch the current prices of the item on eBay and even prepare the data for tracking or listing.