 Ruby
Ruby
 Golang
 .Net
.Net
 MCP
MCP
 C++
C++

Let's learn how to build a smart AI voice assistant! Previously, we built a simple AI voice assistant using the OpenAI API. Feel free to follow the tutorial here.
 Hilman Ramadhan
This time, we want to eliminate the knowledge limitation of the OpenAI model (which is cut off in a certain year) by adding the ability to Google an answer. If we can Google the answer, we can get real-time data!
Here is the video demo of what we're going to build:
Expand the AI assistant knowledge
"LLMs can reason about wide-ranging topics, but their knowledge is limited to the public data up to a specific point in time that they were trained on. If you want to build AI applications that can reason about private data or data introduced after a model’s cutoff date, you need to augment the knowledge of the model with the specific information it needs. The process of bringing the appropriate information and inserting it into the model prompt is known as Retrieval Augmented Generation (RAG)." - What is RAG - LangChain.
We're going to see a simple implementation of RAG using OpenAI.

How to connect the assistant to the internet
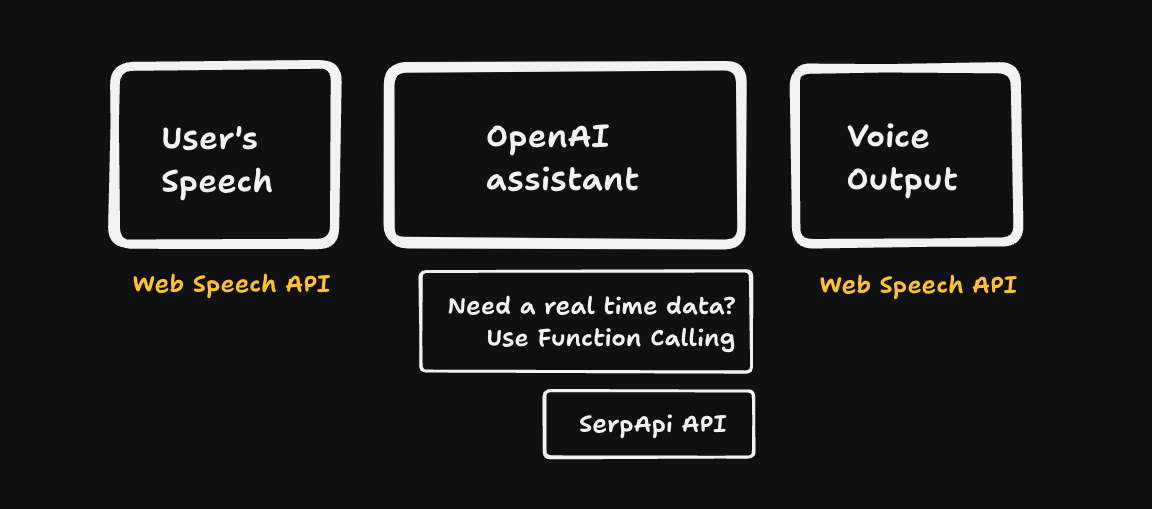
OpenAI has a separate API called function calling , which enables the AI assistant to call external APIs. Luckily, SerpApi offers an API to access Google Search results. So, we'll call the SerpApi Google Search API via function calling inside our app whenever the assistant needs real-time data.
Using function calling, the assistant is smart enough to decide when to call and when not to call for an external API.
Here is how our app is structured:
Reference:
- Connect OpenAI with external APIs using Function calling.
- Google Search API by SerpApi.
SerpApi provides answer_box in the response, which we can utilize to get answers to common questions like:
- What's the weather in {location}
- Stock price information for {company name}
- Step by step on doing something, for example how to clean up disk c
- etc.
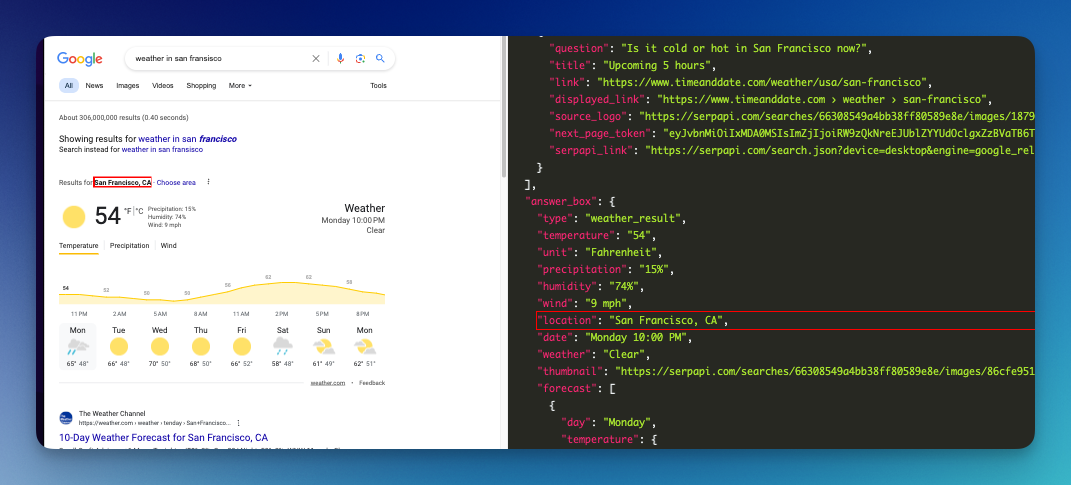
As you can see, using a Web Search API like SerpApi will enable your AI model to access real-time data from the internet.
Step by Step
Let's look at the step-by-step process of building a smart AI voice assistant using OpenAI. Don't worry, the final source code for this blog post is available on GitHub:
 hilmanski
I won't cover all the codes line by line. Instead, I'll highlight the important parts.
Do you prefer to watch a video? You can watch it here or on YouTube
Create a new assistant
Just like before, we need to create a new assistant. We can do it programmatically or via GUI. I prefer the latter. Make sure you have an OpenAI account. You can create the assistant from the platform page.
Here is the instruction I gave:
You're a general AI assistant that can help with anything. You're a voice assistant, so don't speak too much, make it clear and concise. When needed, you can access the internet through an external function that is available to you. The external function is access to Google, you can get a direct answer or knowledge graph from your Google search. Only use the external API when needed.
I chose the gpt-4-model-preview . Make sure to choose a model that supports multiple function callings.
Add functions calling as tools
Let's add a function schema during the assistant creation. This is like preparing the AI to call a described function whenever necessary. We'll declare the actual function (external API) in the code.
Feel free to add as many functions as you need.
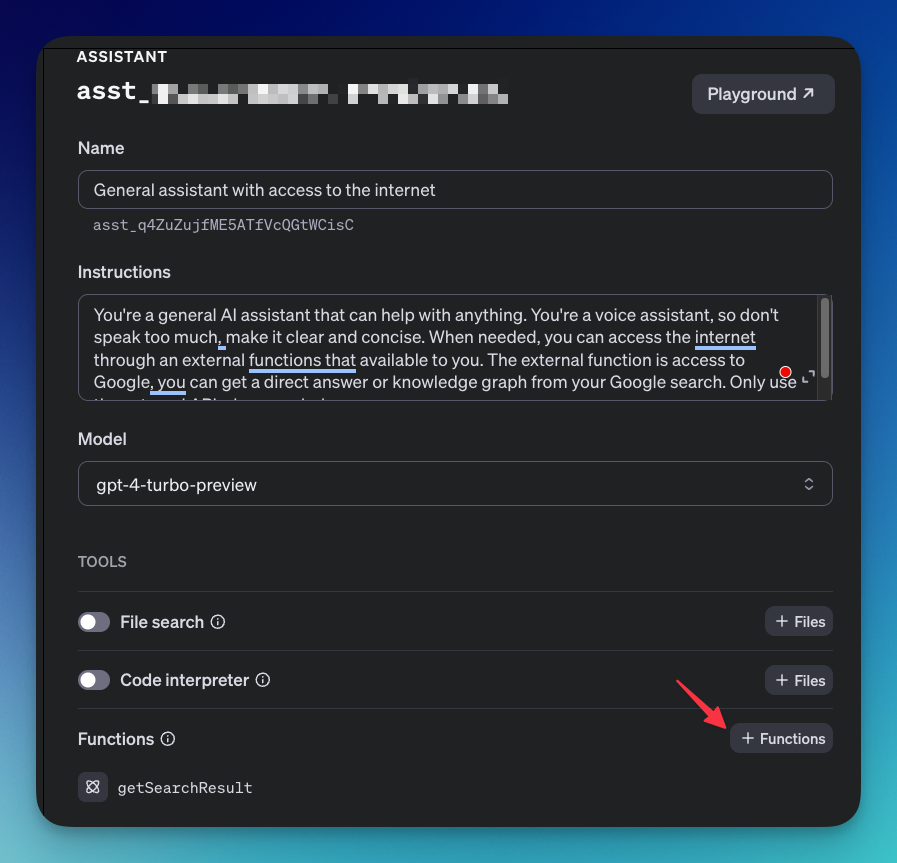
Here is the function that I added to the OpenAI GUI platform:
{
  "name": "getSearchResult",
  "description": "return search results from a given keyword",
  "parameters": {
    "type": "object",
    "properties": {
      "query": {
        "type": "string",
        "description": "The search query"
      }
    },
    "required": [
      "query"
    ]
  }
}
Clone the base code from the introduction tutorial
We've covered the basic functionality in the first part of this serie. Feel free to take a look. Here is what we did:
- Use Web Speech API for the voice input.
- Add Assistant API for the logic.
- Use Web Speech API for the voice output.
- Prepare a simple interface for the demo.
The source code from the first tutorial is available on GitHub.
Install and use SerpApi
Make sure to register at serpapi.com. You'll get a free API key. Add this API key to the .env file called SERPAPI_KEY.
Let's add SerpApi package to this repo
npm install serpapi --saveAdd SerpApi code in the index.js file
const OpenAI = require('openai');
const { OPENAI_API_KEY, ASSISTANT_ID, SERPAPI_KEY } = process.env; // add serpapi key
const { getJson } = require("serpapi"); // main SerpAPi function

...

// SerpApi function
async function getSearchResult(query) {
    console.log('------- CALLING AN EXTERNAL API ----------')
    const json = await getJson({
        engine: "google",
        api_key: SERPAPI_KEY,
        q: query,
        location: "Austin, Texas",
    });

    // I only return the answer_box. Feel free to adjust based on the response you'll need.
    return json['answer_box'] ;
}
Update checkingStatus method to support function calling
async function checkingStatus(res, threadId, runId) {
    const runObject = await openai.beta.threads.runs.retrieve(
        threadId,
        runId
    );

    const status = runObject.status;
    console.log('> Current status: ' + status);

    if(status == 'completed') {
        clearInterval(pollingInterval);

        const messagesList = await openai.beta.threads.messages.list(threadId);
        const lastMessage = messagesList.body.data[0].content[0].text.value

        res.json({ message: lastMessage });

    } else if(status == 'queued' || status == 'in_progress') {
        console.log('Still in progress or queued ... ')
        await new Promise(r => setTimeout(r, 2000)); // wait 2 seconds
        checkingStatus(res, threadId, runId)
    } else if(status === 'requires_action') {
        if(runObject.required_action.type === 'submit_tool_outputs') {
            console.log('submit tool outputs ... ')
            const tool_calls = await runObject.required_action.submit_tool_outputs.tool_calls

            // We can call for a function simultaneously, by adding them in one array
            let toolOutputs = []
            for(const toolCall of tool_calls) {
                const parsedArgs = JSON.parse(toolCall.function.arguments);
                const apiResponse = await getSearchResult(parsedArgs.query)
                console.log('Query for 3rd API: ' + parsedArgs.query)

                toolOutputs.push({
                    tool_call_id: toolCall.id,
                    output: JSON.stringify(apiResponse)
                })
            }

            openai.beta.threads.runs.submitToolOutputs(
                threadId,
                runId,
                {
                    tool_outputs: toolOutputs
                }
            )

            await new Promise(r => setTimeout(r, 2000)); // wait 2 seconds
            checkingStatus(res, threadId, runId)
        }
    }
}
Update message endpoint to call the runStatus method:
app.post('/message', async (req, res) => {
    const { message, threadId } = req.body;
    addMessage(threadId, message).then(message => {
        runAssistant(threadId).then(run => {
            const runId = run.id;
            checkingStatus(res, threadId, runId); // The polling is now happened inside the checkingStatus method
        });
    });
});
Let's try!
You can run the backend code with node index.js and run the frontend part with a live server like VSCode live extension for example. Feel free to ask anything, including general information or something that needs a real-time data resource. I hope you enjoyed this post!
Things we can improve
There are several things we can improve for this voice assistant.
Voice and listening
We use native browser API to listen and speak. Better alternatives exist, such as Elevenlabs, AssemblyAI, and more!
More real-time data
Not every question can be answered by the Google Answer box, we can provide more 3rd party APIs as a backup.
